Analytics User Management
User Management
Set up your users with specific permissions in order to ensure that they can see and do everything they need for their work while protecting student data to the highest degree possible.
Why Limit Access? — Student data and privacy must be safeguarded. Analytics uses multiple datasets to identify subpopulations of at-risk students based on unique predictors of persistence to inform policy and outreach.
- Basic access: Users without access to student-level data or the ability to send messages to students can still use the application for its group-level analytics, to identify risk factors for different groups of students without seeing any data for individual students within the student groups being analyzed.
- Admin access: Users with administrative privileges have the ability to give or remove access to student-level data and the ability to send messages to students for users of Analytics.
Best practices
- Minimize the number of users who can access student-level data (which includes names, IDs, emails, and persistence predictions)
- Restrict who has the power to send direct outreach messages to groups of students.
Single Sign-On
Single Sign-On (SSO) is an authentication process that allows a user to access multiple applications with one set of login credentials (e.g. an institution’s username and password). SSO is typically set up during the initial deployment of a Civitas application and requires coordination from Civitas and institution SSO engineers.
If your institution chooses to:
- Enable SSO, users will log into Civitas applications using their institution credentials, rather than a separate set of Civitas credentials.
- Skip SSO, users must have a Civitas user account created before they can access the applications. Create these accounts individually (Manage Users) or in bulk (Import Users).
SSO Person ID — The SSO Person ID fields are used by Civitas to identify users as they attempt to login via SSO. To enable SSO, you must complete the SSO Person ID fields when creating their account (e.g. LTI and SAML Person ID) for them to have access to Civitas applications. If not, leave these fields blank.
| SSO Person ID | Description |
| LTI Person ID | Used for SSO access to IFF via your LMS. If a user needs access to IFF via SSO, you will need to populate the LTI Person ID field with the correct ID. |
| SAML Person ID | Often the staff or student ID at an institution (e.g. the 7-digit numeric EMPLID for PeopleSoft institutions). It is used for SSO access to Administrative Analytics (Illume), Courses, Degree Map, Initiatives (Impact), and IFA. |
Auto-Provision Users
Auto-provisioning is the process by which a user is automatically granted access to an application based on the permissions associated with their user role in the SIS. This is especially helpful for products like Degree Map or IFF where the number of users is typically higher, but it can be utilized for any product. Configuration for auto-provisioning is often completed during deployment and requires some coordination by Civitas and your institution’s SSO engineers.
There are three major steps involved in setting up auto-provisioning.
- Determine the application and feature permissions that will be granted to groups of users.
- Use the Access Permissions table to review roles/permissions in Civitas products.
- The internal role identifier is the flag Civitas will recognize when a request comes through. There is no custom logic for role identifiers. You must be able to identify/provide a flag for the group you would like to map in your SIS.
- Every time a user logs in via SSO, we determine which permissions they should have based on this mapping and update their Civitas user account.
Important
Once auto-provisioning is configured, coordinate internally with your SSO team to create new role identifiers and add associated permissions sets in the Permission Sets tab.
Grayed out permissions — Auto-provisioning creates user records for which permissions are grayed out by default and the box “User permissions provided by an external single sign-on service” is checked. If the permissions for a given user need to be updated, uncheck that box and change their permissions. You can also correct their SAML, LTI, or Institution Person ID as needed.
Import Users
From the Import Users tab, you can bulk import your users by uploading a tab-separated (TSV) or comma-separated (CSV) file with user information. You can use this functionality for both single-sign-on user and Civitas user upload.
- SSO — If using SAML for single sign-on, the samlPersonId value must match an identifier sent by the Identity Provider in a SAML assertion.
- LTI — If using IMS LTI for single sign-on, the ltiPersonId value must match the identifier sent by the LTI Tool Consumer.
- Civitas user — If neither samlPersonId or ltiPersonId are provided for a user, then by default a Civitas user is created, with a random password to reset on login.
Your import file needs a header row consisting of 3-7 column names. The column headers you are to use and their descriptions are given as tabs of information below Supported Columns.
Best practice
Because every user in a given upload gets the same permissions, create separate upload files for users that will share the same level of permissions. For example, you might use a set of upload files named for key levels: admin-users.csv, basic-users-csv, outreach-users.csv, report-users.csv, on-behalf-users.csv
- From the Import Users tab, follow the instructions at the top of the page to create a CSV (comma-separated) or TSV (tab-separated) file for the users you need to add. You can create these files using Excel or other data visualization applications.
- Important
To avoid an error, make the column names match the instructions exactly. - Passwords — Upload users with the password field blank, so that temporary passwords will be auto-generated. When they log in the first time, they will reset the password.
- Tip
You can only assign one set of permissions to an import, so do several imports if you have multiple groups that need different permissions.
- Duplicates
Don’t worry about accidentally uploading duplicate users. Any duplicates detected will be flagged and presented back to you with the option to keep or skip them.
Manage Users
From the sidebar, select User Management. If you do not see this link, log in as an admin-level user.
From the main Manage Users tab, you can find, add, edit, and delete individual users. Select the Add User button at the top right to add an individual user.
In the list of existing users,
- Select the Edit (pencil) icon to the left of any user’s name to modify their permissions
- Select the Delete (trashcan) icon to remove that user
Tips and Cautions
- You can assign permissions when creating a user’s account or later. The Permissions column will be empty for any users that still need setup.
- Any edits you make to permissions take effect immediately.
- To allow Civitas to handle creating temporary passwords for your users to change, use Import Users.
- When you add users, email addresses are validated to be well-formed, but they are not verified (checked for deliverability).
- Edits and Deletes cannot be undone, so use the Export (arrow) button to download a CSV file of your entire user list before making major changes and purges.
Access Permissions
Because Analytics permissions are set up per user, each user can have unique permissions and is given access to student-level data only as appropriate. For example, Paulo must be able to send campaigns, but he has no need for financial aid data access.
How it works
- In most cases, users need multiple permissions.
- To access a child permission, first grant the parent permission.
- Granting parent-level access only to an area is usually read-only access.
Parent-level permissions (those in bold, below) generally lets users view data but not (1) access personal information or (2) export data. For that, users need additional child permissions, like these (with the newer permissions in blue):
- Administrative Analytics
- View and Export Student Lists
- Include Raw Prediction Scores
- Send Nudge Campaigns to Students
- Allow another campaign-authorized user to send on my behalf
- Access Financial Aid Data
- Trends Dashboard
- Persistence Insights Dashboard
- Completion Insights Dashboard
- Course Demand
- Scratchpad
- Nudge Hub
- Course Insights
- View and Export Student Lists
- Initiative Analysis
- Add and Edit Initiatives
- Adoption Reports
- Export Degree Map Usage Report
- Export Administrative Analytics Usage Report
- Export Course Insights Usage Report
Here are the access permissions, which are discussed below. IFA and IFF refer to Inspire for Advisors and Inspire for Faculty, respectively.
| Permission | Effect when granted |
| Access Financial Aid Data | Can access all data, facets, and filters |
| Add and Edit Initiatives | Can create and edit initiatives as well as view past/current ones |
| Administrator | Can access all Admin Settings; can Manage Users |
| Administrative Analytics | Can access basic parts of Admin Analytics |
| Adoption Reports | Can access the Adoption Reports feature |
| Allow another nudge campaign-authorized user to send a campaign on my behalf | Another user can send a campaign on behalf of this account. This name will be available as an optional sender when composing an outreach. The sending user must be granted the permission to send campaigns. Uses: To delegate the sending of your campaigns to another user To set up a dummy account with a shared email address, for staff to send nudge campaigns via that account |
| Completion Insights Dashboard | Can view Completion Insights on dashboard (graduation predictions) |
| Course Demand | Can access Course Demand Analytics (side menu) |
| Course Insights | Can access Course Insights (side menu) |
| Export Administrative Analytics Usage Report | Can export the usage report for Analytics |
| Export Course Insights Usage Report | Can export the usage report for Course Insights |
| Export Degree Map Usage Report | Can export the usage report for Degree Map |
| Export IFA Outreach Report | Can export the outreach report for Inspire for Advisors (IFA) |
| Export IFA Usage Report | Can export the usage report for Inspire for Advisors (IFA) |
| Export IFF Outreach Report | Can export the outreach report for Inspire for Faculty (IFF) |
| Export IFF Usage and Course Views Reports | Can export the usage and course views reports for Inspire for Faculty (IFF) |
| Include Raw Prediction Scores | Inspire for Advisors only: Can export the student list to also include the raw prediction probability value, for institutional research teams who require it. |
| Initiative Analysis | Can have read-only access to Initiative Analysis (side menu), for in-progress and completed initiatives |
| Nudge Hub | Can view the Nudge Hub resource area (not send nudges) |
| Persistence Insights Dashboard | Can view Persistence Insights on dashboard (retention predictions) |
| Scratchpad | Can view and use the Scratchpad (data snapshots) |
| Send Nudge Campaigns to Students | Can access Outreach, view campaigns, and see the option to send nudge campaigns (bulk emails) to students |
| Trends Dashboard | Can view the Trends charts on the dashboard |
| View and Export Student Lists (Analytics) | Can see individual students in Analytics and also view and export student lists, which includes student IDs and their prediction groups |
| View and Export Student Lists (Course Insights) | Can see individual students in Course Insights and also view and export student lists |
View and Export Student Lists
If a user is given access to view and export student lists, they will be able to access and download lists of students to identify currently enrolled students that meet the selected filter criteria. These lists include student information, which must be protected:
- Student ID
- Name
- Enrollment status
- Persistence and completion predictions
- Last and next terms enrolled
These are primary ways to work with student lists:
- To export this data to a .csv file (readable by spreadsheet and analytics applications), select the Download button. The file includes student names and details, so handle this file securely to protect student privacy.
- To start a nudge campaign for the students on this list, select the Outreach button.
What else opens a Student List? Look for a link on Currently Enrolled Students:
- Prediction Distribution — From the Dashboard, look at the Prediction Distribution (pie) chart. Select the number in the center to open the student list.
- Powerful Predictor — Highlight a range of a Powerful Predictor’s probability density chart. At the right end of the bar, select View Currently Enrolled Students to open that student list.
- Paired Predictor Plot — In any quadrant of a Paired Predictor Plot, select Currently Enrolled Students (located below the ratios) to open that quadrant’s student list.
Include Raw Persistence Scores
You can give or remove access to students’ raw prediction probability value. This permission is intended for institutional research and analytics teams who require these prediction values for additional research.
If given access to raw prediction scores, the user will be able to see each individual student’s score when they download a student list in a .csv file.

Send Nudge Campaigns to Students
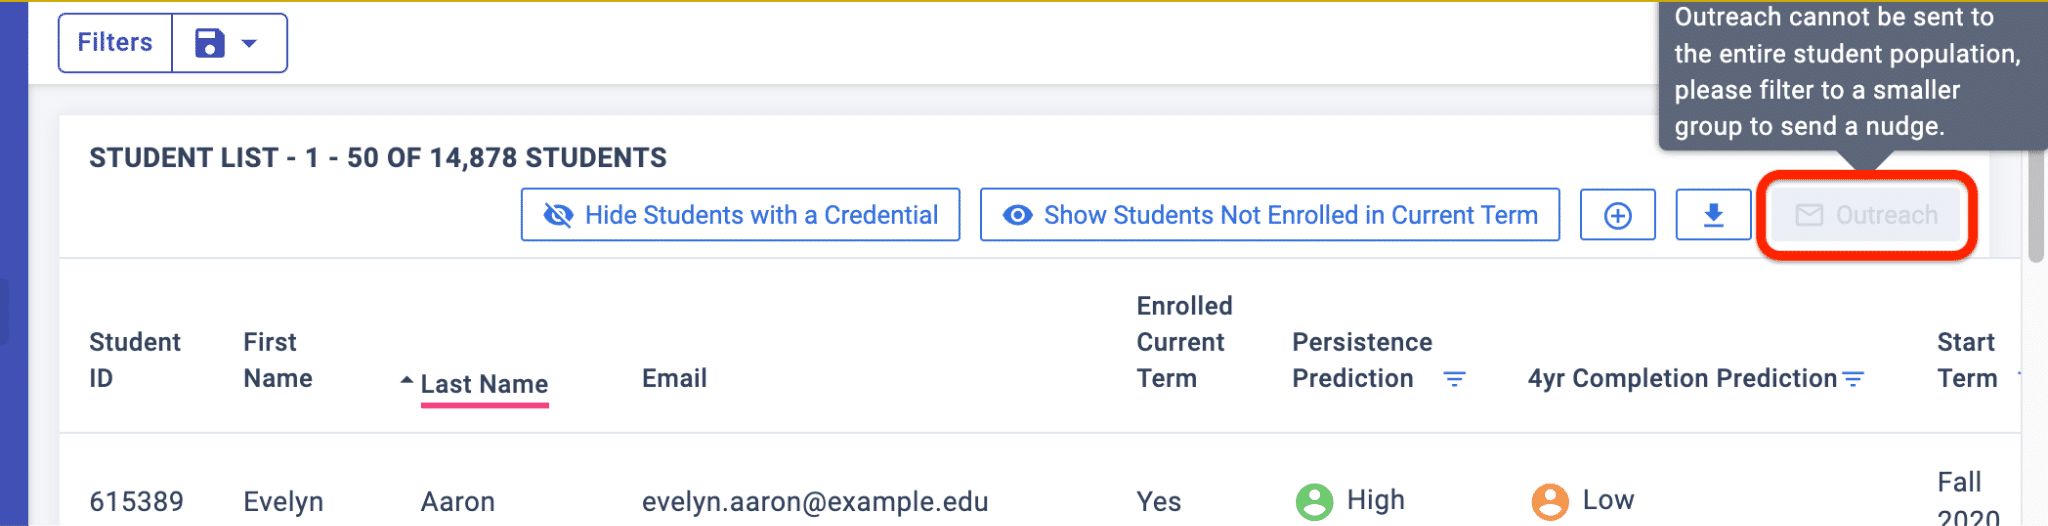
If an Analytics user is given access to send nudge campaigns to students, they will be able to send messages to students from within Analytics.
To send an email message to a list of students, go to the Student List page, apply a Filter to identify the subpopulation and click the Outreach button.
A pop-up window will prompt you to enter an email message to send to the list of students.
Allow another to send a campaign on my behalf
If a user is given access to allow another nudge campaign-authorized user to send a campaign on their behalf, they will be able to have messages sent to students on their behalf from within Administrative Analytics. This permission lets them be included in the From list, so that others can send emails for them.
How this helps — This feature is useful for delegating campaign work, and it also allows your team to set up a shared email as a user and have everyone send campaigns through that identity.
How it works — To send a nudge as another user, open a student list and select the Outreach button. From the pop-up window, locate the From field and select the drop-down arrow. Select the name and email address of the user who will appear to be the sender.
Will the named sender get a copy of the nudge? Yes.
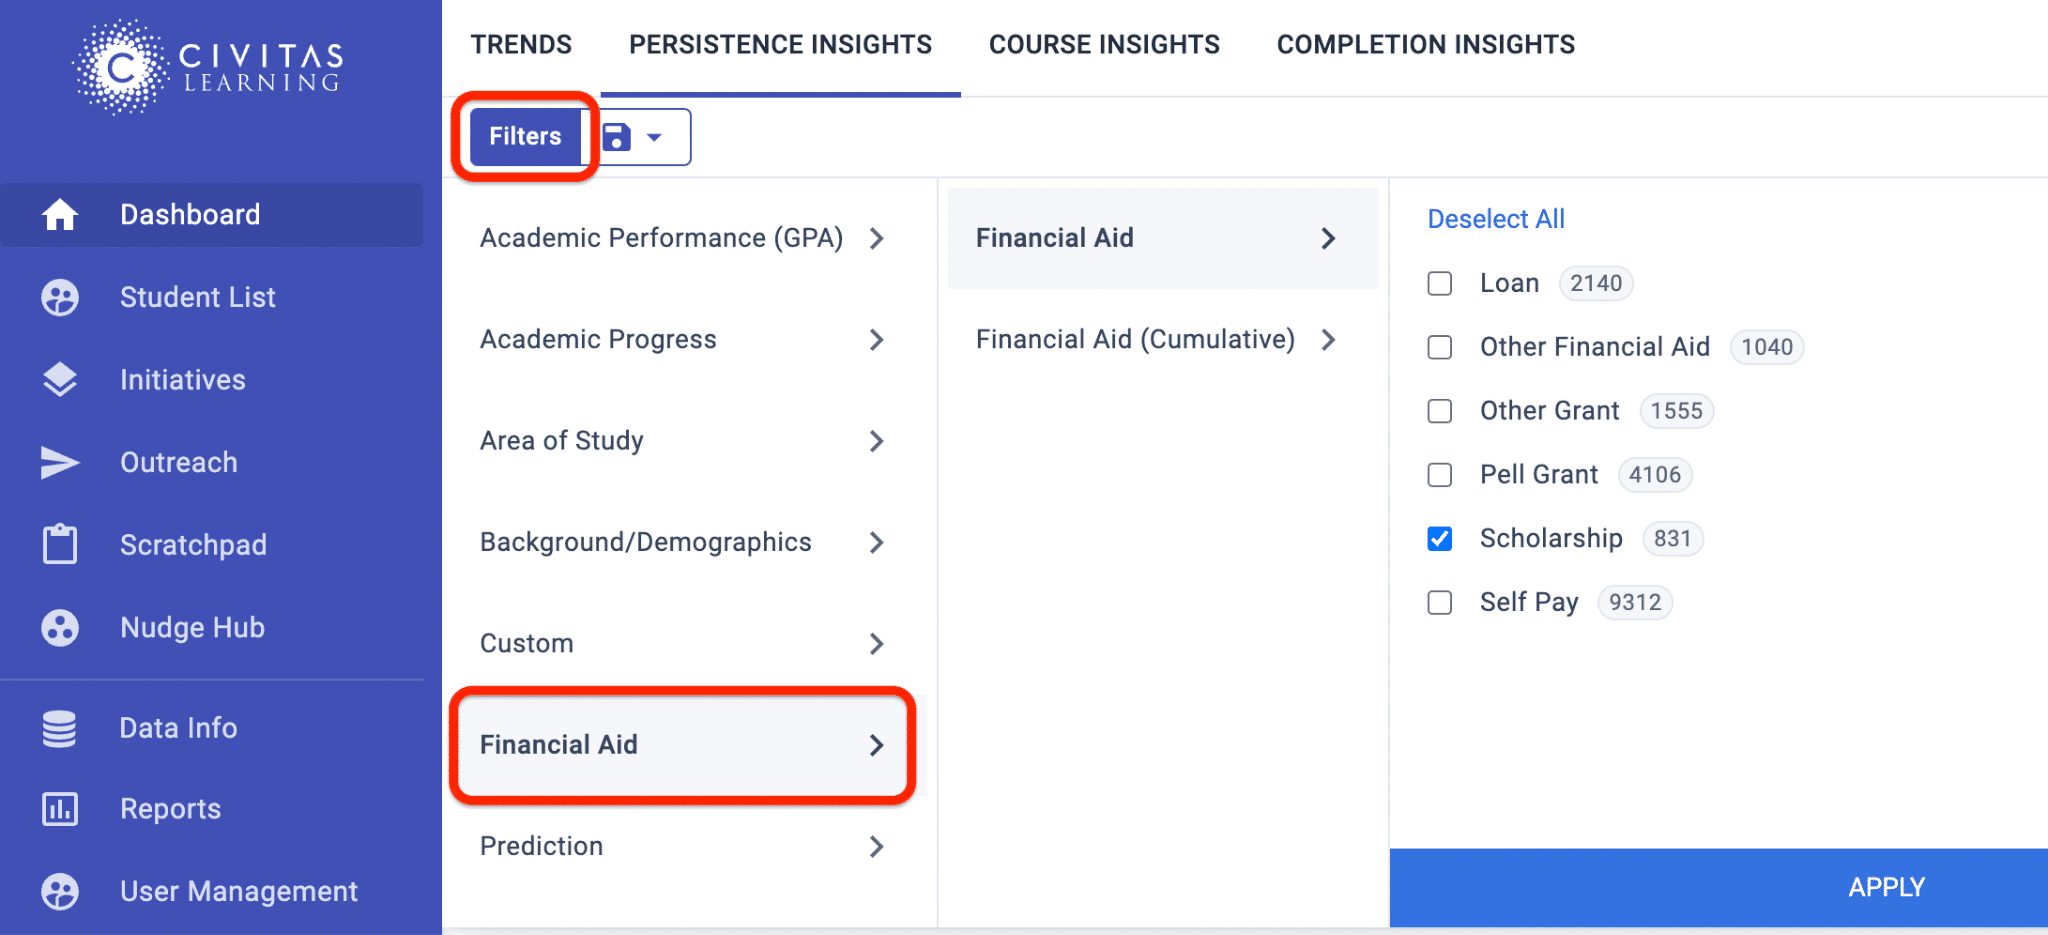
Access Financial Aid Data
If an Analytics user is given access to access financial aid data, they will be able to access financial aid filters and Powerful Predictors. This permission ensures that users who are authorized to see financial aid data can explore financial aid insights.
By default, this permission is turned off and must be actively selected to enable permission to access financial aid data.