Advising Updates
- Student Calendar for Desktop
- Mobile-First Calendar Redesign
- Expanded Alert Options on Profiles
- Preferred Name for Academic Alerts
- 10DLC Registration of SMS Numbers
- Concerns Column Display/Download
- Dashboard Enhancements
- Advanced Advising Dashboard
- Suggestion Box
- New Courses: Faculty Alerts, Strategies
- Alert Assignments, Columns, Concerns
- Zoom Meeting Integration
- Self-Service Kiosks for Walk-In Queues
- Messaging by Text (SMS)
- Automatic Timeout Warning
- Dual Roles & Updated Editor
- New Enrollment Filters
- New Navigation, Messaging Updates, and Usage Reporting
- Upload a Static Group
- Calendar and Advising Note Improvements
- Change in Persistence
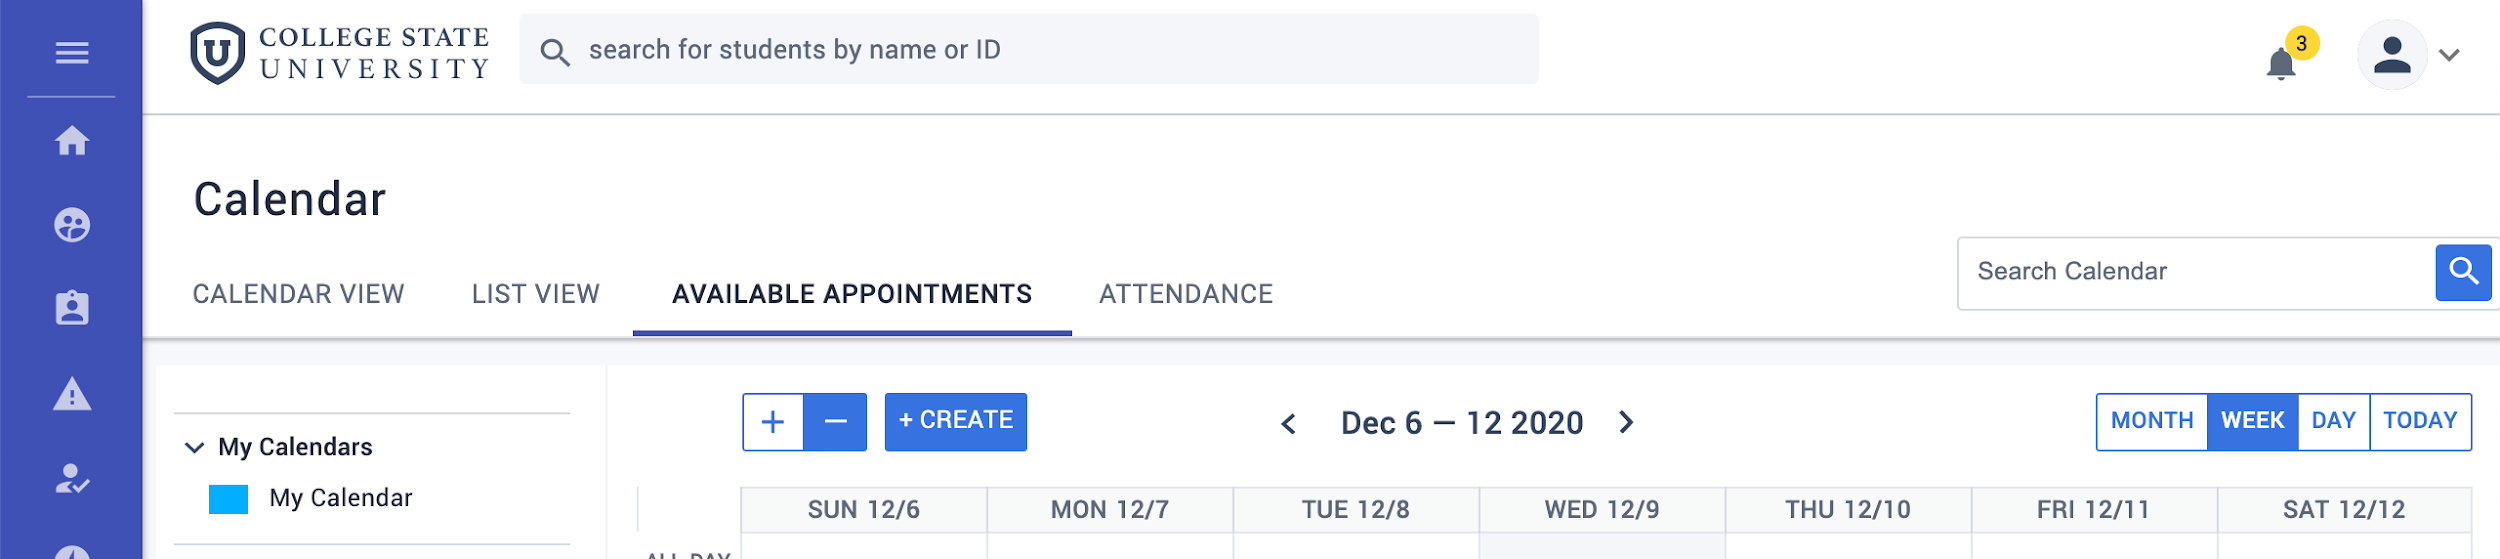
- Walk-in Appointments & Calendar Improvements
- Filter for LMS Engagement
- Clarity on Inactive and Active Advisors
- Updates to Workflow Capabilities
- Nudges and Outreach Integrated
- Access Custom Student Groups
These enhancements are listed in order of the most recent.
Student Calendar for Desktop
In this update: To match the new improvements made to students’ phone-friendly calendar for scheduling, their desktop view of the Advising Calendar has also been reengineered in both layout and flow. This has no impact on how advisors see and use the Calendar.
Availability: These improvements are available to all, including those who have not yet enabled the mobile experience.
What’s added?
- Filtering — Students can apply many filters to find optimal appointments: advisor/staff member, date, time, appointment type, modality, and days of the week.
- Assigned by default — If a student has assigned advisors, they see them clearly starred and have them auto-selected in the Advisor filter.

- Services — If services have been configured and applied to appointment blocks, students can select which one they’re seeking. If no services are configured, then the filter is hidden.

What’s streamlined?
- Students no longer see the calendar grid view tab, which is for use by advisors.
- Students no longer have to select an “Office” (SSU) to search for appointments.
- Students no longer see appointment slots that aren’t available for them to schedule, so the unneeded “status” column is hidden.
- Students no longer have to make selections to see results: selecting Search without filters shows them all appointments available to them, listed chronologically.

Mobile-First Calendar Redesign
In this update: To give students a better “mobile first” experience of scheduling with the Advising Calendar on their phones, the Calendar has been reengineered in both layout and flow.
Availability — Ready for new implementations. Redeployment of the Calendar for existing users will happen individually to allow you time to update any materials you provide to students.
In response to your feedback, these are major changes students can now enjoy using Advising from their phones:
- They can now find appointment slots without scrolling through a large grid view.
- Appointment selections and options are now streamlined.
- Appointments automatically filter for the student’s assigned advisors, if they have any.
- Additional filtering helps students find the right help: Services and Service Offerings.

Service Offerings — “Service Offerings” are a new layer of filters for finding appointments. If there will be multiple categories of help available during a Service, you can optionally add them as Offerings: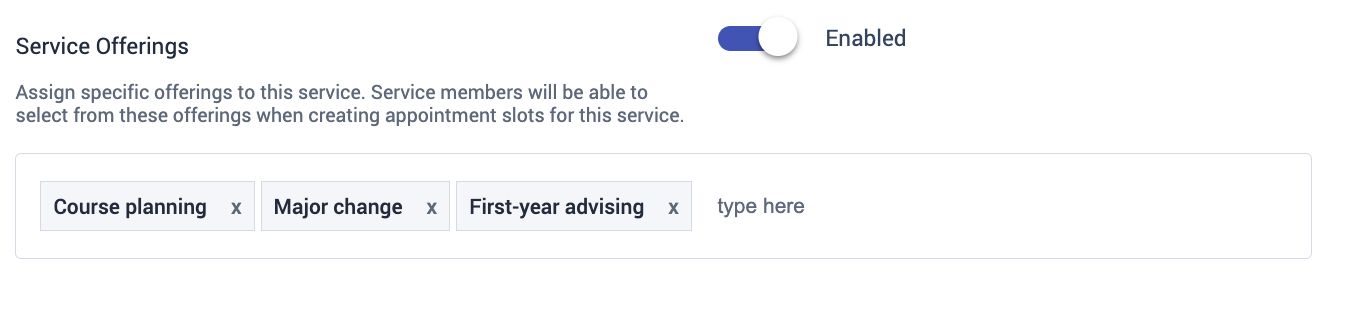
When creating appointment blocks, users will choose which of those specific offerings (service categories) the advisor can provide during that service block. These categories guide students to find the help most appropriate for their needs.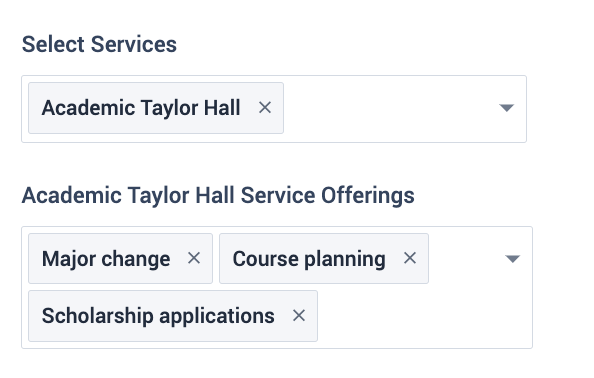
Standards — Every page updated for this redesign has been reworked for the mobile experience. All updated student-facing pages meet these standards:
- WCAG 2.1 AA accessible
- Responsive (dynamically adapting to different screen sizes and devices)
- Optimized to work on mobile phones (the smallest devices)
Expanded Alert Options on Profiles
In this update: To help advisors work through academic alerts more efficiently, the Alerts tab on student profiles now offers all of the alert management options that exist on the Alerts page. 
Now an advisor can work on a student’s profile with access to all of these Alert commands:
- Download (PDF)
- Comment
- Resolve
- (new) Reassign the alert to another user
- (new) Remove the user currently assigned to the alert
Preferred Name for Academic Alerts
In this update: To help advisors create an inclusive environment by addressing each student by their chosen name, the Preferred Name column now appears throughout Advising’s Alerts UI.
The Preferred Name column has been added to Advising in these areas:
- Academic Alerts student list
- Current academic year alert page
- Academic Alerts download report
10DLC Registration of SMS Numbers
In this update: Due to 10DLC Registration, a new anti-spam measure required by U.S. mobile carriers, how new SMS numbers are assigned to individual Advising users has changed. Users who are already sending SMS messages via Advising are not affected.
What is 10DLC? — 10-Digit Long Code (10DLC) is the new standard for Application-to-Person (A2P) text messaging via a traditional 10-digit phone number. To combat spam, U.S. mobile carriers now require special registration for SMS messaging: providers such as Civitas Learning must register on behalf of our customers for all 10DLC SMS messaging sent out by our web applications. For details, see campaignregistry.com/what-is-campaign-registry.
Who is responsible? — Civitas Learning handles this registration. We register on behalf of our customers as directed by our provider. All current Advising customers using SMS are registered, and each new Advising customer who opts for SMS will be registered during implementation.
What information is used? — To comply with these requirements, Civitas Learning must register each customer that uses SMS features in Advising. This is the information we use for registration:
- Your institution’s legal name
- Your institution’s official address
- Your institution’s Tax Number/ID/EIN
- Official documentation of your institution’s Tax Number/ID/EIN (not the information available through public search), which may be requested by a carrier
Does this delay getting an SMS number? — After enabling SMS, the user’s SMS status will change from Pending to Enabled only when registration is complete. Registration happens immediately or else as long as 6 weeks, if additional approvals are required by our provider or the Campaign Registry organization. We pre-register blocks of numbers to avoid delays, but this is subject to limits when many users are enabled in quick succession.
Provisioning SMS Users
Users must each be “enabled” for SMS before they can start to send messages (those who are already sending messages need not register). Once enabled, the SMS number provisioning happens quickly unless the SMS provider requires additional approval. 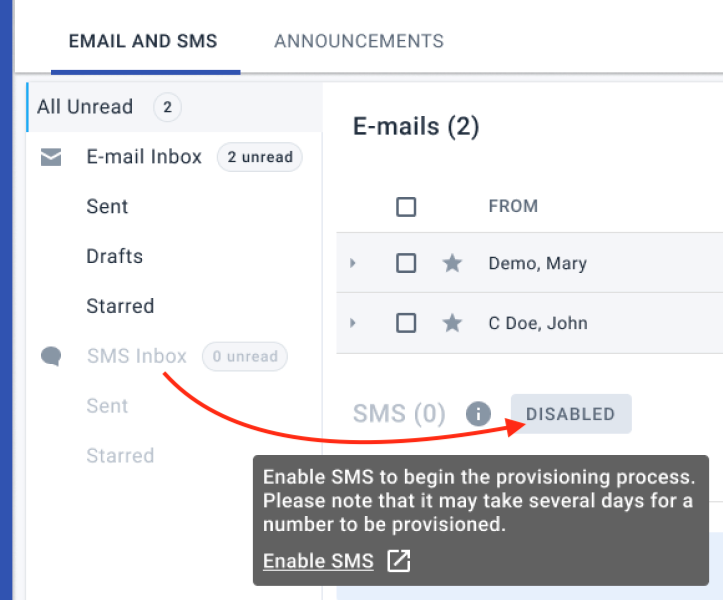
Enabling a user happens one of two ways:
- Users can select Enable SMS themselves on their Profile (top right image/avatar).
- Admins can select Enable SMS on individual user records (User Management tab).
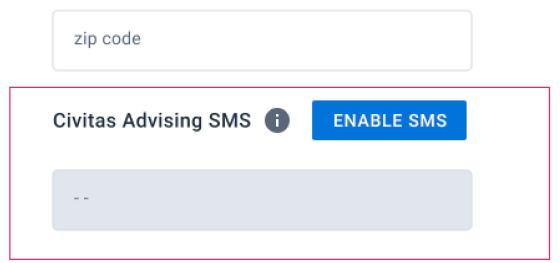
Enabling SMS for Yourself
To enable SMS for yourself, open your Profile:
- Select your photo/avatar (top right) and select Profile from the drop-down menu.

- Scroll to the Civitas Advising SMS section and select the Enable SMS button:
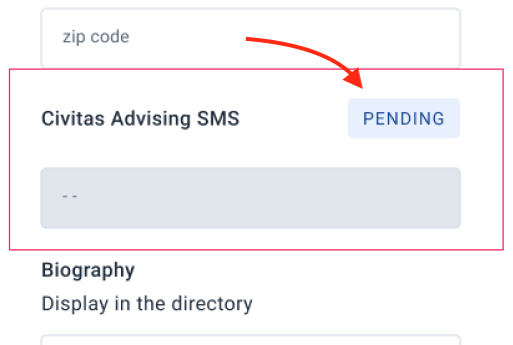
- Use the status flags to track your SMS assignment:
- While your SMS number is provisioning, a Pending flag appears, without a number:
- As soon as your SMS number is provisioned and assigned, the flag changes to Enabled and your assigned number is listed:

- On your Communication page, the SMS Inbox shows these statuses as well.
Enabling SMS for Others
If you have the Director role and the Manager Users permission, you can enable SMS for a user by editing their user record.
- Open Configurations > User Management.
- While creating a new user or updating an existing user, select the Enable SMS checkbox in the Civitas Advising SMS section.
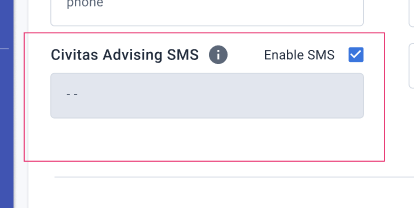
- Save your changes. SMS number provisioning begins immediately, and a Pending flag will display on the user’s record.
- Once you see the flag change to Enabled, with the assigned SMS number below it, provisioning is complete.
- From the User Management tab, you can monitor the provisioning of all your users, using the columns for SMS Status and SMS Number (which are included on download):
You can also filter by SMS Status:
From the User Management tab, you can monitor the provisioning of all your users, using the columns for SMS Status and SMS Number (which are included on download):
You can also filter by SMS Status:
From the User Management tab, you can monitor the provisioning of all your users, using the columns for SMS Status and SMS Number (which are included on download):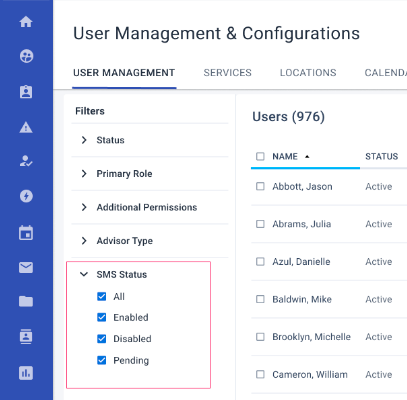
You can also filter by SMS Status:
Concerns Column Display/Download
In this update: Because the Concerns / Areas of Excellence categories are key to working with Alerts, the column has now been added to the Alerts table. This column is also now included in the download report for Alerts. These categories are available for filtering, under Filters.
Dashboard Enhancements
In this update: The dashboard has several requested enhancements: filtering now keeps your recently used filter groups handy; the Insights have many new columns to improve actionability; and the panel trends now offer better visual guidance.
In response to your feedback about the new dashboard, numerous improvements now make the dashboard easier to use and more useful in a wider variety of use cases.
Dashboard Filter Improvements
The Advanced Dashboard now remembers your recent filter groups, defaults to All Students for non-caseload users, and lets users see the filter status of newly pinned groups.
Recently Used Groups — The dashboard now remembers the last five groups that you used to filter the dashboard; these appear on the filter drop-down panel so that you can select them again quickly:
Non-Caseload Users see All Students — If you do not have an assigned caseload, the dashboard now defaults to displaying All Students, which sets the dashboard to show data for all the students that you have permission to see. In combination with the Recently Used group listing, this puts you one click away from the filtering you depend on for your work.
Data Availability for New Groups — Because the dashboard data for a newly pinned or starred group isn’t available for filtering immediately, new status information appears in the filter area to let you know which filters are still being processed. Generally, filter processing for pinned groups finishes overnight, so you will be able to use your filters the next day.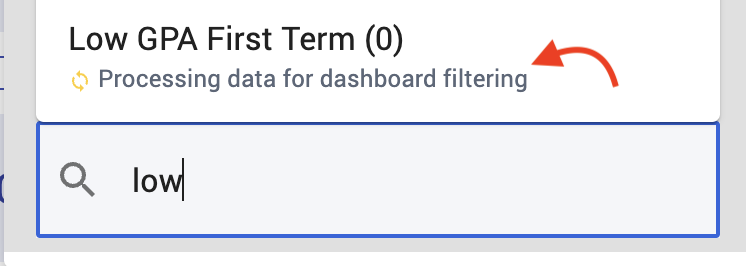
New Columns for Insights
The dashboard Insights have gained several columns to improve their usefulness:
- For Withdrawals, you can see the most recent withdrawn class and date.
- For Holds, you can see the hold type from the SIS.
- For Persistence, you can see the date and type of last Advising contact.
Withdrawn Class and Date — You now have two additional columns to help you work with the Withdrawal Data Insights student list:
- Last Withdrawn Class shows which class each student withdrew from most recently
- Most Recent Withdrawal displays the date of that withdrawal
Hold Type — To help you work with the Holds data insight, you now have a column for the Hold Type. The column shows the types of holds currently placed against a student, as recorded in the SIS. If you do not see this column, it may not yet be mapped for your institution; contact us about getting this data mapped. If you do not see the Holds insight panel itself, it means no data is available to populate it.
Last Contact — All of the student lists that you open from Persistence Insights now include the column for Last Contact, which combines when the student last had Advising contact and how (such as an appointment or an email).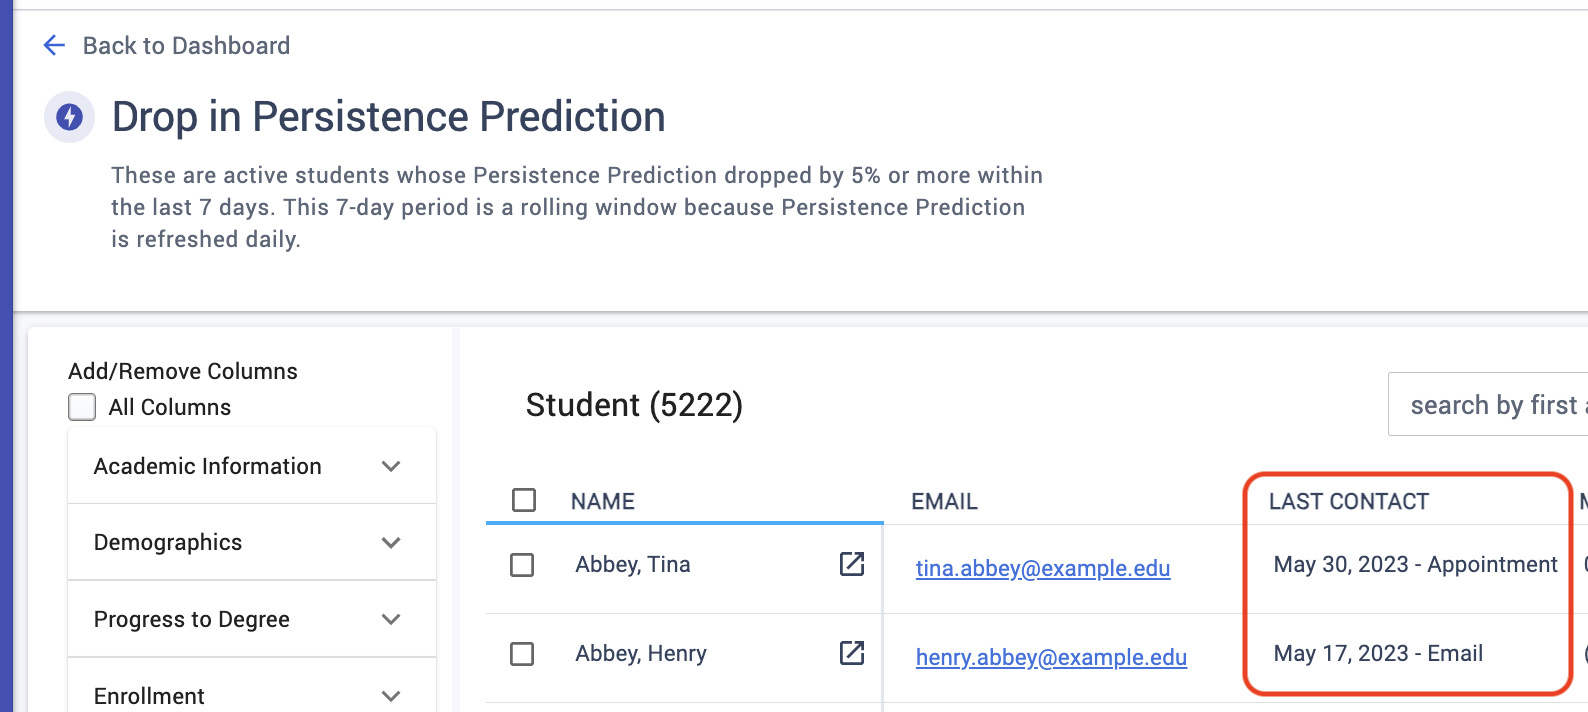
Visual Guidance for Trends
In response to your feedback, the visual indicators for the Data Insights panel have been changed to better alert you to the action needed.
Before, any positive number in the trend was shown with a green plus and any negative number was a red negative. Now they reflect the underlying meaning of the trend:
- When rising numbers mean trouble (such as a rise in student holds), the visual indicator is a red plus sign.
- When falling numbers mean success (such as a drop in withdrawals), the visual indicator is a green negative sign.

Advanced Advising Dashboard
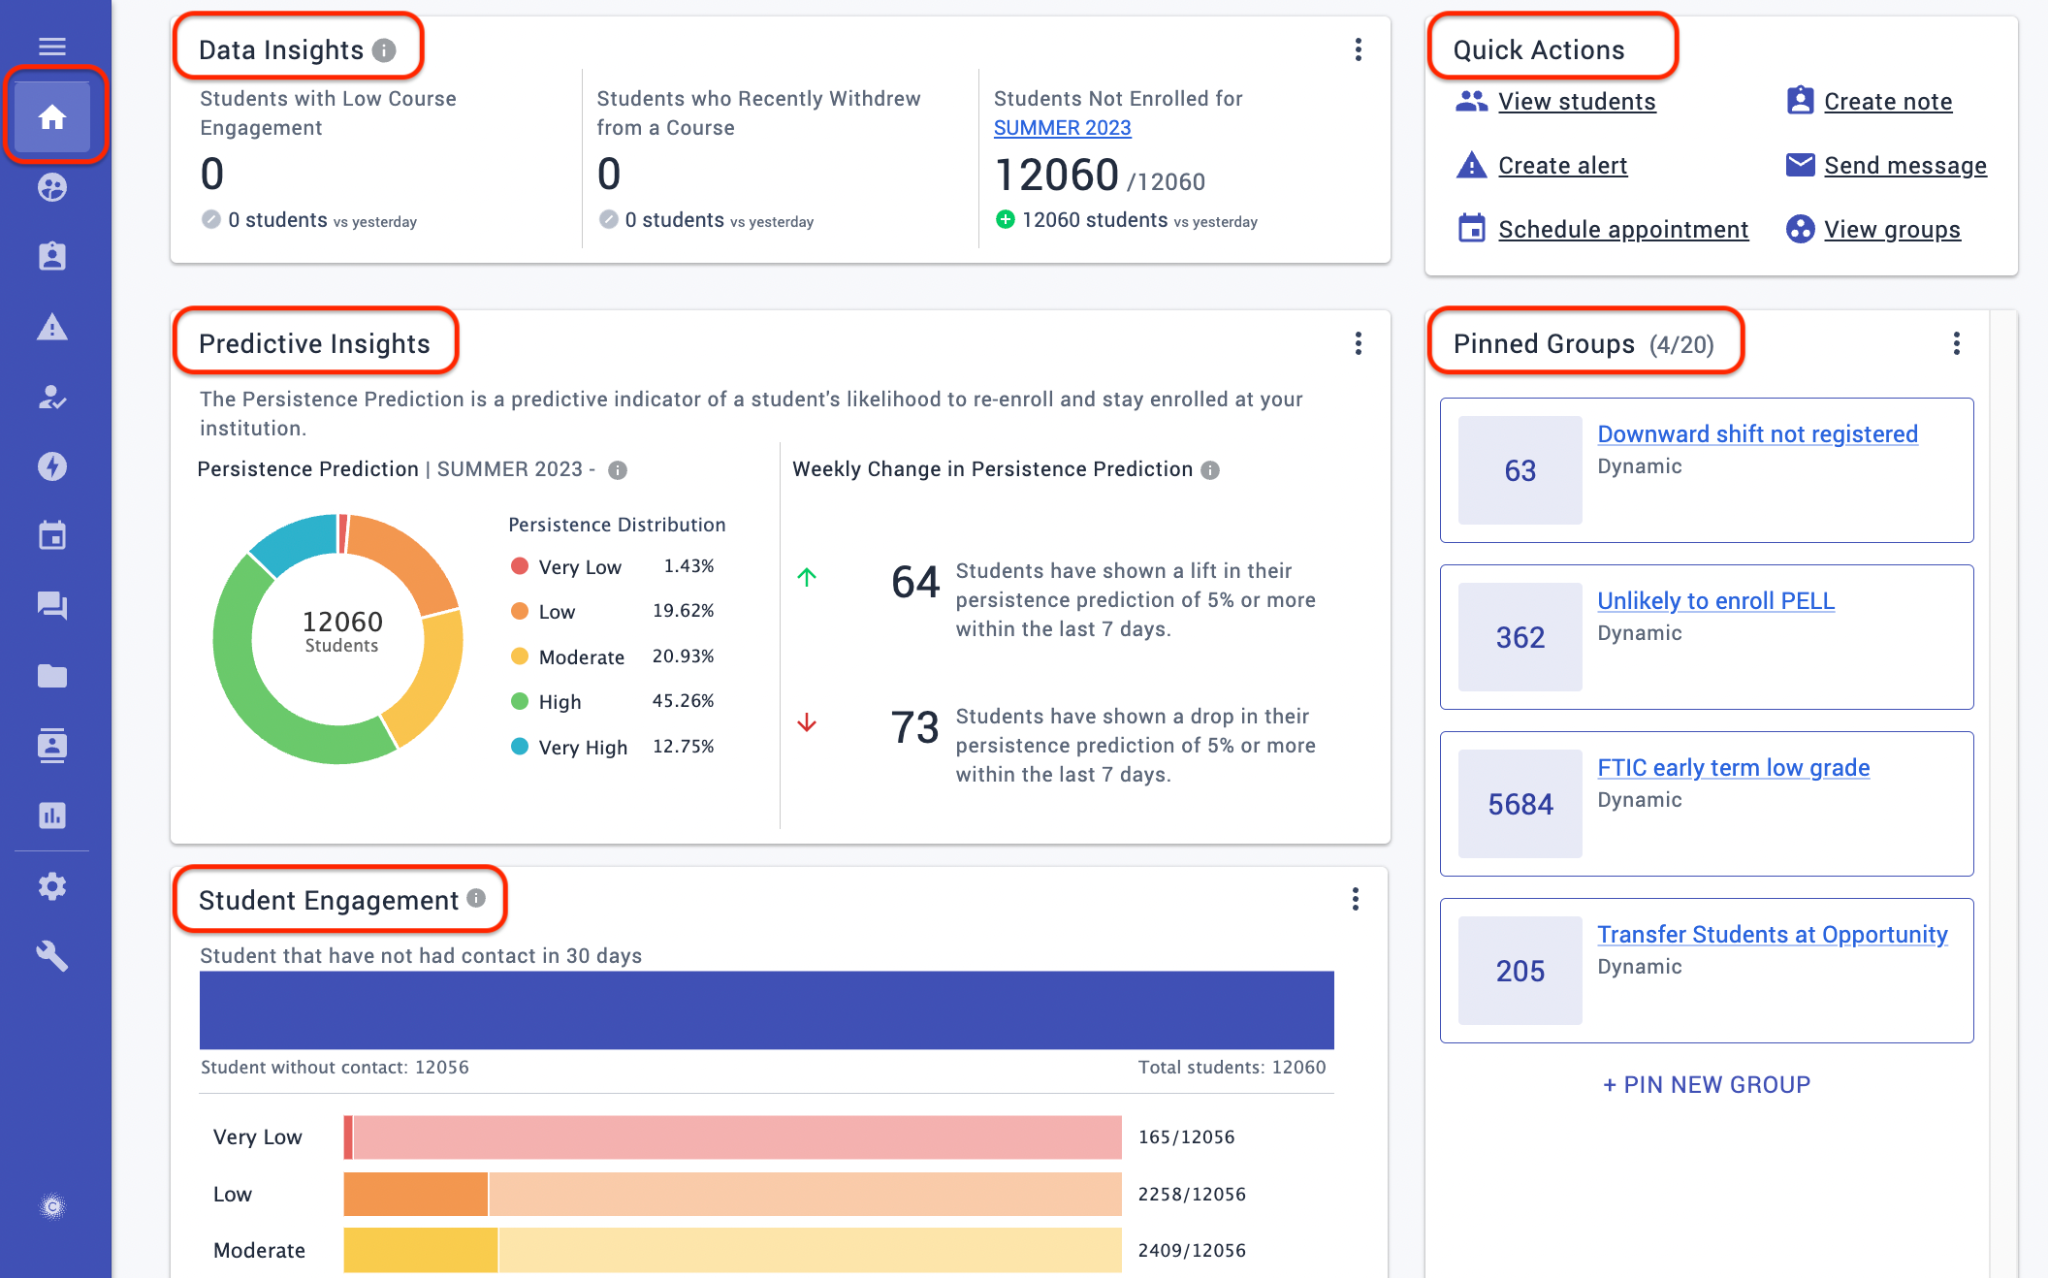
In this update: You can now enable an Advanced Dashboard that outfits each advisor’s home page with today’s reporting on students, surfacing those who need help to persist (stay enrolled). Advisors can Pin their important groups and click through insight charts to outreach to students based on their persistence predictions, behaviors, and Advising engagement.
▶ Watch a video tour of the new Dashboard
Switching to the New Dashboard
The new Advising Dashboard renders analytics intelligence into insight charts, so that advisors can click into precise subgroups of students who need their help the most. These insights leverage each student’s persistence prediction, which is their likelihood of staying enrolled (based on historical data). All of the charts refresh when you change the data view.
Important: Which dashboard advisors see depends on what’s enabled for their SSU. Unless this is enabled, they see the basic dashboard, with the legacy summaries, panels, and navigation links.
Enabling the Dashboard — Each SSU is configured separately, based on whether it should have access to the advanced features and data insights of the new Dashboard:
- Logged in as a Director, select Configurations (wrench icon) from the bottom of the side menu, and open the User Management tab.
- Grant the Manage Dashboards permission to all Director-level users who need it.
- Open the Dashboard tab.
- Select an SSU from the drop selector.
- Toggle the Dashboard visibility as needed, and select Save (to the right).
- Repeat for each additional SSU.
How it Works — After you log in, you see a dashboard designed to prompt you to respond quickly to such issues as withdrawals, not registering, and plummeting persistence predictions. It also shortcuts you to quick actions (such as Create Alert) and your essential (Pinned) student groups. The Dashboard has many new components, detailed below.
Pinned Groups
Starred ★ groups are shared across your team, but you can now Pin 📌groups for your personal use, as shortcuts on your Dashboard. This is especially useful for institutions that don’t assign caseloads.
Here are examples of groups that you might pin:
- Students on probation academic standing
- Students with an unresolved alert
- Students who are inactive yet are in good academic standing
Pinning is more than a Dashboard shortcut: Pinned groups become filters that you can search for and apply to the dashboard insights. Because of this, take time to create and pin groups that you want to have available as insight filters.
To pin a group, select Quick Actions > View groups and click the pin icon to the right of the group: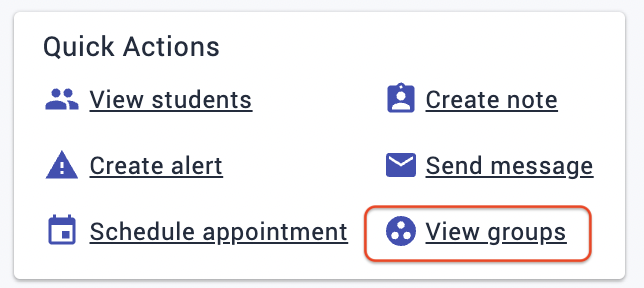
![]()
Filtering Students
The power of the Dashboard lies in its ability to filter student data. As soon as you select a new data set from the Viewing data for… drop-down menu (top right), the entire page of insights refreshes the charts and panels for this new group of students.
- If you have an assigned caseload, the dashboard defaults to filtering for My Assigned Students.
- If you do not have assigned students, then the dashboard starts with All Students (these are all of the students you are allowed to see in your SSU).
- You can type-to-search for a group that has been Starred or that you have Pinned for your own use. As soon as you select a group from the search results, the insights are all filtered to that group:

Note: It takes one day after a group has been starred or pinned before it is ready to be used as a dashboard filter.
Data Insights
The top of the Dashboard gives you a panel of Data Insights, for common issues needing intervention. Below the totals are the changes since the prior day, to help you spot upsurges: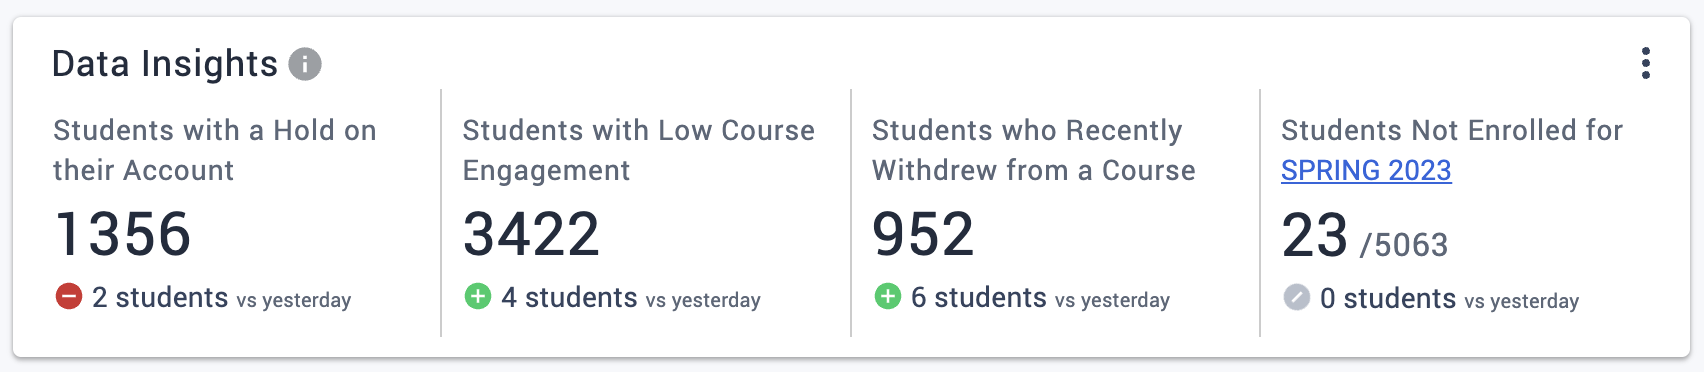
These are the concerns covered, from left to right:
- Account holds — all students with at least 1 hold, which can block registration
- Low LMS engagement — low LMS logins compared to the average for their section
- Course withdrawals — recent withdrawals during the active term
- Not enrolled yet — no record of enrollment for the selected upcoming term (if more than one term is enrolling, you can select among them)
Predictive Insights
Below the Data Insights panel are the Predictive Insights, which reveal the persistence prediction ranges for your selected students. Persistence prediction is a student’s likelihood of staying enrolled (based on your institution’s historical data). It’s the key to identifying students needing attention.
To see the Persistence Distribution ranges (buckets) behind the donut chart colors for your institution, click the information (gray “i”) icon: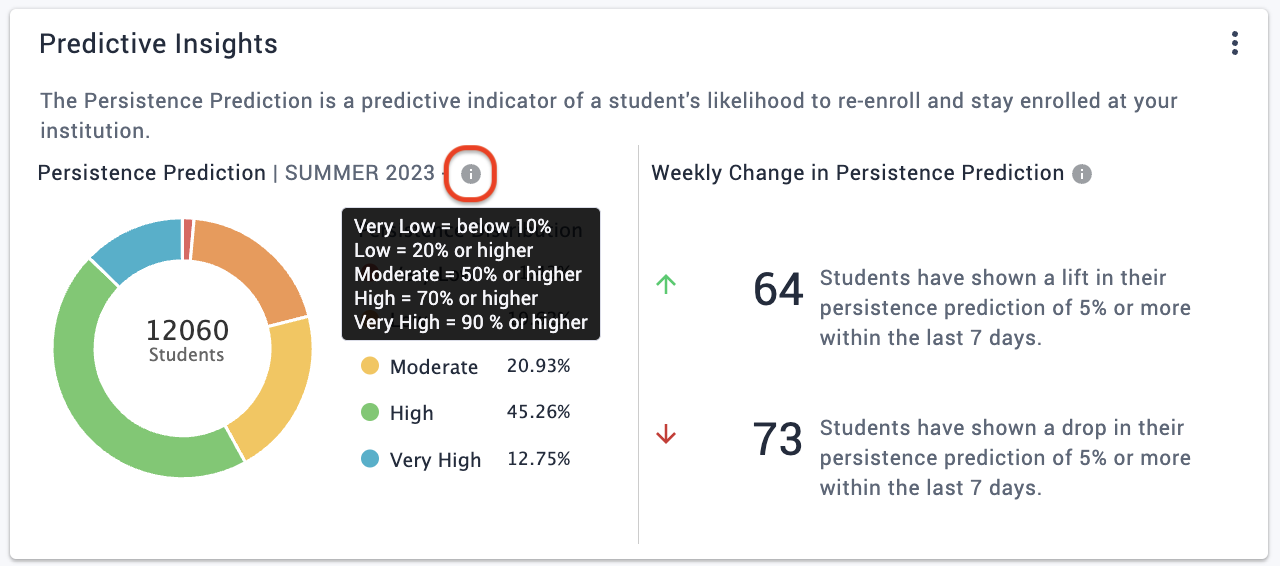
Use the Weekly Change in Persistence Prediction counts at right to target students with a fast drop in their persistence scores: this helps you catch students who are displaying concerns (perhaps a crisis), despite a high persistence score.
Using these charts — Wherever you see numbers or colors on these charts, click to open a Student List for outreach to these students. For example, clicking on the 73 count of students with a 5% drop in persistence will open a Student List page with those 73 students.
Student Engagement
Engagement is counted as an Advising action logged in the platform that serves a student: email, SMS, or an advising note.
The graph counts the currently filtered active students who have not had any Advising engagement the last 30 days, dividing them into clickable buckets:
Click through these persistence prediction buckets to reach out to students who most need engagement.
Suggestion Box
In this update: In-app Help now includes a way for you to submit anonymous feedback on how to improve Advising.
With the new Advanced Dashboard, expect the insight charts and elements on it to change over time, reflecting new functionality and requested improvements. You can use the in-app Help > Suggestion Box to share your ideas to shape its development, as well as to notify us about other changes that would make Advising work better for you and your team.
New Courses: Faculty Alerts, Strategies
In this update: New self-paced courses for Advising are available on training.civitaslearning.com.
Advising | Faculty and Alerts
- Faculty members play a crucial role in sharing insights related to student performance, attendance, and behavior that impacts the student’s standing both in the course and their academic career. With alerts, faculty share with advisors their unique view and expertise about students’ issues and needs for engagement. Faculty Alerts help to break down communication silos separating students, advisors, and faculty, and they strengthen students’ safety nets by providing advisors with a window into the classroom. This gets help to students faster and facilitates teamwork between faculty members and advisors in supporting student success.
Advising | Strategies
- Advisors play a crucial role in alleviating stresses associated with registration, and they create a space where students can pause and reconsider their path to completing a degree. The earlier the student can be seen, the earlier such space can be created to tackle any challenges and so help the student prepare for a successful registration season.
For more on gaining access to on-demand training services, contact training@civitaslearning.com.
Alert Assignments, Columns, Concerns
In this update: Numerous feature improvements to Alerts are now available within Advising:
- Alert Assignment
- Add Columns to Alerts
- Filter Alerts by Concern
- Alert Accessibility
Alert Assignment
To support students who have an alert, you may need to pull in an Advising team member who is not a student’s assigned advisor, nor a member of the alert committee. To make this easier, you can now assign an alert (or a set of alerts) to a specific Advising user. The assignee can then work the alert as needed, either resolving it or handing it off to another user.
What does “assigned” mean?
Only users who have permissions to view a given student may be assigned an alert for them. (Notification of a new assignment is not yet available.) Being “assigned” grants them these actions:
- Open the alert
- Update the alert
- Resolve the alert
- Reassign the alert to another user
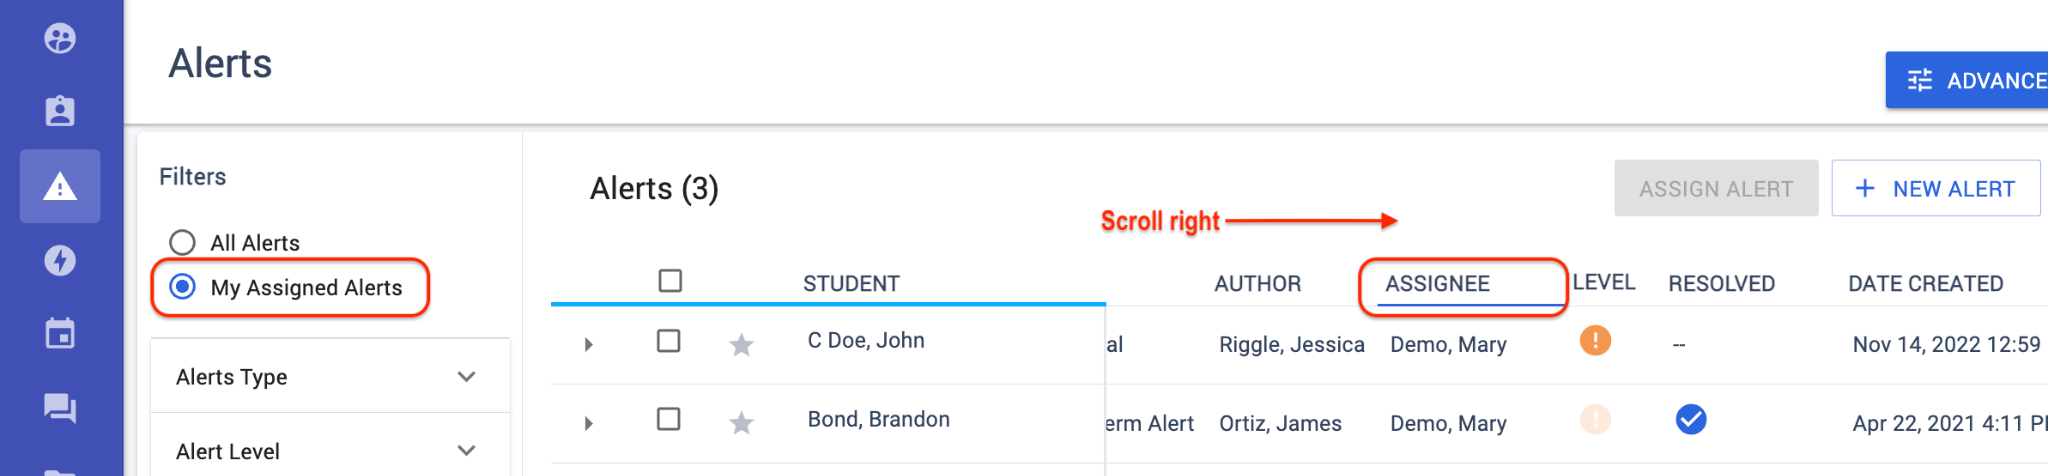
Where do I see assignments?
When an alert is assigned to you, you see it listed under My Assigned Alerts, at left in your Filters. For all users viewing alerts, the user currently assigned appears under the Assignee column:
Who can assign alerts?
As a rule of thumb, anyone who can resolve alerts can also assign them.
- Alert Committee — If your institution has an alert committee configured, users with the alert committee permission can assign alerts.
- Assigned Advisor — The student’s assigned advisor can assign the alert.
- Assigned User — The assignee of an alert can re-assign that alert.
How are alerts assigned?
As soon as you select an alert on the Alerts page, the Assign Alert button activates:
Check multiple alerts if you want to assign them in bulk to the same user.
In the Assign Alert window, use the filters to run Search for the user you want to assign.
- To see all eligible users, skip the fields and select Search and browse the results.
- To filter by First name, Last name, or Title, enter at least one character in the field.
- To narrow by SSU (student success unit), use the drop-down menu to select one or more.
Use the Select all checkbox to make sure all SSUs are searched.
Even if created in bulk, assignments must be changed and removed individually.
Click on an alert to expand it, and use the buttons along the bottom to change the assignment:
- Re-Assign — Use the same search filter to locate a new assignee, or cancel by clicking the ✕.
- Remove Assignee — Confirm that you want to remove the assignment, or select Cancel.
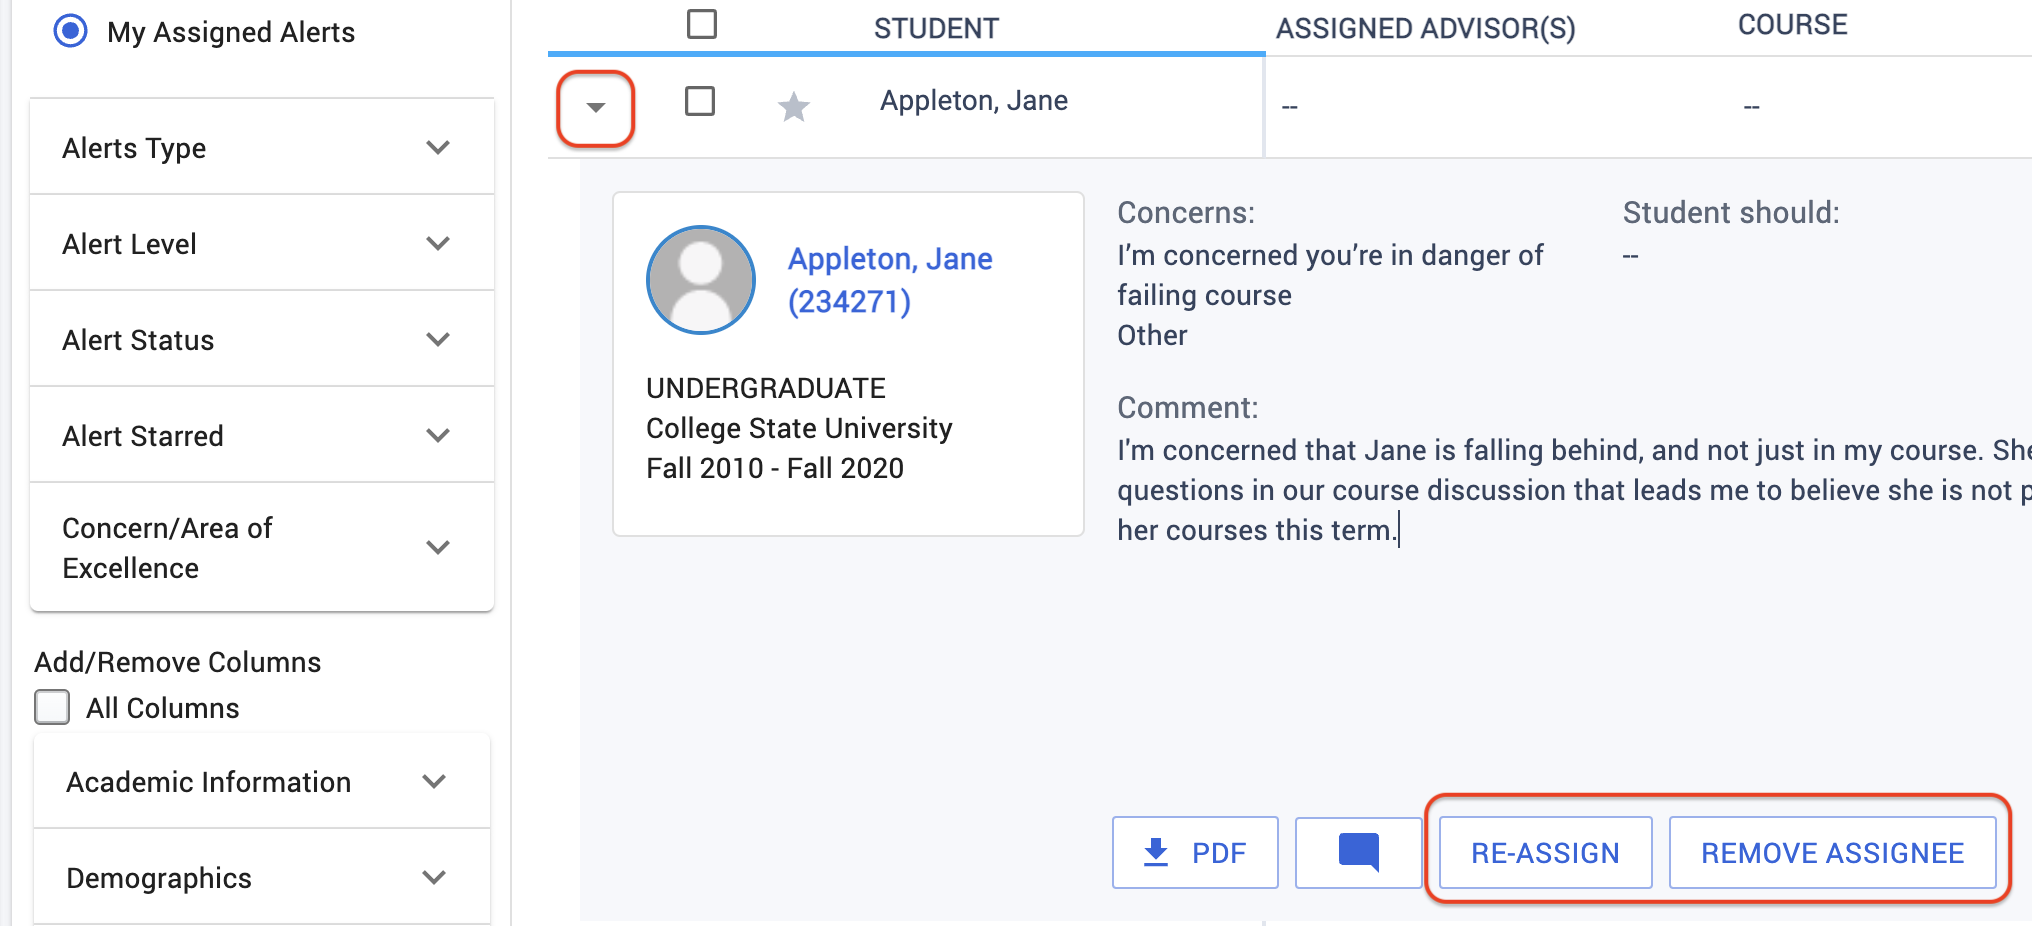
Tip: If the assignment change was done in error, the user can just be assigned to the alert again.
Filter Alerts by Concern
You can now filter alerts by one or more Concern (or Area of Excellence, for Commendations). Expand the Concern/Area of Excellence filter group and select one or more concerns from the list: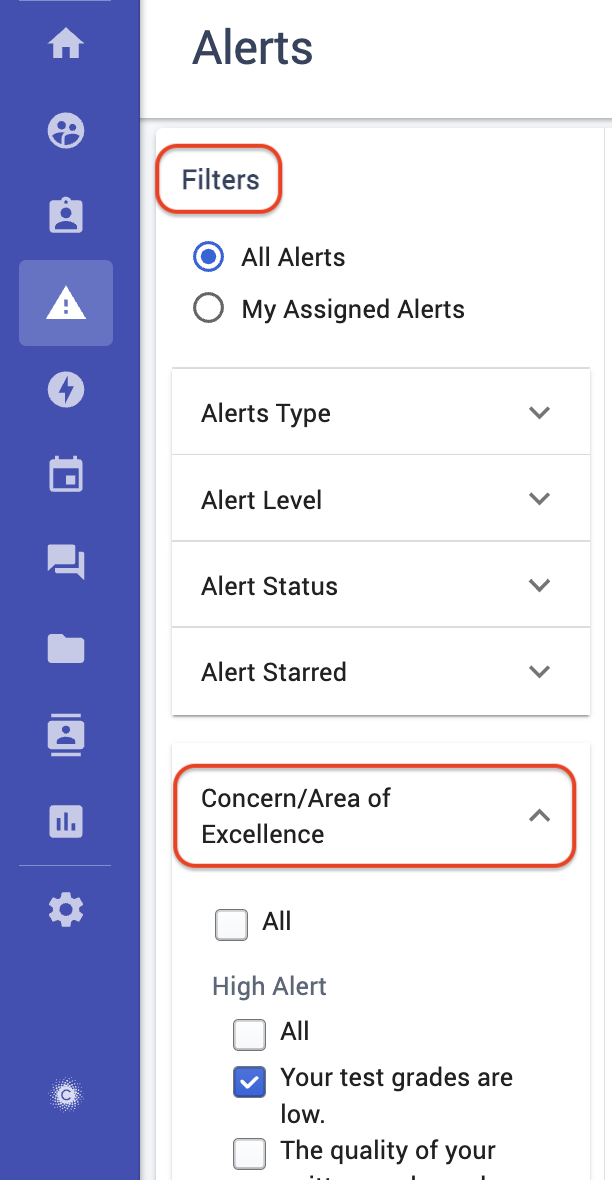
Add Columns to Alerts
You can now add and remove standard columns on the Alerts page, exactly as you can on the Student List. Persistence filters are planned to be added.
Alert Accessibility
To meet WCAG 2.1 AA accessibility standards, we have upgraded the UI technology for the Alerts functionality. The new technology has realized many benefits:
- Brought Alerts into WCAG 2.1 AA compliance
- Boosted the performance of the Alerts page
- Raised the maintainability and extensibility of the Alerts UI
- Allowed for UI improvements for Alerts
Zoom Meeting Integration
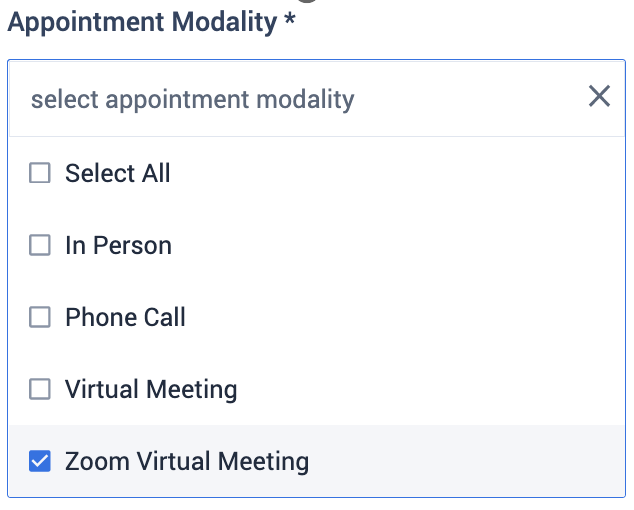
In this update: Advisors can now automatically schedule Zoom virtual meetings with students through the Civitas Advising Calendar.
Once the integration is set up for your institution, advisors can connect their Zoom account on the Settings page. After that, they can select Zoom Virtual Meeting as an appointment’s modality. Choosing this will generate the specific Zoom meeting link that will be included on the appointment and sent to the student.
Integration Setup — Implementation of Zoom happens in three parts:
- The IT department completes the back-end steps: Advising | Zoom Integration (PDF)
- Zoom integration is enabled and linked in your Calendar configuration.
- Each advisor chooses to link up their Zoom account on their own Settings page.
Once IT has completed the back-end setup, a Civitas Advising user with the Manage Calendar Configuration permissions can enable it for your team:
- Go to the Calendar configuration page.
- Set Zoom Virtual Meeting to Enabled.
- Enter the Client ID and Client Secret provided by your IT department.
- Select Save.

Connect Your Zoom Account — With the Zoom integration enabled, each advisor can go to their Settings page to connect their Zoom account.
- In the Zoom Integration section, select the Connect button.
- You are redirected to Zoom’s website to authenticate.
- Once you have authorized the connection, you are returned to the Settings page, where you see the status CONNECTED. You are now able to schedule Zoom meetings.

Schedule a Zoom Meeting — To schedule an appointment as a Zoom meeting, select Zoom Virtual Meeting as a modality for the appointment block:
When making a Zoom appointment, wait for the Zoom link to generate, which could take several minutes in some circumstances. As soon as the link has been generated, you will see it in the details for the meeting. The same Zoom information will be included in the appointment notification email that your student receives.

Self-Service Kiosks for Walk-In Queues
In this update: As students are returning to campuses and advisors are meeting with students in person, take advantage of the Queueing and Kiosk features in Civitas Advising.
Self-Service Kiosks — Students can sign themselves in for ad hoc and walk-in appointments using the brand new kiosks. Launch a kiosk on a tablet or other device at any advising or student support office, and advisors and staff will be able to use queues to manage students waiting to meet with them. All advisors will now also see the new Today’s Schedule page in the Calendar to better manage both their queues and appointments for the day.
Queue Managers — Additionally, administrators can assign the Queue Manager role to staff members to coordinate and manage queues of students who have signed in.
Services for Kiosks — In the Configuration area, advising administrators can set up Services to facilitate signing in with a kiosk for your various offices and advising services, and also to categorize appointments.
Messaging by Text (SMS)
In this update: Advising now has SMS functionality (text messaging) in addition to email messaging.
Communication and relationship building is at the heart of holistic advising, and we know that students often prefer to communicate using their mobile devices. To that end, we are opening an additional communication channel to foster better communication between advisor and student. Advisors and students can communicate with one another via SMS.
Opting in and out — Students will be able to opt in or out at any time via the Settings page, and can note their preferred communication channel: email or SMS. Students can opt in or out separately to receive calendar notifications and to communicate with Advisors via SMS. Additionally, Civitas can facilitate opting students in and out of SMS in bulk.
In our redesigned Communication area, we’ve added an SMS Inbox in addition to the Email Inbox.
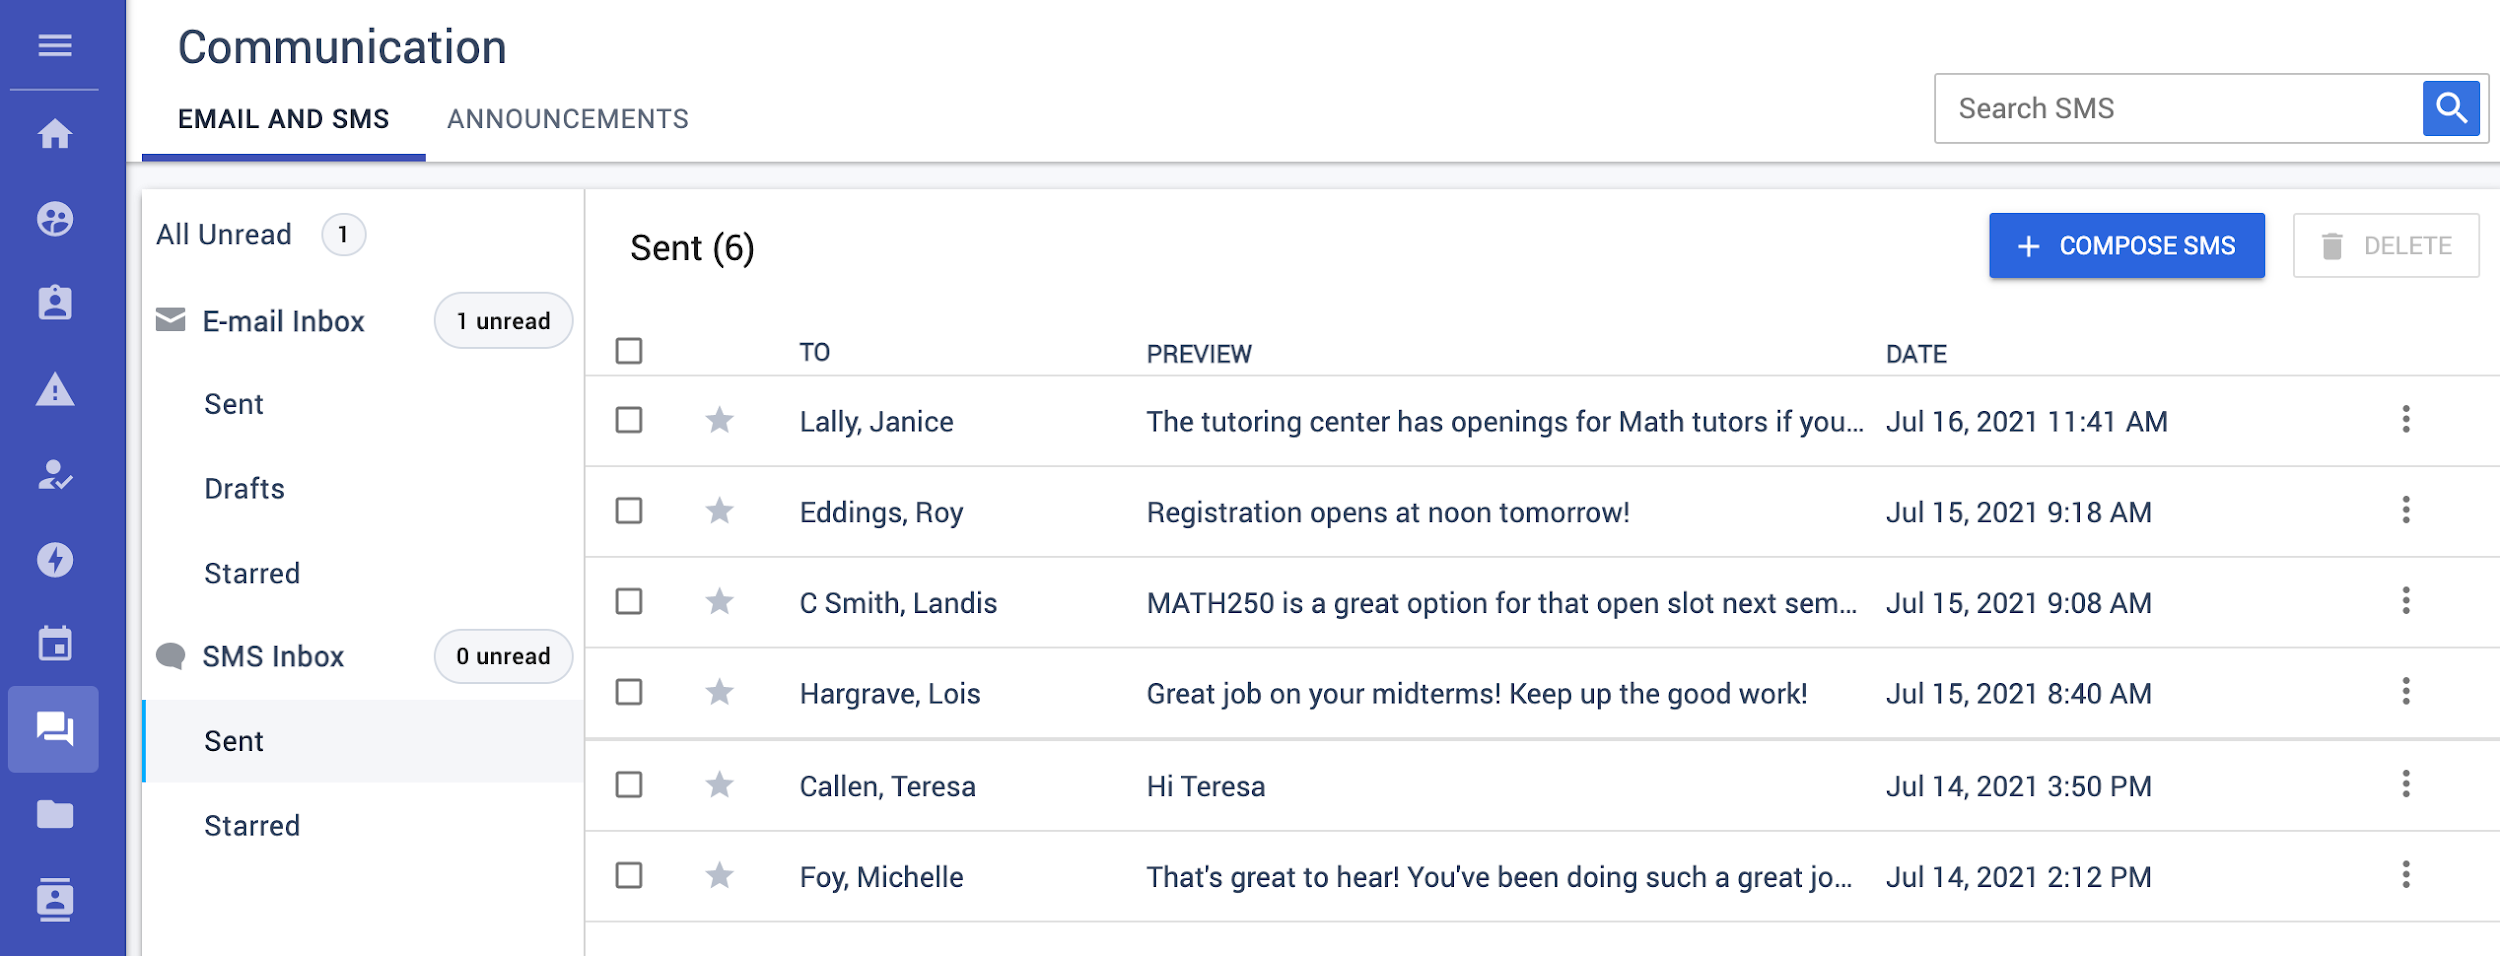
- Advisors can select to send SMS messages to one or multiple students (e.g., to a group of students in a mass text; students will not see who else has been texted in a group).
- Advisors can then chat back and forth with individual students.
- Advisors are provisioned with a dedicated phone number for the application, and they will do their SMS communication in the application with that number, not from their private phone numbers.
- Students will receive messages on their mobile phones, so they do not need to log in to communicate, although they can log in to see read-only versions of all the SMS messages.
Automatic Timeout Warning
In this update: Users are now automatically alerted when they are about to be logged out due to inactivity.
One minute before a user is about to be logged out due to inactivity, a popup will appear that counts down until either the time runs out and the user is logged out, or until they select the “Stay Signed In” button, at which point the timeout will reset.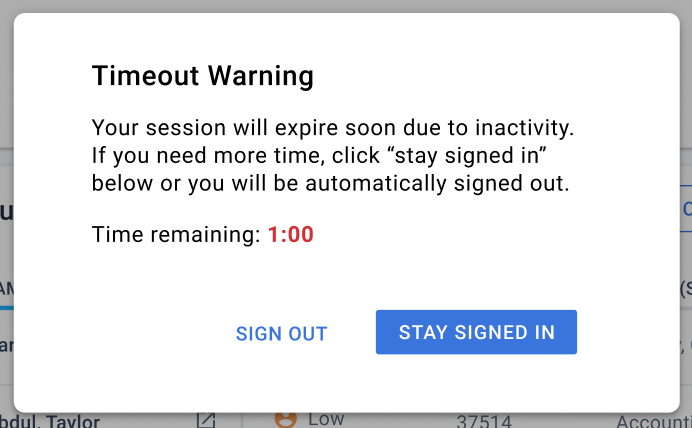
When a user’s session has expired due to inactivity, they are redirected to the login page which displays an indicator that explains why they were logged out.
By default, the session timeout is set to one hour. Contact Support if you would like to set a different timeout length for your institution.
Dual Roles & Updated Editor
In this update: We have introduced the ability for users to have Dual Roles, and have upgraded the text editor throughout the application.
Users can now have both a Student role and a Staff or Faculty role.
We have updated the editor used throughout the application with new formatting options, advanced copy-paste support, and Autosave.
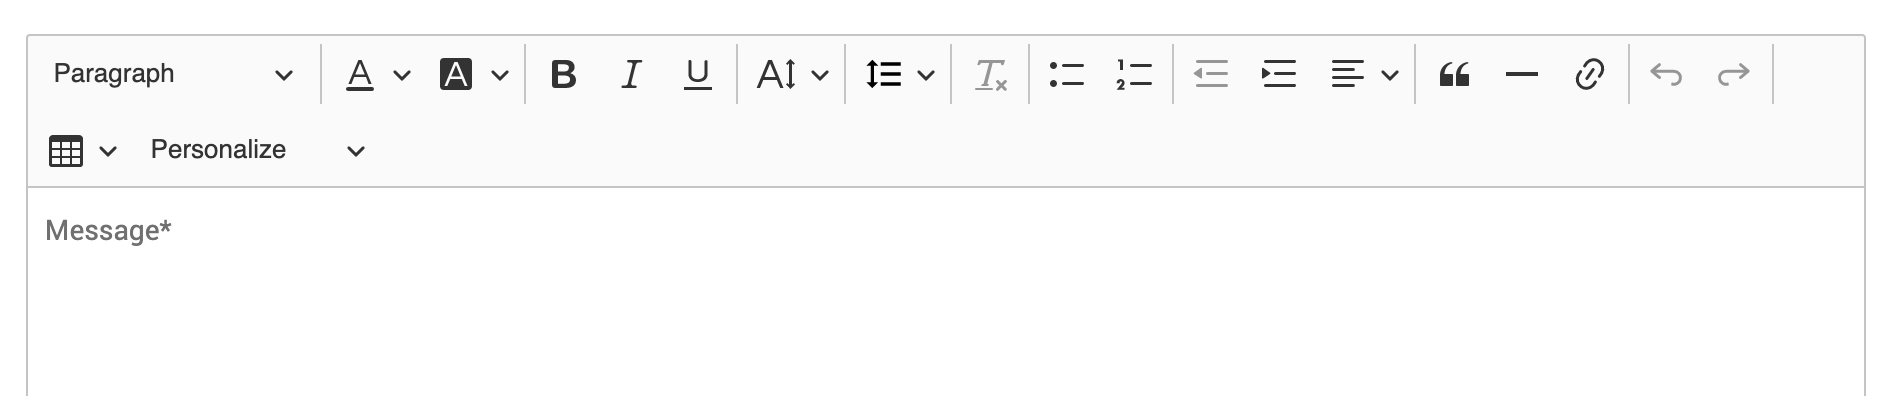
Formatting options include
- Font color & font background color
- Font size
- Line height
- Bulleted & numbered lists
- Indent & text alignment
- Block quotes
- Horizontal lines
- Hyperlinking
- Table builder
Additionally, the editor supports the retention of formatting when copying and pasting in content from other applications such as Microsoft Word and Outlook. For example, you can compose and format your message in Microsoft Word and paste it into a Message in the Communication module with no loss of formatting.
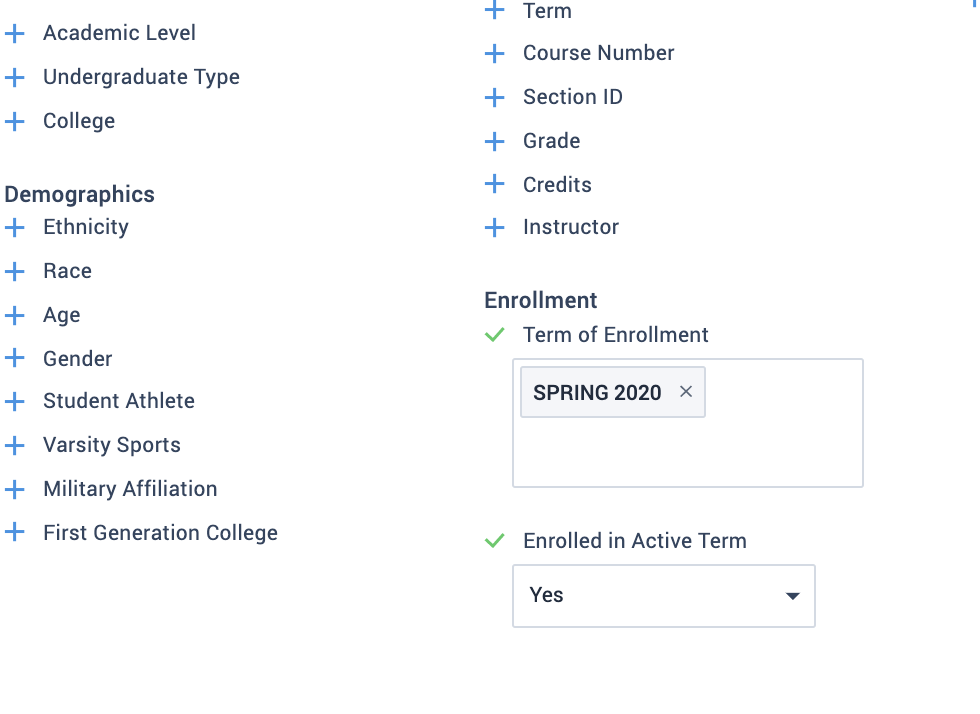
New Enrollment Filters
In this update: We have added a new “Enrollment” section of filters to help you better reach out to the students that need your support.
There is new “Enrollment” filter section in all places filters display (e.g., Advanced Search) with two available filters:
- “Term of Enrollment“: Enter one or more terms to filter by students enrolled in those terms. This filter has the same functionality as the “Term” filter in the Courses section.
- “Enrolled in Active Term“: Select “Yes” to filter by students who are currently enrolled in the active term. Select “No” to filter by students who are not currently enrolled in the active term.
In this update:
- Redesigned navigation
- Updated messaging, including the ability to create Advising Notes from group messages
- Added fields to the Advisors page to facilitate usage and adoption reporting
Updated Navigation
We’re excited to introduce an updated navigation experience in Inspire! This improved navigation experience has allowed us to upgrade and improve the UI technology we use, and provides a unified navigation experience for users that also have access to other Civitas Learning products.
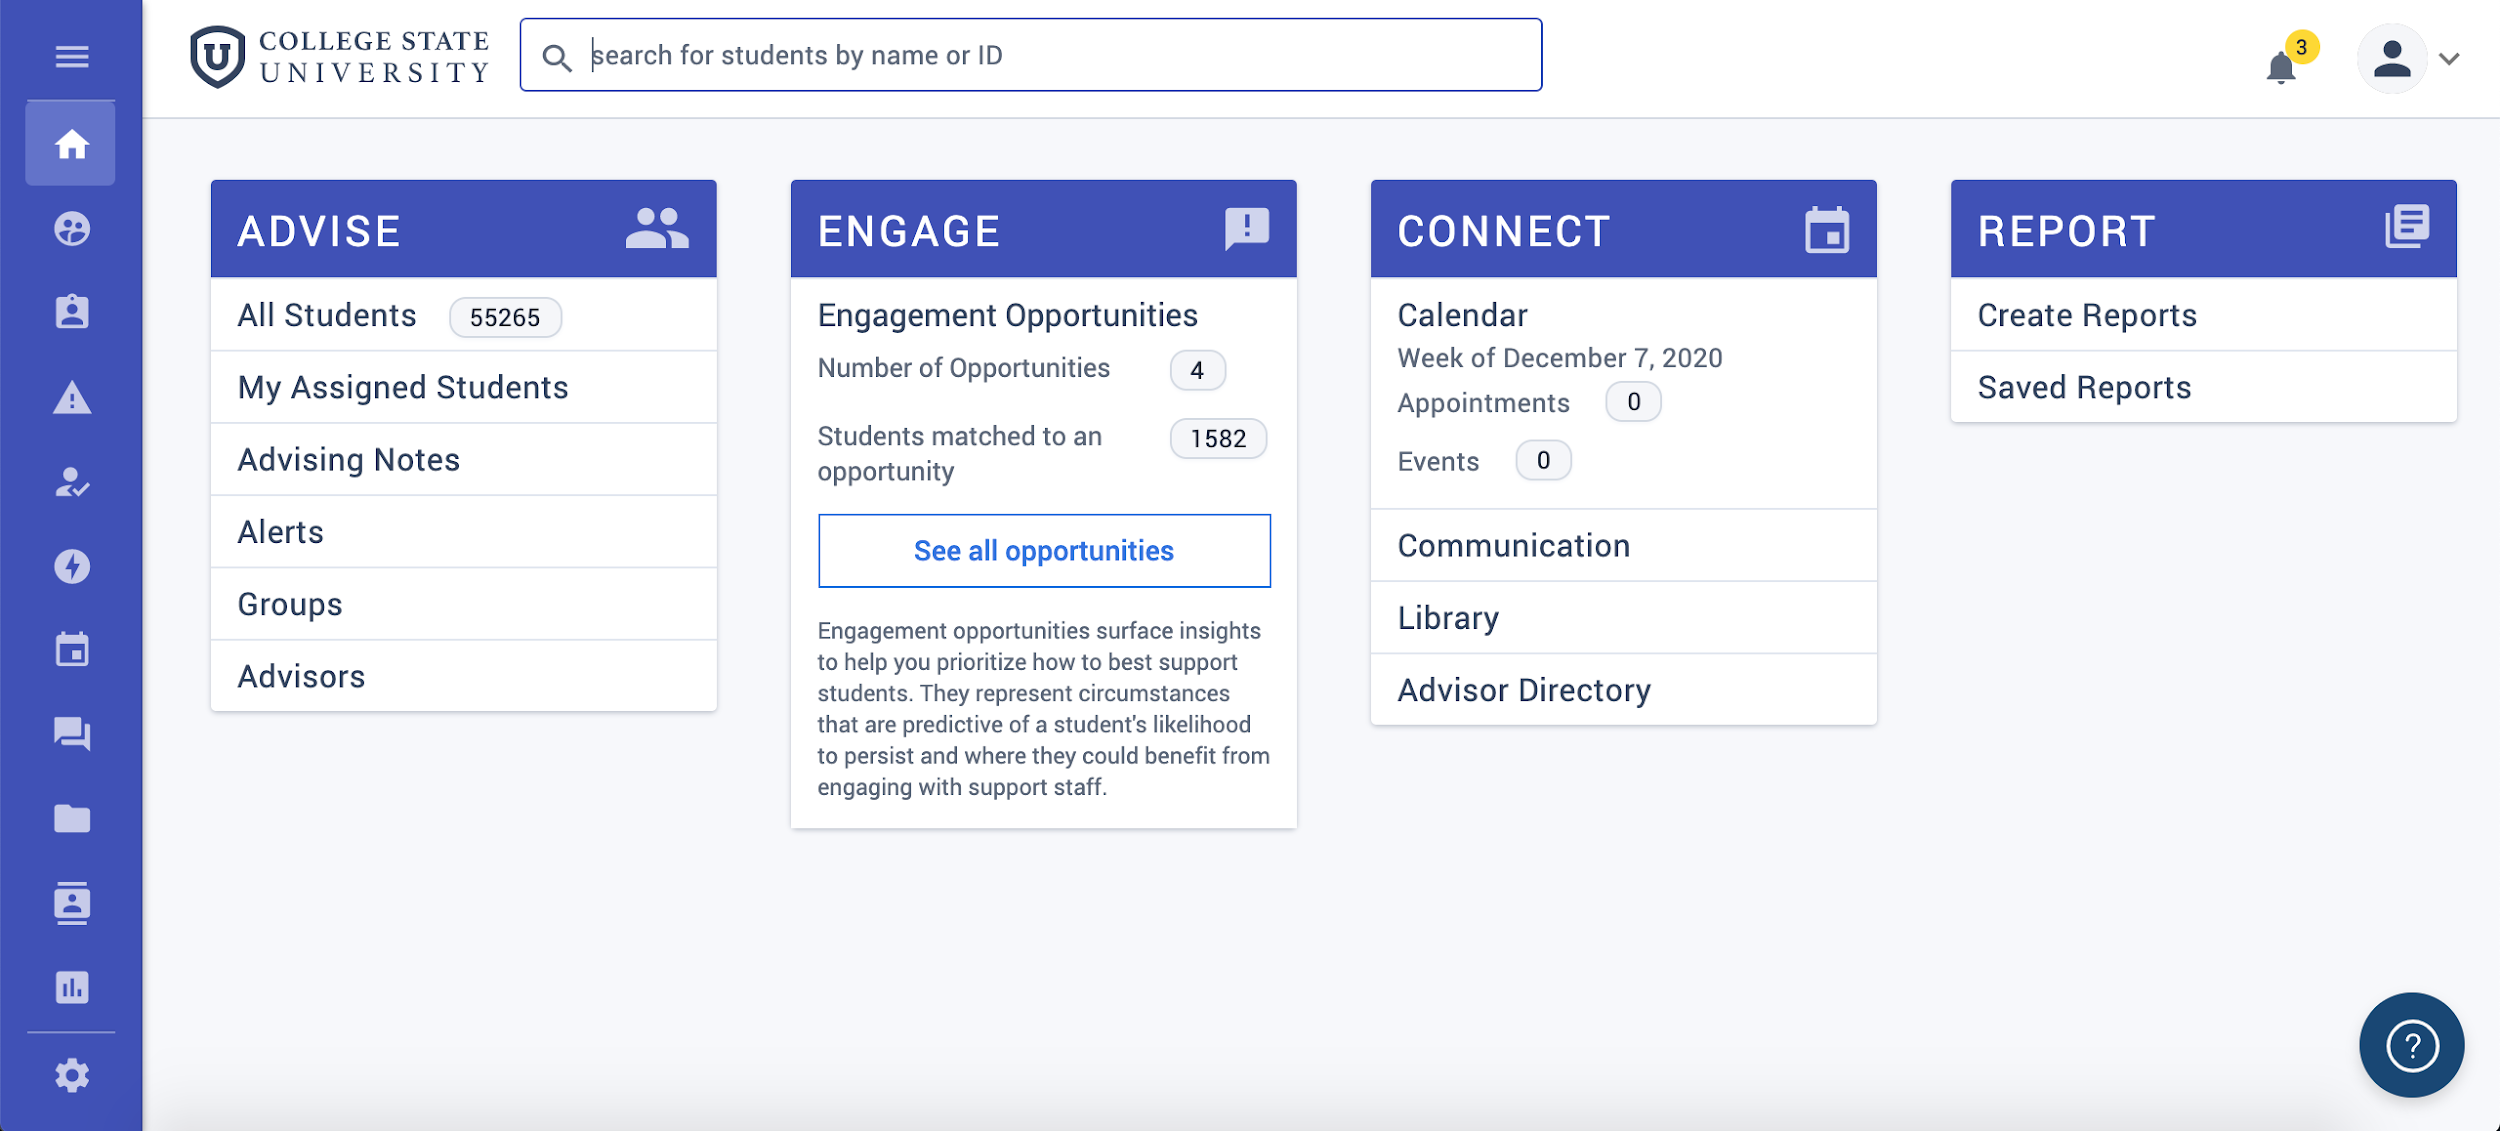
The primary navigation has moved to a panel on the left-hand side with links to all of the major feature areas in Inspire. The navigation expands upon hover, or when clicking the Menu icon. For areas with multiple pages, the sub-pages are displayed as tabs in the Secondary Navigation which appears as options along the top of the page.
▶ Video tour of the new navigation: Advising Updated Navigation Tour
Messaging Updates
- We have renamed the page from Messages to Communication
- We have redesigned the Compose dialog
- You can now save messages without entering a recipient email address
- It is now possible to create Advising Notes when sending a message to multiple recipients

Advisors Page Updates
To facilitate adoption and usage reporting, we have added additional columns and improved the filtering on the Advisors page.
We have added the following columns:
- Number of login sessions
- Date of last login
- Number of email messages sent
- Number of Advising Notes created
- Number of Walk-in Appointments
Note: Login counting began 20 January 2021. Previous logins are not included in this count.
Upload a Static Group
In this update: Advisors can create a new Static Group by uploading a file with a list of students to be included in the Group.
Whether you’ve identified a list of students in your SIS, LMS, or in Advising, you’ll be able to quickly and easily use this list to create a Static Groups. You can then use your static group to send outreach, schedule advising hours, or view a list of students to support.
- When creating a new Static Group, there is now an option to “Create from Uploaded Students”
- Select the Upload List button and attach a file with a list of Student IDs. You do not need to include a header. The uploader will accept TXT, XLS, XLSX, CSV, and other tabular file formats.
- Once the file is uploaded, select the “Create” button to create the new Static Group.
- If any Student IDs in the file do not correspond to a student in the system, an error message will display with each unmatched Student ID.
- A group will be created with all matched Student Ids
- Additional students can be added or removed individually once the group is created.

Calendar and Advising Note Improvements
In this update: There are several improvements to the calendar and to advising notes.
- We’ve added additional event type quick filters on both the grid and list view to make it easier to filter for all types of events
- When scheduling an appointment or creating hours on the calendar, the time picker will no longer start at midnight, but will instead be scrolled down the 10 minute increment nearest the time the user’s current time
- It will now be possible to configure how Walk-in Hours display on the calendar, similarly to how Appointment Slots can be configured. Contact Support for help updating this configuration.
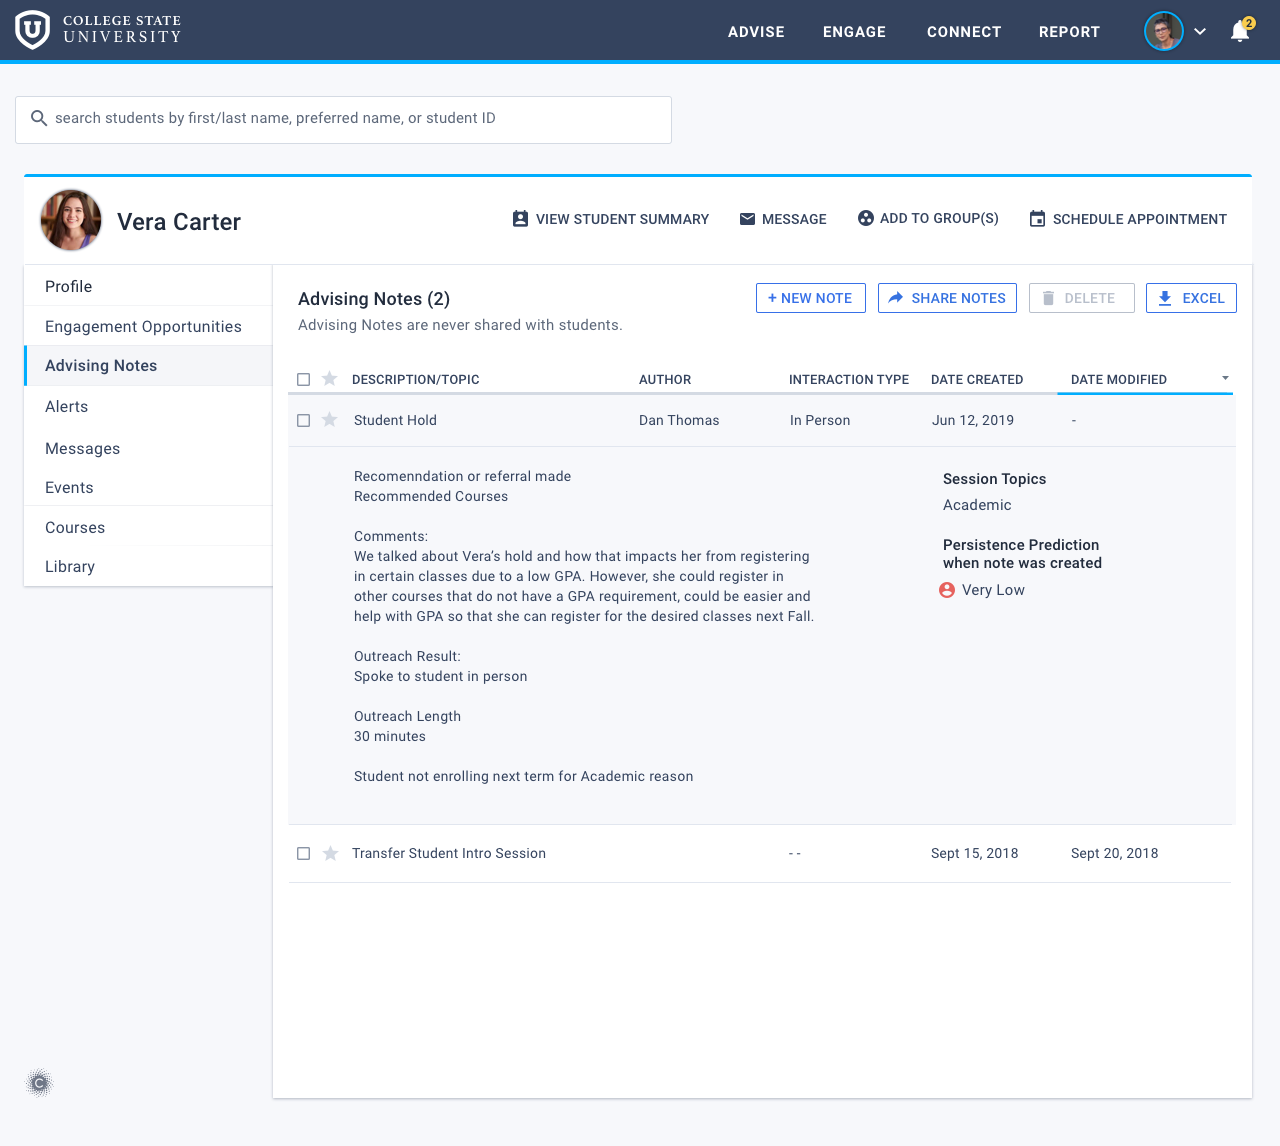
- For clarity, the name of the column on the Advising Notes table and report changed from “Description/Topic” to “Subject”, which is how it is referred to when creating the Advising Note.
Change in Persistence
In this update: You can now see and filter on a student’s change in their Persistence Prediction.
We’ve created new data points in Inspire to help you better support your students and identify students who may be at risk of not persisting. We’ve added Change in Persistence – informing a new field, filter, and Engagement Opportunity in Inspire. Change in Persistence will show how much a student’s persistence prediction has changed from one week to the next (over seven rolling days). For example, if a student goes from being 50% likely to persist to 30% likely to persist over the course of 7 days, this will display as a 20% downward change.
Change in Persistence appears in a variety of locations and uses:
- Add as a Column: Users can add Weekly Change in Persistence Prediction as a column to the Students table on the Advising Management page or when creating a report. This column displays how many percentage points a student’s change in prediction score changed over a rolling course of 7 days, and whether the score increased or decreased (denoted with an arrow). This column can be sorted by ascending or descending order.
- Use as a Filter: Users can filter the Students search or report to show students who have had a change in persistence greater than 5, 10, 15, or 20 percent, upward or downward.
- View on the Student Card: Users can now see a student’s change in persistence prediction on the Student Summary Card. You can view this information by searching for a student and navigating to the student’s profile.
- A New Engagement Opportunity: Users can also use the new “Students with a more than 5% drop in persistence prediction in the last 7 days” Engagement Opportunity.
Change in Persistence Quickfilter and column on the Students page:
Change in Persistence on the Student Card: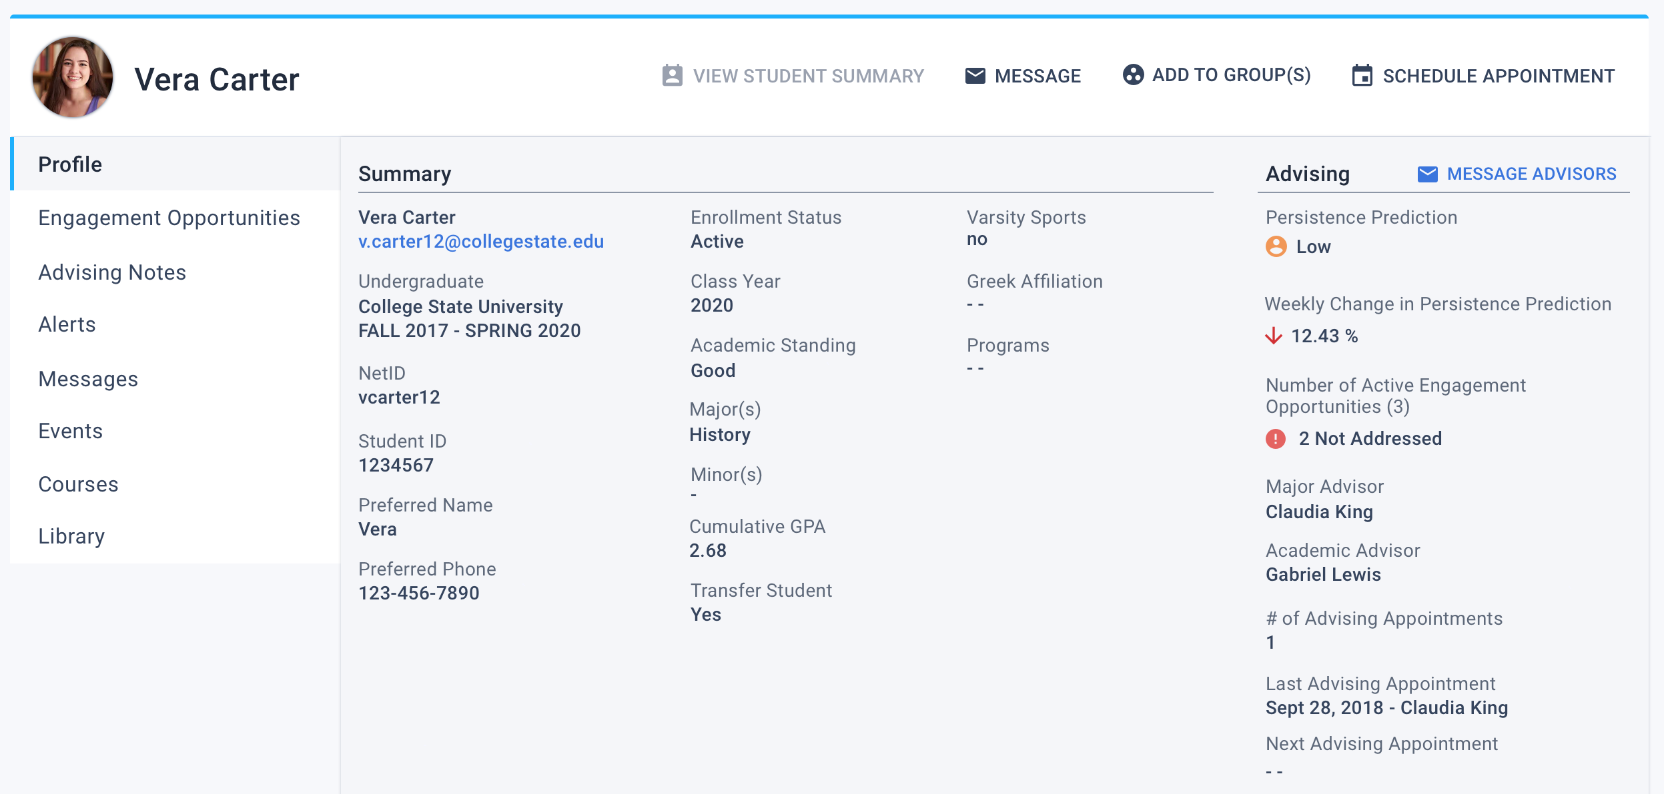
New Engagement Opportunity
Under the Engagement Opportunities tile, you’ll see that a new Engagement Opportunity has been added: Students with a more than 5% drop in persistence prediction in the last 7 days. This Engagement Opportunity displays active students who have shown a drop in persistence prediction by five percentage points or more within the last 7 days. This 7 day period is a rolling window as persistence prediction is calculated daily.
In 2019, our research found that significant drops in prediction scores by themselves are a strong signal that a student is less likely to persist to the following term. Utilizing this new Engagement Opportunity, we recommend reaching out to students who have had a 5% or greater drop in prediction score over the course of a week as a significant opportunity for proactive intervention to help students who are in a negative slide.
New Engagement Opportunity on the EO Page: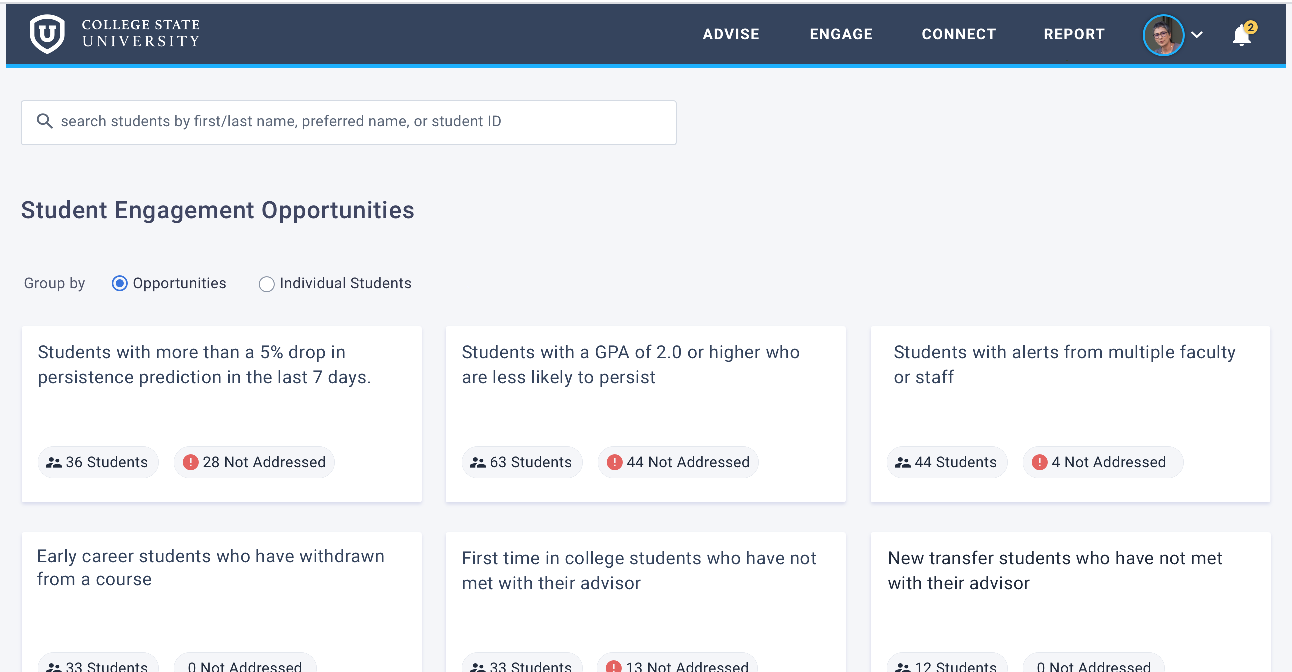
Walk-in Appointments & Calendar Improvements
In this update:
- Advisors can now create walk-in hours alongside scheduled advising slots! We’re also adding more flexible ways to record how advisors meet with students with a new appointment modality field.
- Students will be able to see both appointments and they can schedule in advance and walk-in hours for drop-in appointments to make it easier to connect with an advisor within their schedule.
What you’ll see:
- Walk-in Hours: Walk-in Hours are created similarly to creating Scheduled Appointment Slots on the Calendar. Select a portion of the day by clicking and dragging the mouse, or click the Create button.
- Walk-in Appointments: An Advisor can create a walk-in appointment in the Calendar.
- Interaction Types, Appointment Types, and Appointment Modalities: For more flexibility and to see patterns in your reporting, we are transitioning to using three fields in place of one: Interaction Type, Appointment Type, and Appointment Modality.
- Interaction Type: The Interaction Type on the Advising Note is intended to document the interaction that led to the note being created.
- Appointment Type: The Appointment Type on the Calendar and the Advising Note is intended to record whether an appointment was a scheduled appointment or a walk-in appointment using this new Walk-in Hours feature.
- Appointment Modality: The Appointment Modality on the Calendar and the Advising Note is intended to record how the appointment was conducted, and the same list is available for both Schedule Ahead and Walk-in appointments.
- Reports: Interaction Type is available as a filter and column on the Advising Note report. Appointment Type and Appointment Modality are available as filters and columns on the Appointments and Advising Note reports. These reports can be used to more flexibly understand how Advisors are meeting and interacting with Students.
New Walk-in Form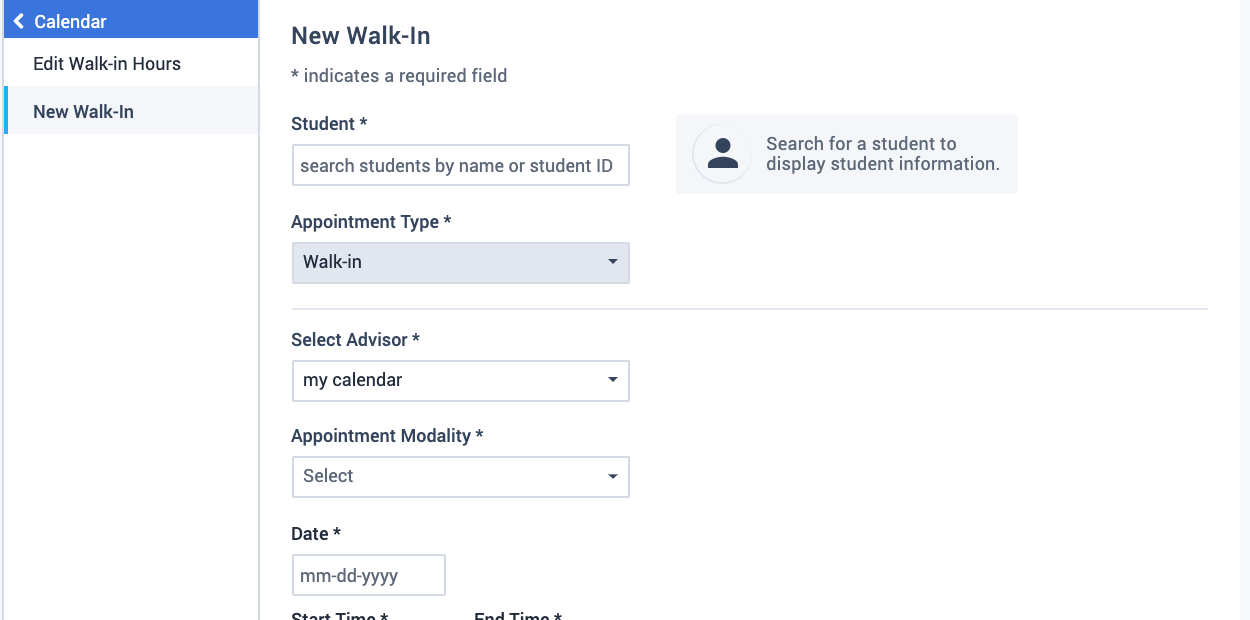
Interaction Type, Appointment Type, and Appointment Modality on the Advising Notes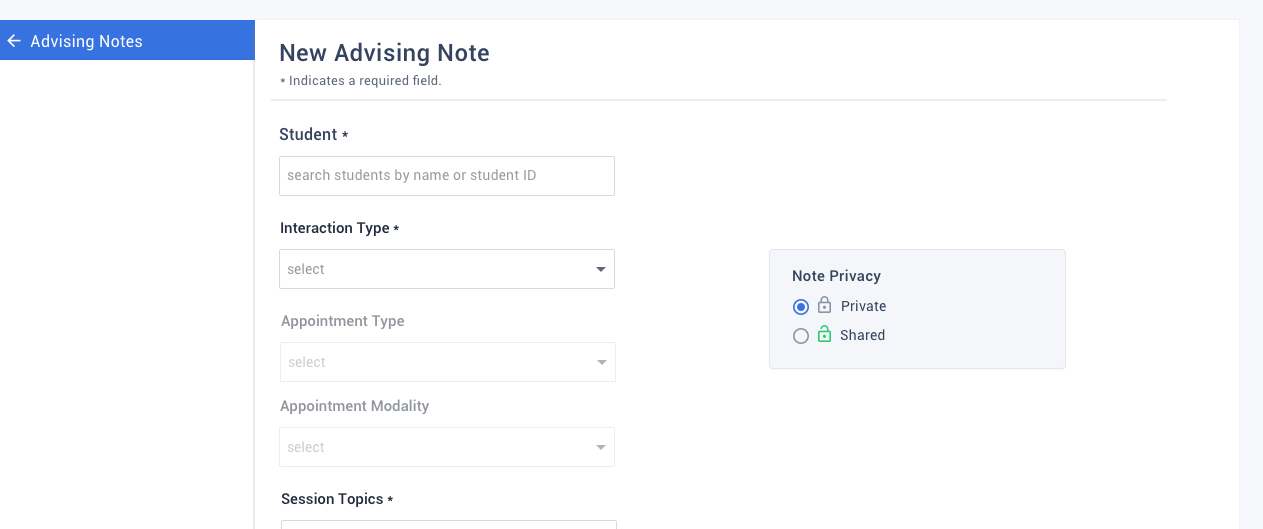
Interaction Type, Appointment Type, and Appointment Modality on the Advising Notes Report
Filter for LMS Engagement
In this update: There is a new filter under Courses, for Latest LMS Activity this Term.
Now that a majority of higher education institutions have temporarily moved their classes online, it’s more important than ever to understand student engagement and personalize outreach accordingly. We wanted to make that an easy strategy as you support students. Introducing the newest filter, “Latest LMS Activity This Term,” with which you can identify who have not clicked on key information or tasks in your institution’s learning management system over a select period of time.
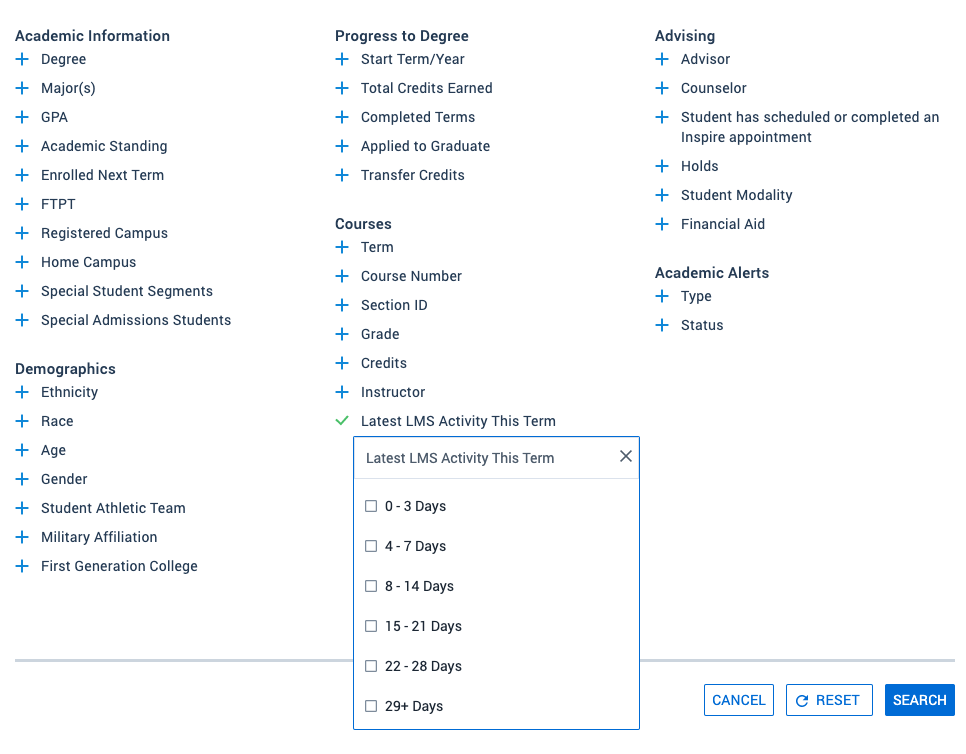
This filter will show up under the “Courses” category and is based on data captured in the Civitas Learning intelligence platform for your institution.
Use this information, sometimes in combination with persistence predictions, to meaningfully engage the right students in the right way at the best time.
Clarity on Inactive and Active Advisors
In this update: Advisors and Students will notice clarity on whether a staff member user is marked as Active or Inactive in the Inspire application.
We want to make it clear to both advisors and students when a staff member is considered an active or inactive user in the application. Only active advisors will be visible in the following areas:
- Searching for an appointment
- Writing an email message
- Reviewing staff members in the directory
- Reviewing assigned advisors in the student card and profile
If an advisor is listed as an inactive user in the application, they will not show up in these areas.
If an advisor becomes an inactive user, students and other advisor users will see a corresponding “Inactive” tag in the following areas:
- Reviewing appointments or events in the calendar view
- Editing an appointment with an advisor

Updates to Workflow Capabilities
In this update: Advisors will notice changes to the file type for Excel downloads, the label for a filter, and the addition of a new column to add to your Advising Management table. These are all designed to make your workflow more efficient and clear.
Excel File Download — Whenever you download data from Inspire via Excel, you’ll notice the file type has changed from .xls to .xlsx. This should resolve an alert you receive from Excel indicating the file might be corrupt or unsafe.
Change to Filter Name — We’ve updated the copy of the filter “Student has met with advisor” to “Student has had an Inspire scheduled appointment.” This change was made to provide more clarity on the definition of the filter.
Add/Remove Cell Number Column — You will now see “Cell Number” included in the Advising Management (Student) table as the final column. Users have the option to add or remove the column by checking or unchecking the box under “Academic Information” on the left side of the page.
Nudges and Outreach Integrated
In this update: Advisors can now see outreach completed in other Civitas Learning applications in Advising.
Advisors can now see a holistic view of all outreach associated with a student across Civitas Learning products. Navigate to a student’s profile and click on Messages or Advising Notes to review non-Advising outreach side-by-side with Advising outreach. Seeing all Civitas Learning outreach together allows advisors to review a student’s history of interactions with the institution all in one place.
- Analytics Outreach nudges are viewable via the Messages tab
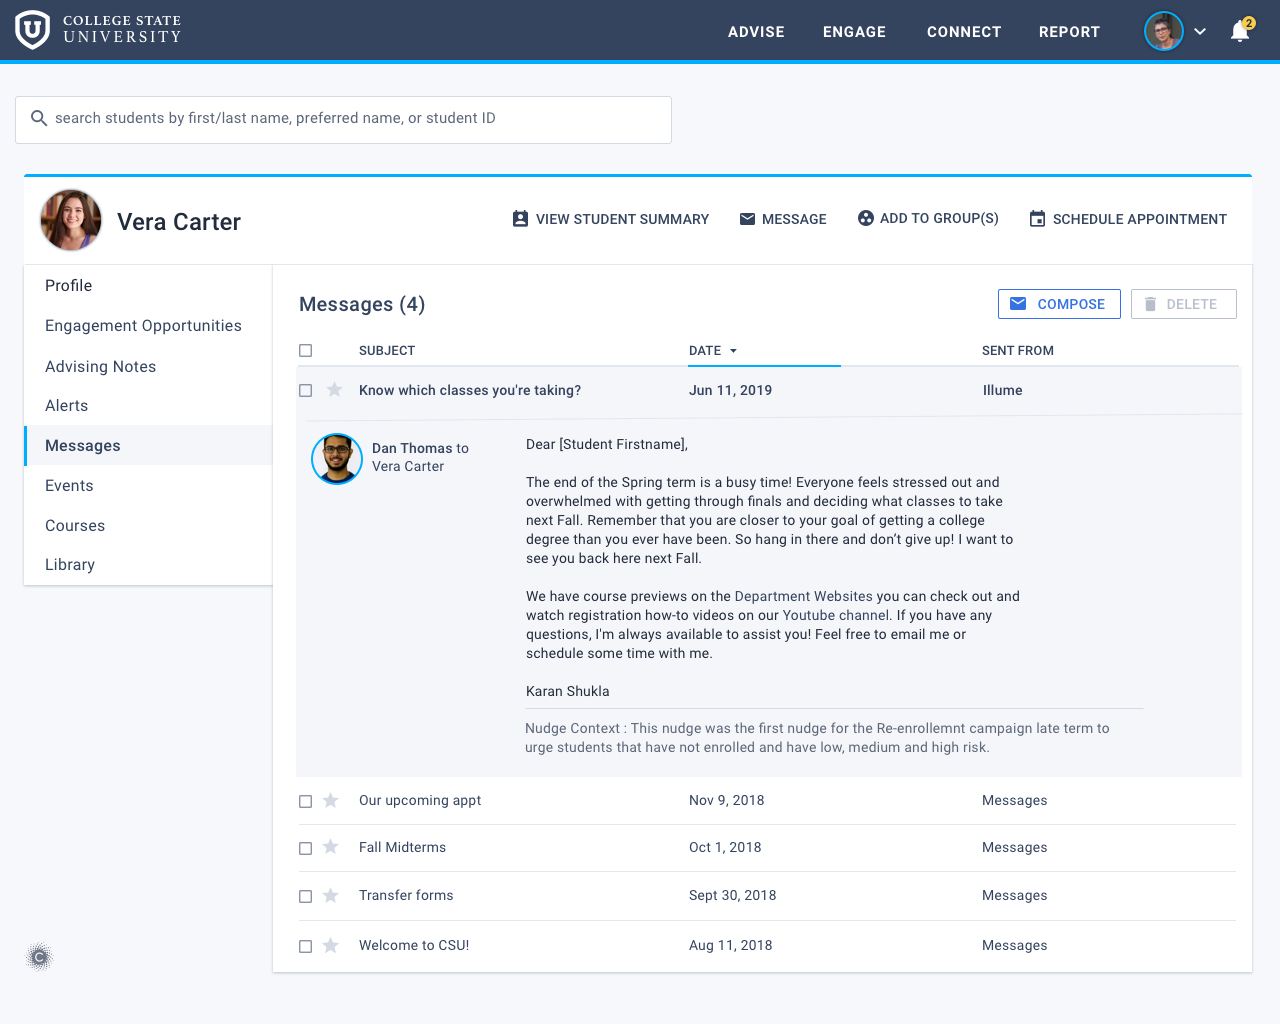
- Inspire for Advisors emails are viewable via the Messages tab
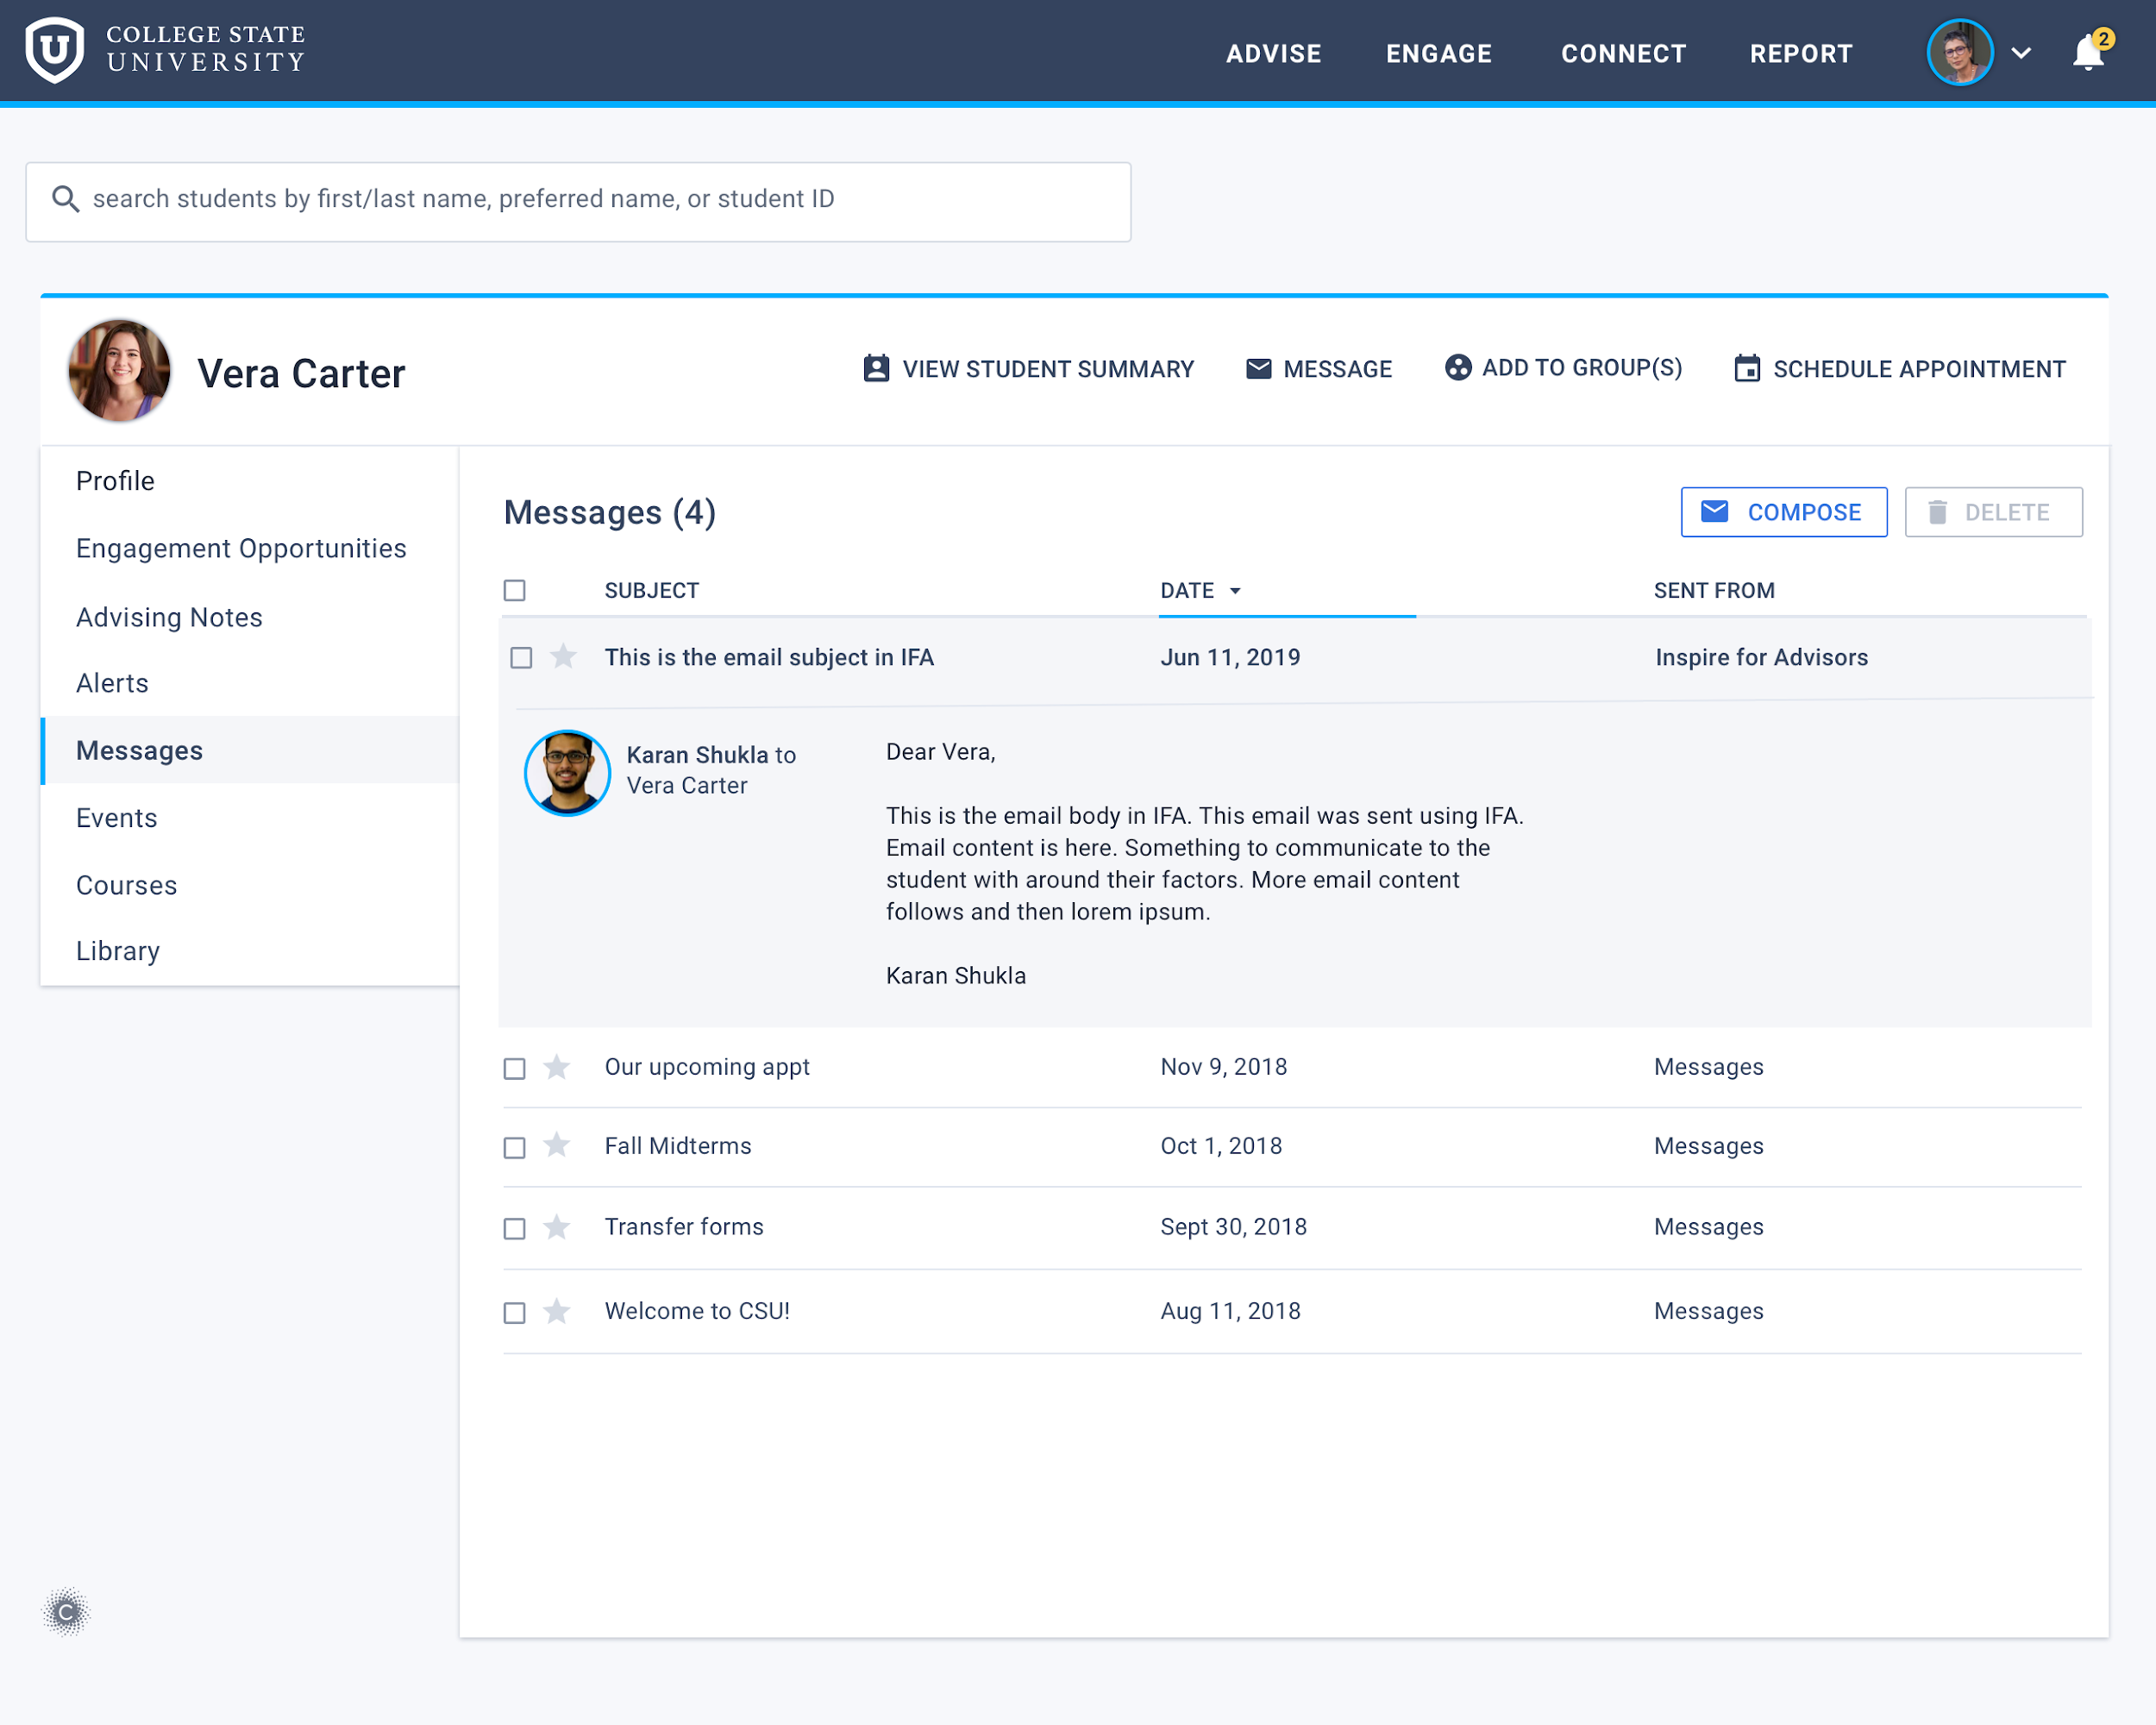
- Inspire for Advisors logged outreach are viewable via the Advising Notes tab
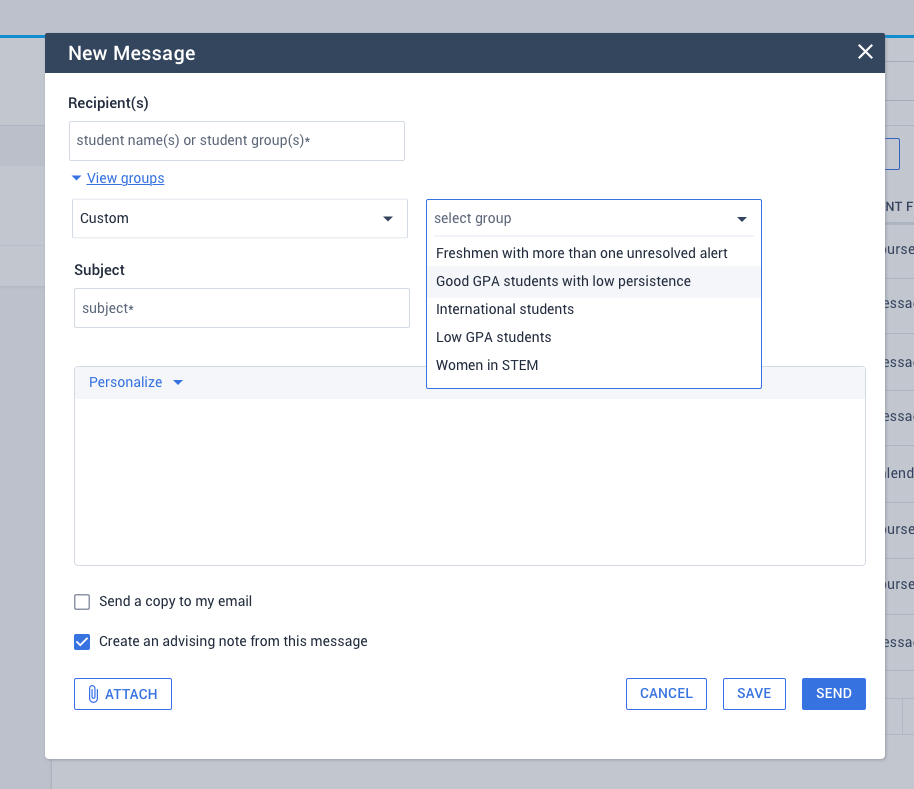
Access Custom Student Groups
In this update: Custom groups are now available to Advisors when writing messaging and announcements to students. In addition to typing out a student group via autosuggest, now advisors can access custom groups under the “view groups” drop-down.
- Advisor users can browse custom groups they created
- Directors and Advisor+ users can
- browse custom groups they created
- browse custom groups shared with them, via the message window or announcements page
To access this functionality, Advisors should click on “view groups” and then select a group type and group. Custom groups have been added to the “group type” drop down. Groups that were created by the user, or shared with that user (depending on their role and permission) have been added to the “group” drop-down. The selected student group will then populate in the recipient field.