Advising Calendar for Students
Advising Calendar
Calendar Shortcuts
The dashboard is your shortcut to the Calendar. To get to the dashboard, open Advising directly from the URL provided by your institution, which will end like this:
Pro Tip ✔
You can always get to the global menu on the left sidebar of every page, and Calendar is the second link. But start with the dashboard, because the Connect panel summarizes what you need most: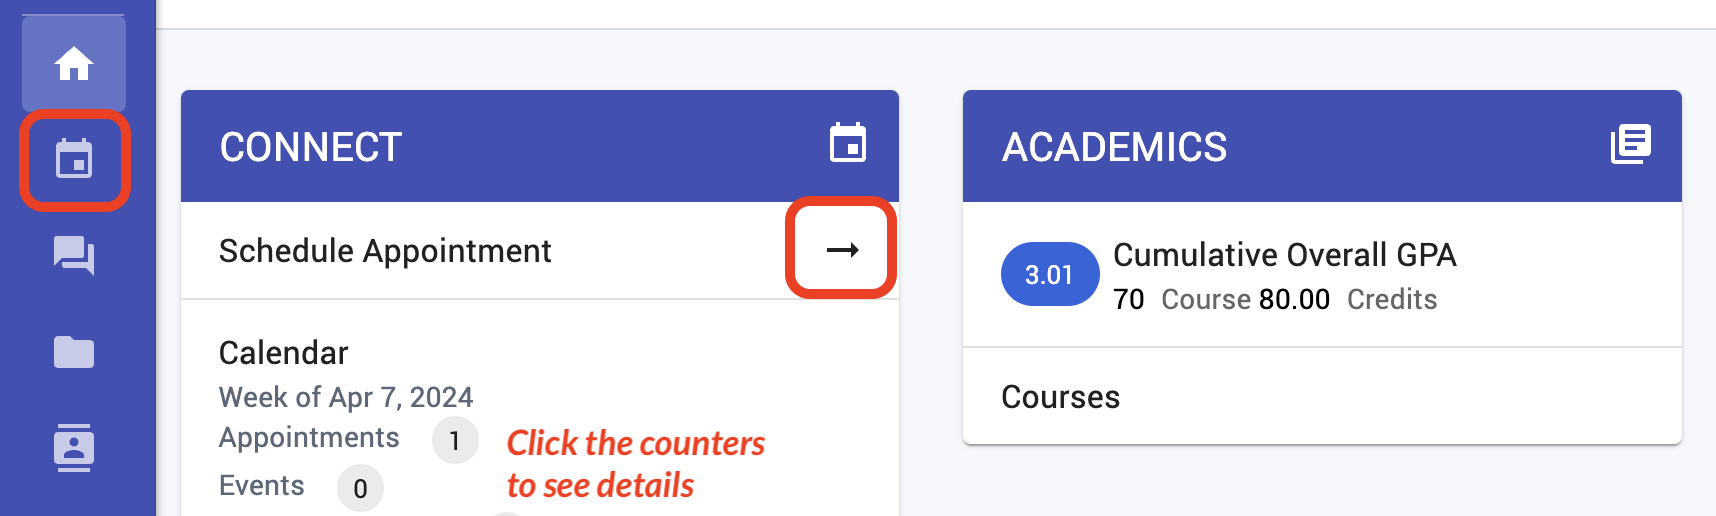
Use the Connect panel shortcuts to make, see, and cancel your advising appointments and events. This is what you’ll do most:
- Schedule an appointment — Select the arrow, pick the advisor and meeting type you want, and choose Search. Choose an open slot and select Schedule.

- See what’s coming — Click through the dashboard counters to verify what you have scheduled now (your My Appointments & Events tab). Just select (edit) one to do any of this:
- Cancel it
- Reschedule it (same advisor, different slot)
- Email the advisor
- Download it for your own calendar
- Change modality, topics, notes, or attachments:
How to Filter Appointments
Knowing how to filter for open slots on the Search Appointments tab lets you find exactly what you need, quickly.
Pro Tip ✔
You can scroll down and select the Search button (lower right) immediately to see all the slots available to you. Use the left-side filters to narrow those results. If you still see too many, expand the 🔍 Search panel and change those filters:
| Left-side filters (update automatically) Type (scheduled or drop-in) Modality (in-person, virtual, …) Days of Week (pick which ones) | Right-side filters (select Search to re-run) Services/Offerings (if set up) Advisors/Staff (pick 1, several, or all) Dates (pick a range within 2 months) Times (drag the slider) |
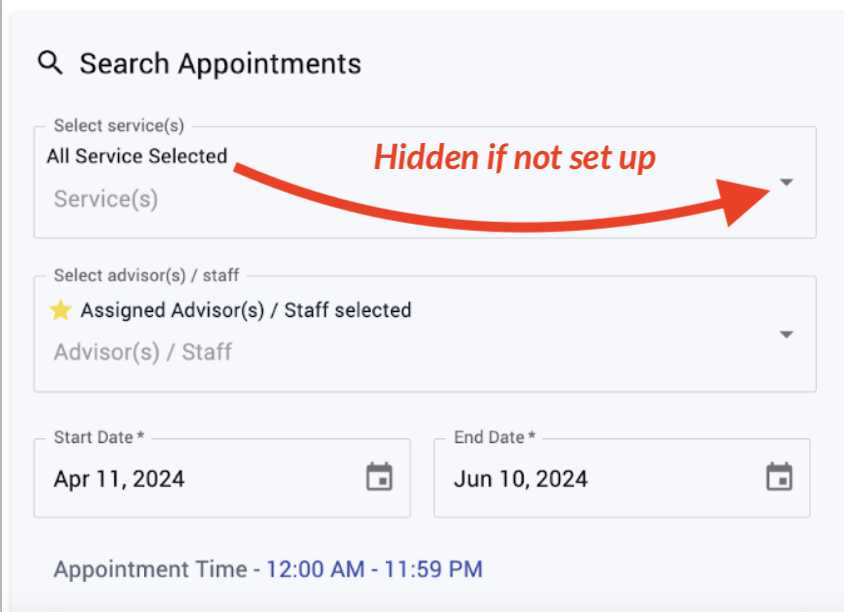
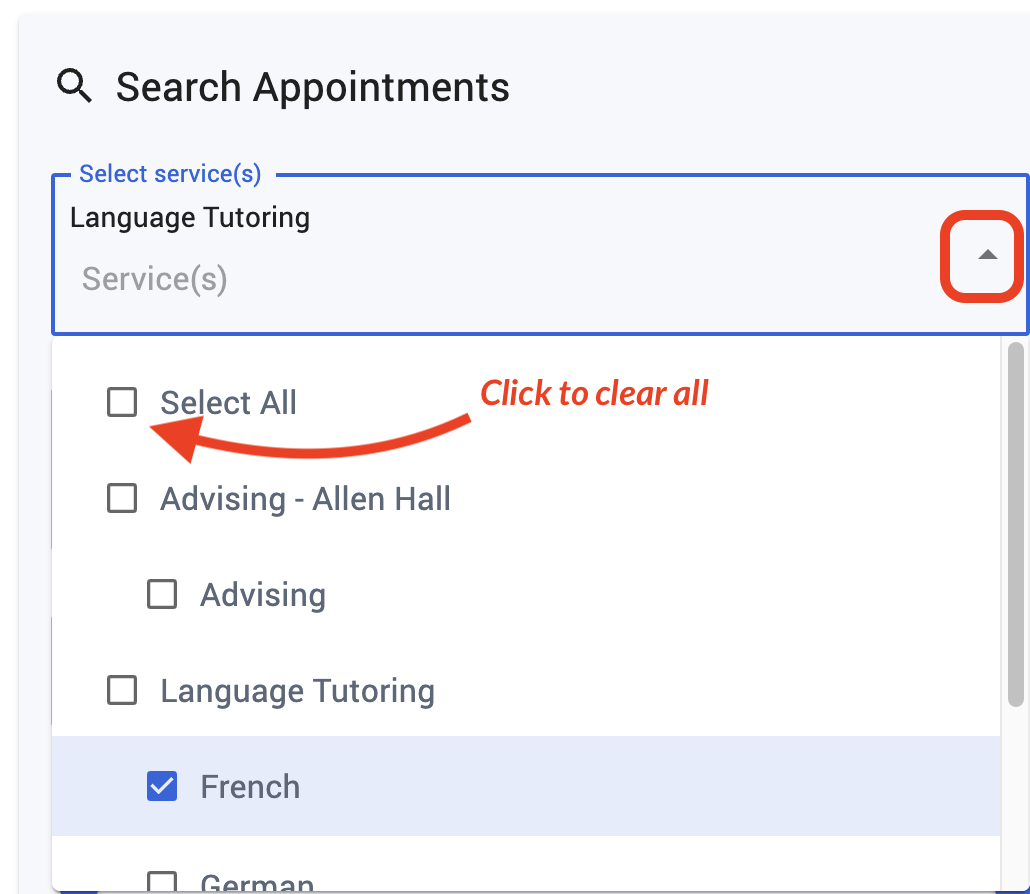
Services — If services have been configured and applied to appointment blocks, you can open the drop-list and narrow the search to which service you need, such as a type of tutoring.
- Not seeing it? If no services were set up, you won’t see this filter:
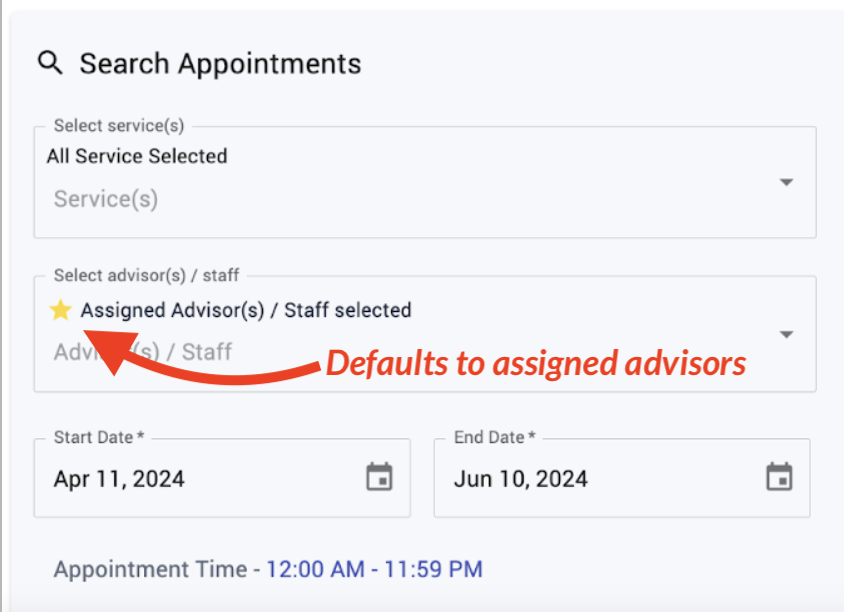
Advisors — If you have advisors or staff assigned to you, you’ll see yellow stars (⭐) by them and have them auto-selected in the Advisor filter. (No stars at all means no assignments exist.)
- If you want to see a different person, expand the drop-list to locate them.
- If it’s urgent and you want to see anyone who’s available ASAP, choose Select All.
Make an Appointment
The first Calendar tab lists your existing appointments and events (including all your prior ones); the second tab lets you make new appointments: 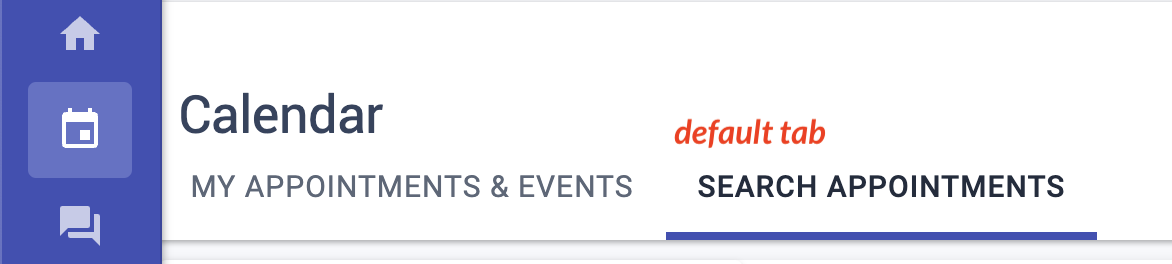
Pro Tips ✔
To get an idea of availability, scroll down to and select Search to see the default search results.
If your filtered search doesn’t return any slot that you want, start removing filters.
When you select Schedule a New Appointment (from the dashboard or the Calendar), you can immediately select the Search button (lower right) to jump to the default list: all available appointment slots with your assigned advisors and staff (or all of them, if not assigned).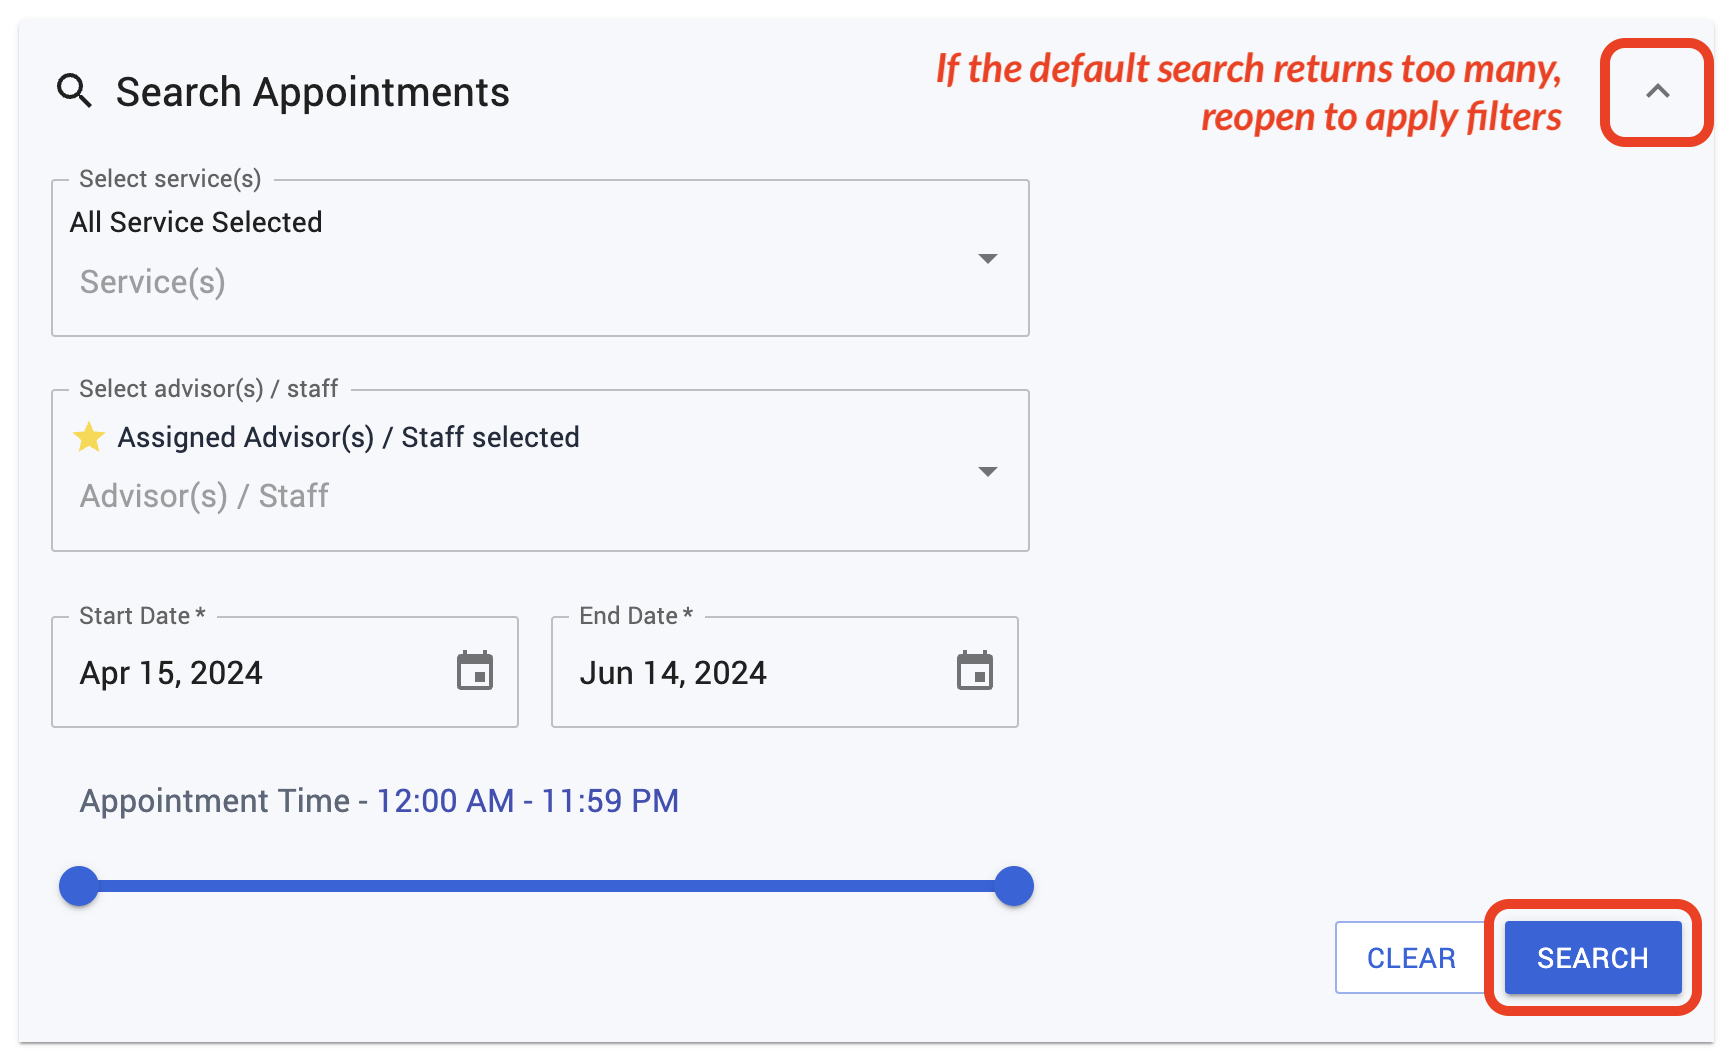
This might be too many to sift through, so filter out what you don’t want. Filters help you pick who, what, where, when, how, and why you want to meet, so that you’ll only see appointment slots that will work for you.
To the left are checkbox filters that you can toggle to change what slots you see dynamically: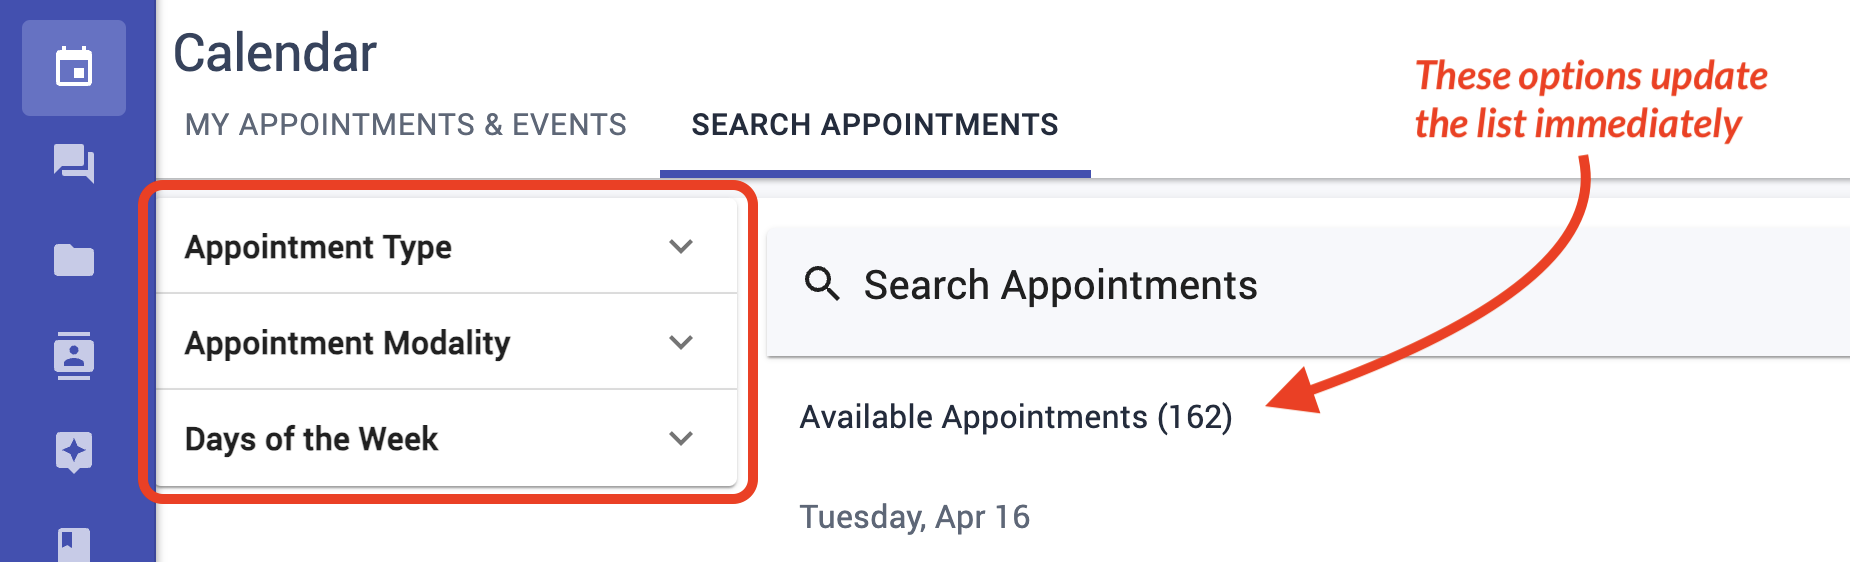
- Type — Using the checkboxes at the top left, choose Scheduled and/or Walk-in. If you choose Walk-in, you cannot sign up: you simply show up at that place and time (first come, first served). For virtual walk-in hours, make sure to find out how to log in for it.
- Modality — Using the checkboxes below those, reject (clear) any ways of meeting that won’t work for you (such as in-person).
- Days of Week — Using the checkboxes below those, reject (clear) any days of the week (such as Monday and Wednesday) that you can’t (or prefer not to) meet.
The other filters are part of the Search panel, which you open using the drop-down arrow:
Within the 🔍 Search panel, work with these:
- Services — If you see “Select service(s)“, expand the drop-list to find the one or two you need:
- Advisors — Next, pick who you’ll meet with. It defaults to your assigned advisors only (if you have any), which appear with a yellow star ⭐, so you have to select the drop-down and select anyone else you want to see.
If you’re willing to meet with whoever is open, select the drop-down and select Select All: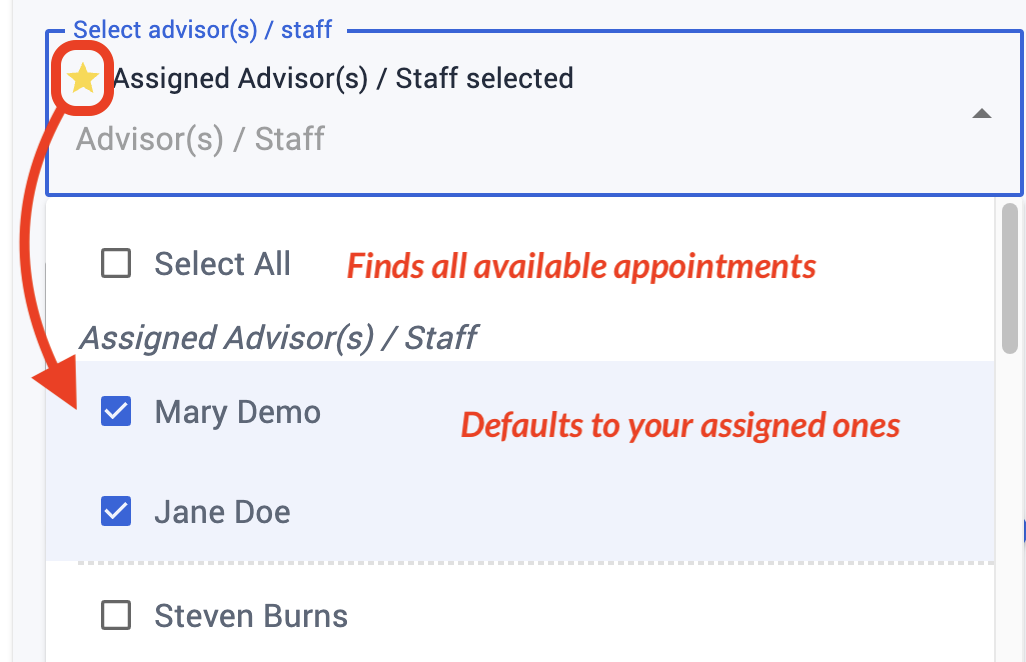
- Date/time — Next, block out the times and days you prefer.
Troubleshooting
If no appointments are returned for you after doing this, start removing filters.
Once you find a slot that works for you, select its Schedule button: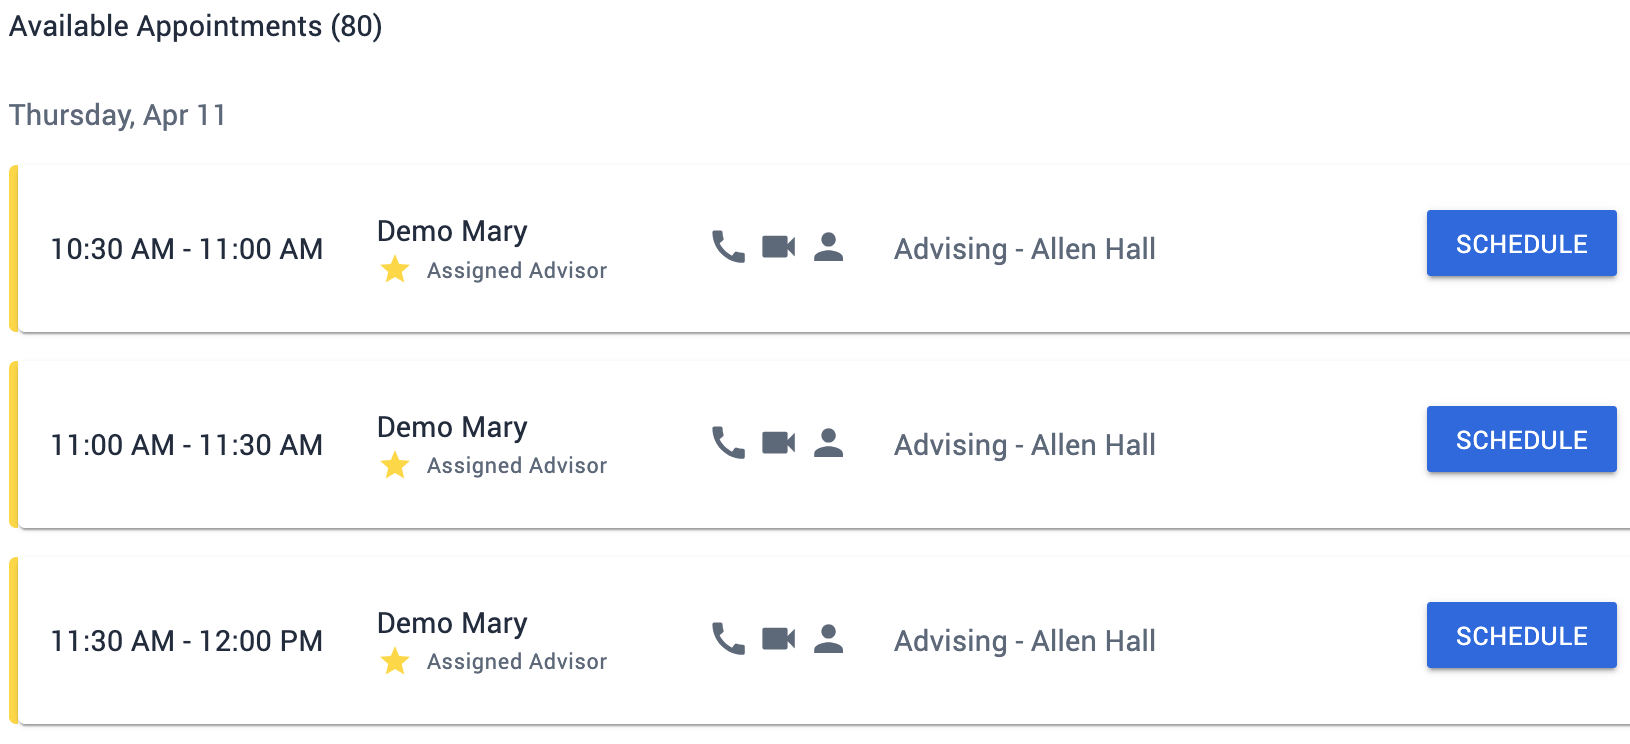
Change Appointments
To verify your appointments and events, choose the first tab on the Calendar page: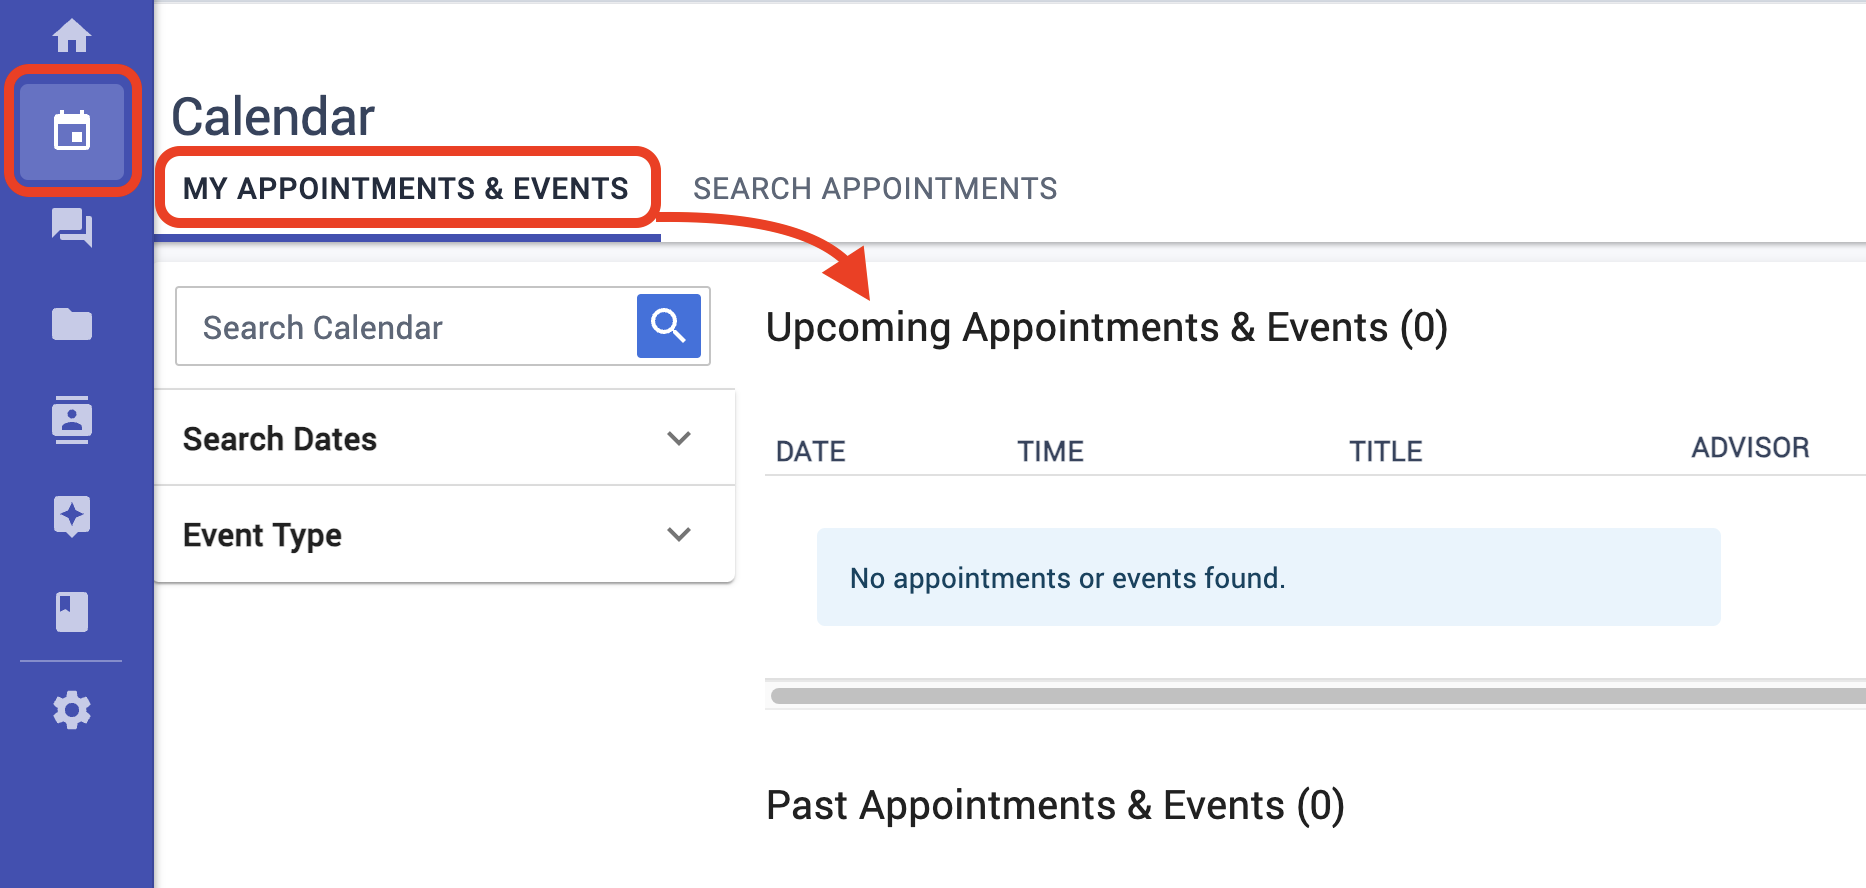
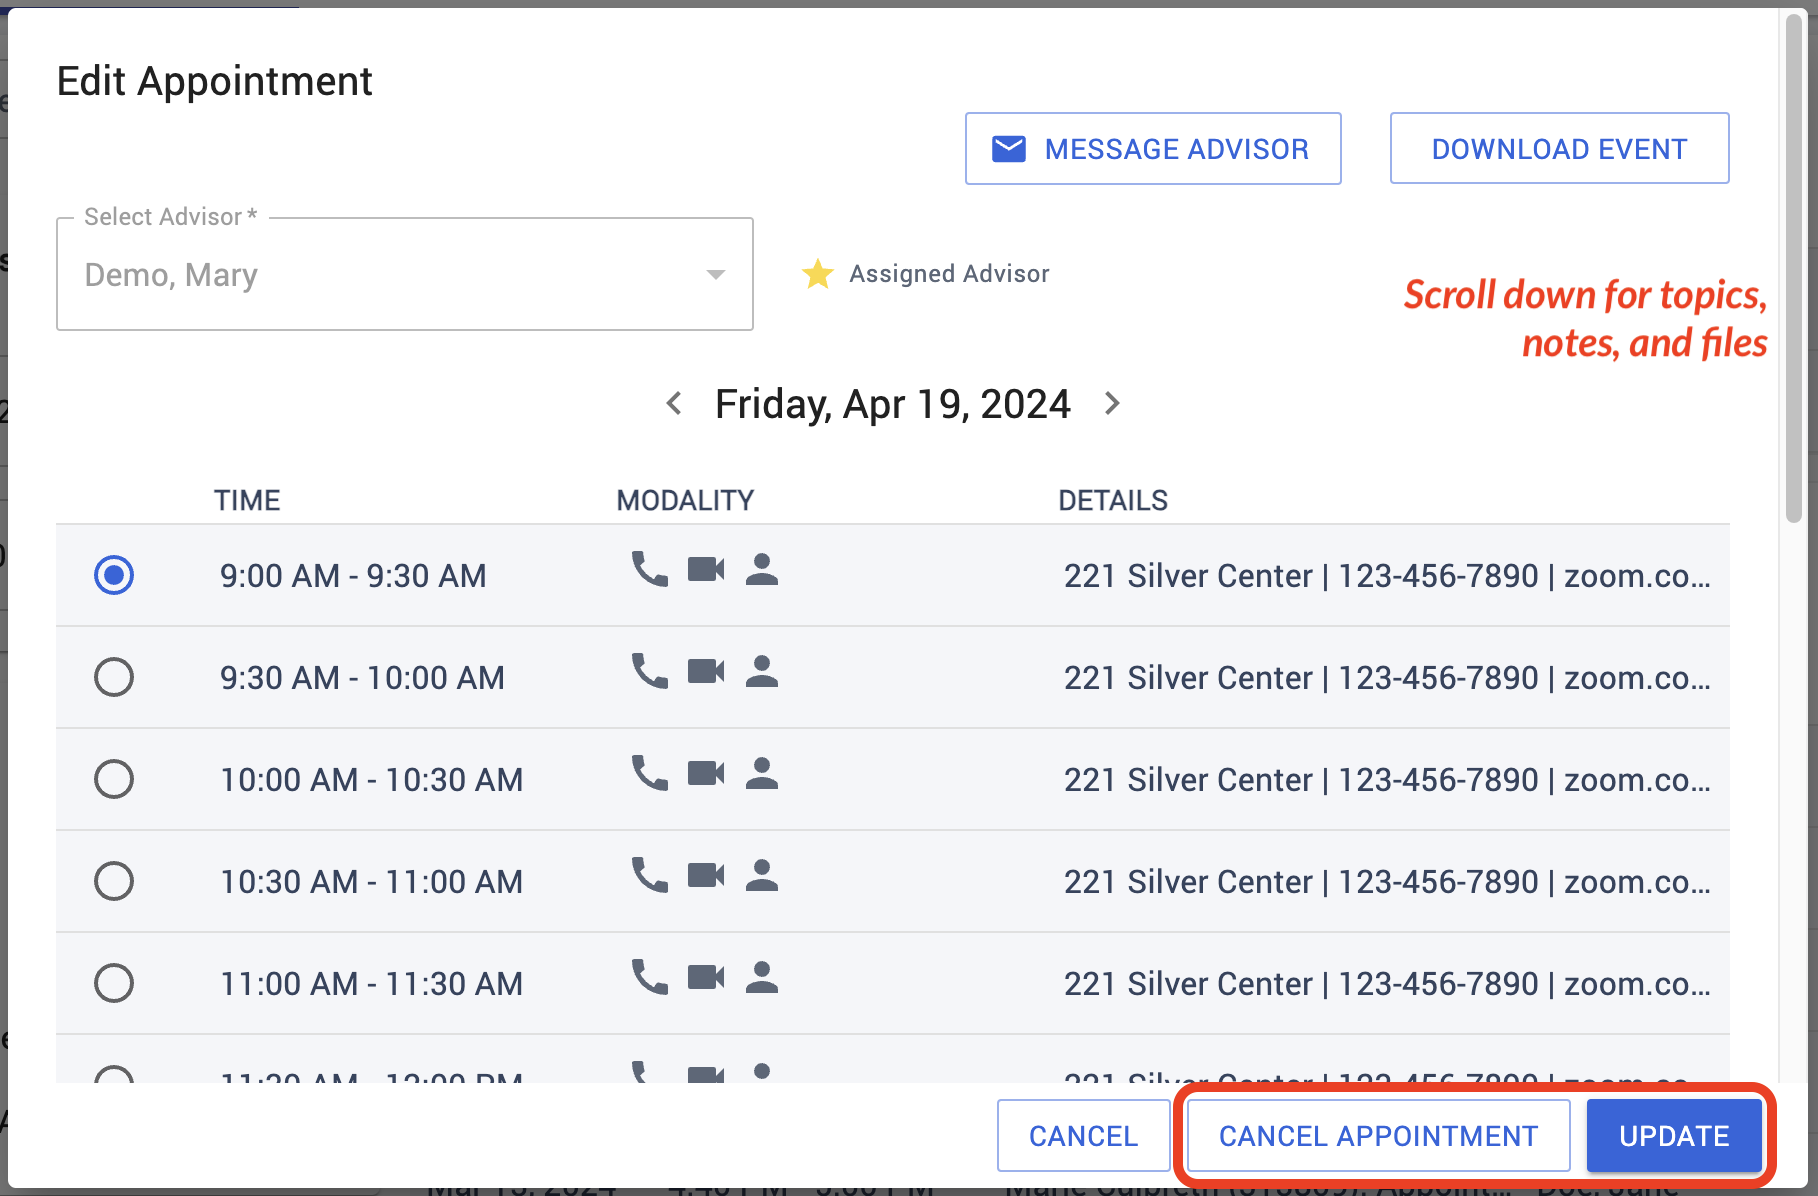
Select View Appointment to open its details, to do any of these:
- Cancel it
- Reschedule it (same advisor, different slot)
- Email the advisor
- Download it for your own calendar
- Change modality, topics, notes, or attachments:

Pro Tips ✔
Remember to scroll down to see the appointment options, notes, and attachments.
Take time to leave clear notes and attachments for your advisor, so they can be ready to help you!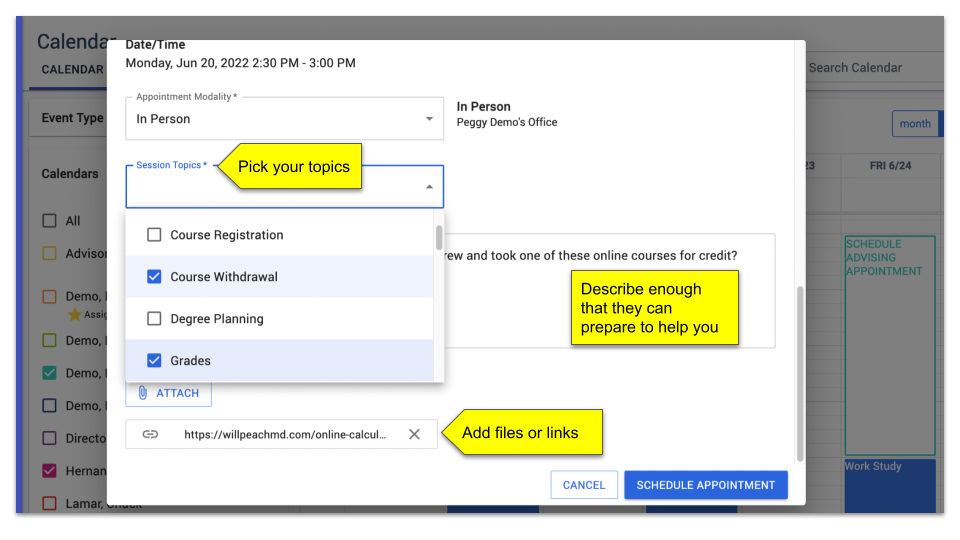
RSVP for Events
Why RSVP? — If you see the option to RSVP, the event may have limited seating and could fill up. When you RSVP, it claims your spot and makes sure that you get emailed in case the event’s canceled, moved, or rescheduled.
Events that you are eligible to attend automatically appear on your list of upcoming appointments and events, but you might need to respond. Select one to see the details and RSVP (look for YES and NO buttons), and add any Questions/Comments that you want to send to the event host:
Important
If you are prompted to RSVP with YES or NO, it means that attendance is being kept and there may be a limit on attendees. If the event is already full, opt in to be notified if a space becomes free. 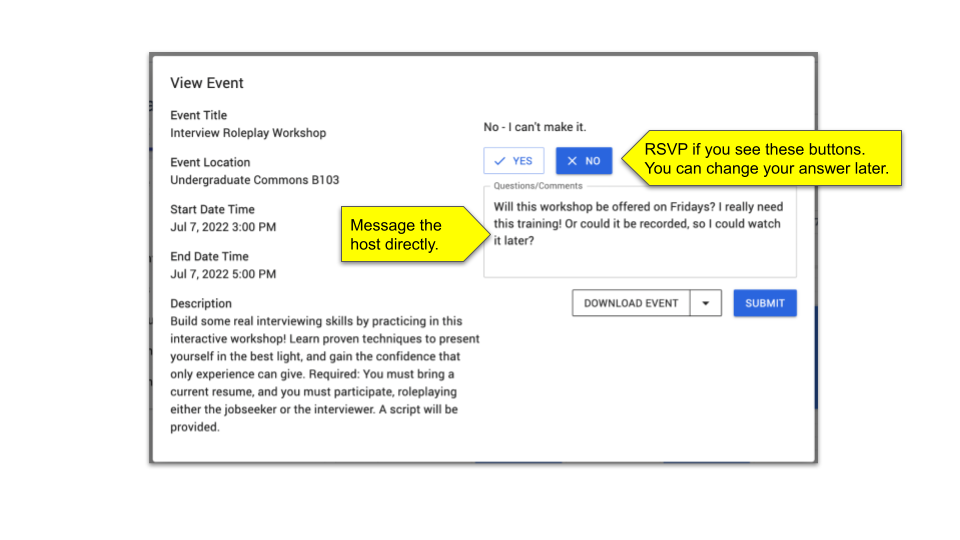
Important
If you are prompted to RSVP with YES or NO, it means that attendance is being kept and there may be a limit on attendees. If the event is already full, opt in to be notified if a space becomes free.
Download Events
Copy to your calendar — Open an event and select Download Event so that you can upload it (as an .ics file) to your personal calendar.
Advising lets you copy events (including appointments) to your own personal calendar by way of an ICS file. This file is a universal calendar format used by Microsoft Outlook, Google Calendar, and Apple Calendar (iCal).
- Open (select View Appointment) and select Download Event. This saves it as an .ics file in your local storage (Downloads folder).

- Using the .ics file you downloaded, upload the event directly to your calendar application.
For Google Calendar, go to Settings > Import & Export, and select your .ics file.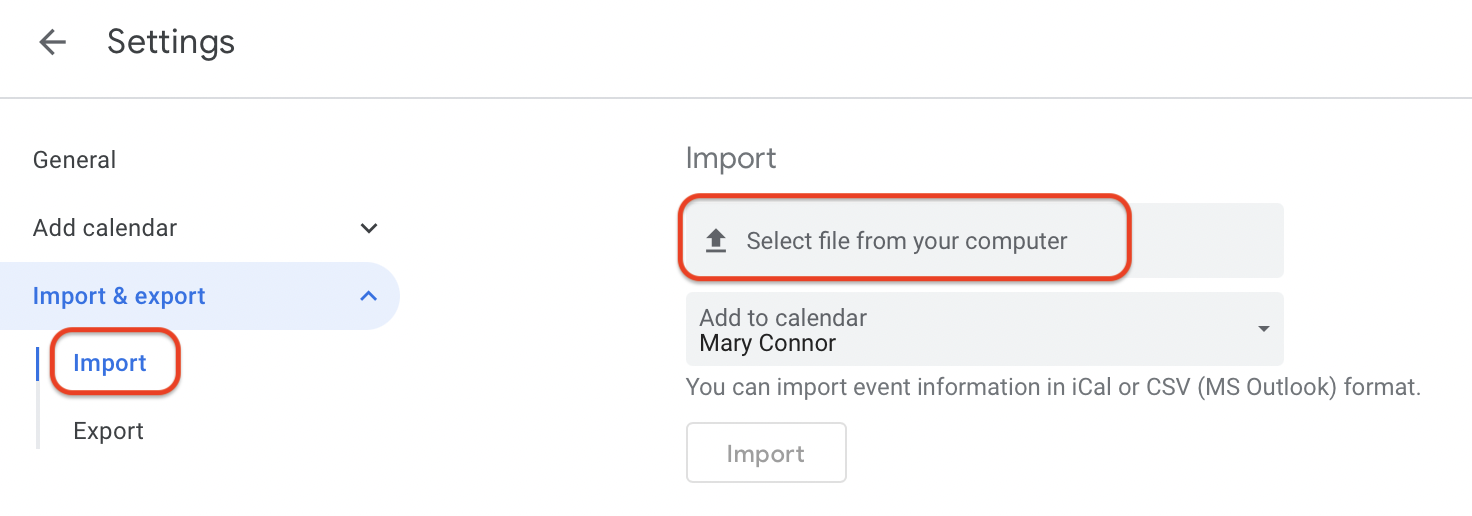
Create Events
The + Create button on the Calendar is a convenience for your private use only, to create events as important reminders for yourself.
Note: Your advisors will not see these.
For example, if you have a weekly student organization meeting to attend, you could enter that as a recurring event. Because it would always show up on your calendar, it would alert you to avoid scheduling any conflicts.