Plan Advising
By working on plans directly with your students, you can offer timely guidance and prevent scheduling mistakes that cost them time and money. As an advisor, you can see academic history as well as plan information about your student, so that you can spot issues, Add to watchlist, and reach out quickly.
Find a plan by searching (by ID or any part of the name) at the top of the page. The top panel provides you the student’s photo, name, preferred name, student ID, and email link:
Planning + Advising
How deeply Planning integrates with your advising workflow depends on whether your institution also uses Civitas Learning Advising. If your institution is using Planning alongside Advising, you have greater reach for helping students.
These are the additional capabilities you have:
- Optimize your effort by identifying those students who need you most via the reports on the dashboard
- Share plans with groups, leveraging static and dynamic groups for sending plans to multiple students
- Share plans with teams, having your students’ plans be visible to other advisors in your group, when they search for students in the Advising view
- See full student profiles, pulled from the SIS (student information system)
- See extra course history information and grades directly from the LMS data integration
- See collected notifications for new comments on your students’ plans
- Capture plan comments into advising notes, so that the concerns and decisions are added to the advising history
- On/off plan and caseload reporting for planning will roll up into Advising
Getting to Advising
Because Advising and Scheduling Tools are different sites with their own authentication, those menu items have icons that show that they open new browser tabs:
Tip
You can have Planning and Advising open side-by-side while you work with a student. Because Advising and Scheduling Tools are different sites with their own authentication, those menu items have icons that show that they open new browser tabs:
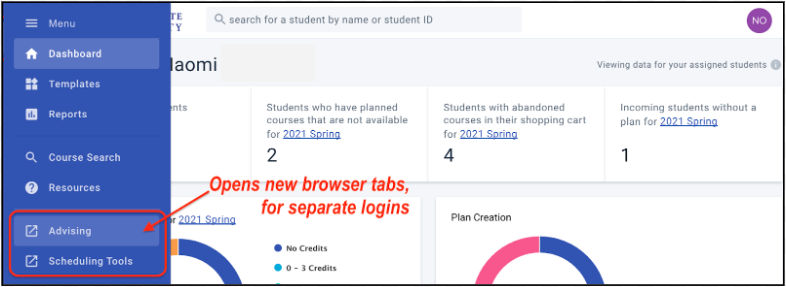
Tip
You can have Planning and Advising open side-by-side while you work with a student.
Dashboard
Academic Planning’s Dashboard (home icon) gives you quick access to your students as well as insights into their academic planning status. These insights guide you in prioritizing your caseload, so you can efficiently help the most students get back on track to graduation.
What you see on your Dashboard depends on whether you have students assigned directly to you:
- No Assigned Students — If you have no students assigned, you only see your private Watchlist of students you are supporting. This restriction protects student information: without student assignments, you’d have access to the plans and contact information for the entire student body.

- Assigned Students — If you have students assigned to you, the data about them is charted above your Watchlist:

Tip
If you seem to be missing students who are part of your assigned caseload, contact Support.
Planning Insights
If you have assigned students, you will see the analytics (engagement opportunity cards and charts) that are specific to them.
Reminder: If you have no assigned students, there is no insight data for you, so the Dashboard just holds your Watchlist.
Engagement Opportunities
The top bar of cards present you with engagement opportunities specific to prioritizing students who need your help with their academic plan.
The engagement opportunity cards run across the top of your dashboard:

When you see a clickable link for a term, that means that there is another active term that you can switch to:
Click an opportunity card to open the list of your students needing attention now:
- New plan comments — Click through to see and respond to plans that have new comments.
- Best practice: Start here first! You don’t receive email notifications about new comments, so rely on this card to stay on top of these student communications.
- Action: Respond quickly with answers that your students are waiting for.
- Unavailable courses planned — Click through to see which students need to change their plans. When you open a plan, a red alert will guide you to the problem.
- Why does this happen? As soon as a term becomes active , the offered courses and sections become official. This triggers alerts if a planned course is unavailable for scheduling.
- Action: Work with students to fix their plan before registration begins.
- Abandoned shopping carts — Click through to see which students stopped short of registering.
- Why is this urgent? The longer a student delays without registering, the more likely it is that their desired sections will fill up. This not only makes them scramble to fix their schedule, it might also block their academic progression.
- Note: This card checks the cart status in Scheduling, not registration records in your SIS.
- Action: Students who are holding a shopping cart loaded with courses are likely having some questions or hesitations about their term choices, so it’s a good time to engage them.
- Incoming students without a plan — Click through to see which incoming students still lack plans.
- Why just incoming students? The longer an incoming student goes without putting a plan in place (and getting support from an advisor), the worse their chances for persistence and success at your institution. This is a concrete and necessary moment to engage them.
- Action: Review the list of students and assign templates accordingly.
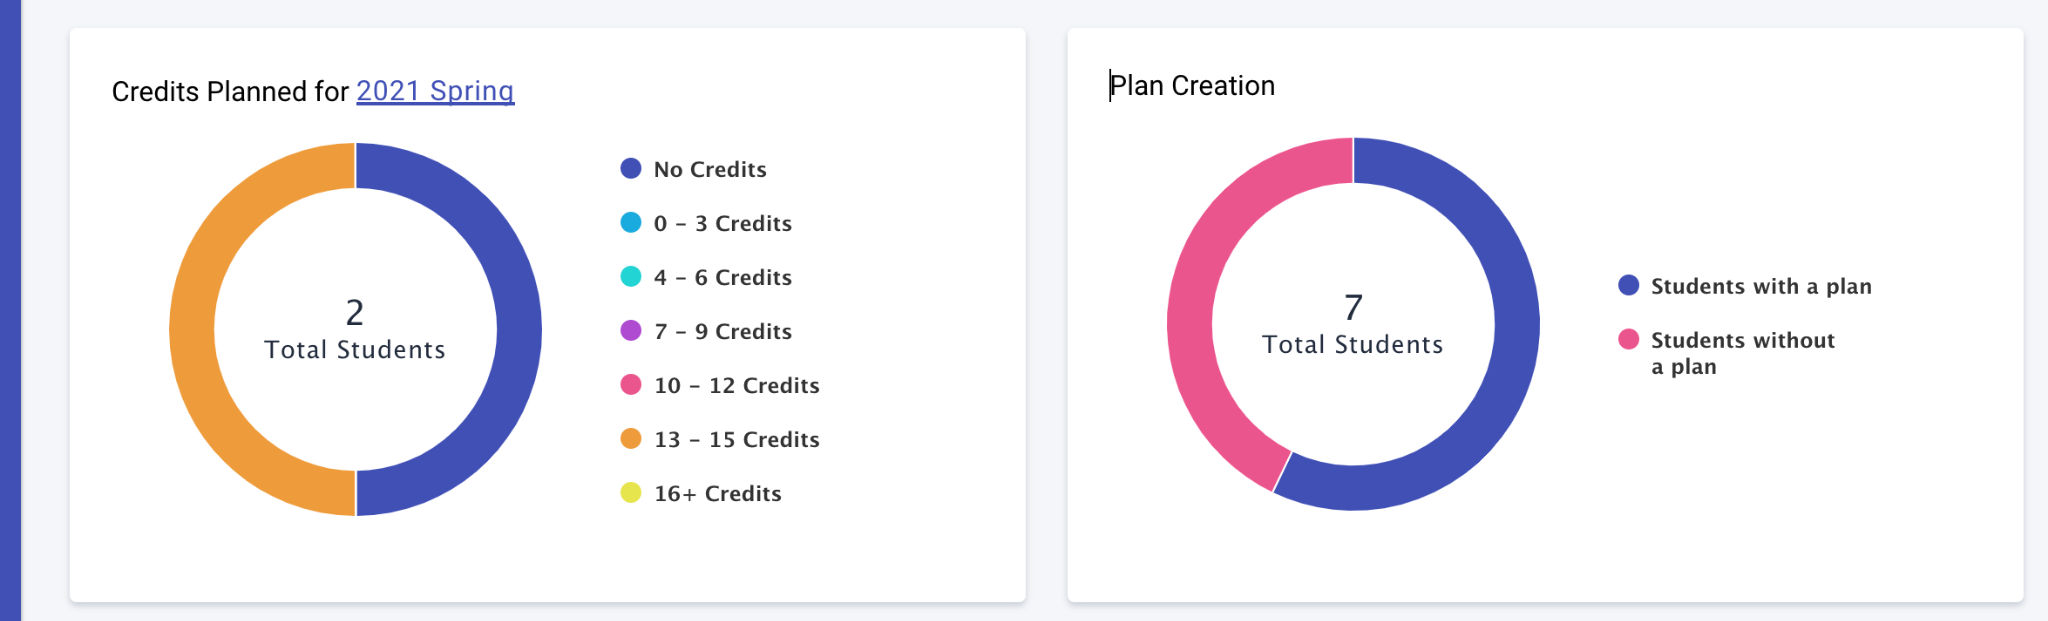
Insight Graphs
The row of charts presents you with visual metrics about your students’ plans:
Remember
Whenever you see a clickable link for a term, that means that you can switch to checking a different term. The chart will redraw immediately after you select a new term.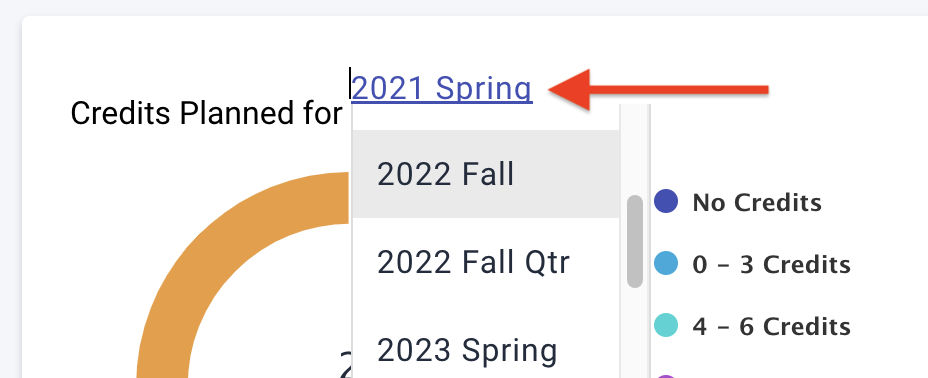
Click a segment of the pie chart to open the list of your students needing attention now:
- Credits Planned — Click through a pie segment to see which students have that target number of credits planned on their primary (Active) plan for the chosen term. (To be included in this chart, a student must have a primary plan and have this term on that plan.)
- Variable credits: These credits are placed in the bucket for the low end of that range.
- Action: These are concerns that you could surface with these metrics:
- No credits: Is this due to a non-credit item? Could credit be earned for it?
- Part-time students: Could you add just one more course? What is blocking that?
- Full-time students: Do you have enough credits to maintain your financial aid?
- Too few credits: If you don’t take a full load, will you graduate on time?
- Excessive credits: Will you be successful with this heavy load? Are there other options?
- Plan Creation — Click through the pie segment for Students without a plan to access the list of students who need your help starting a primary plan.
- Which students are included?
- Incoming students (not prospects) assigned to you
- Active students of all academic levels (not inactive ones) assigned to you
- The graph totals don’t match!
- The Plan Creation graph might show a higher number of Total Students because it includes all active students, with or without a plan.
- The Credits Planned graph shows only those students that have both (1) a primary plan and (2) a term on that plan matching the one selected on the graph.
- Action: For students without a plan, see if they would benefit from applying a template, or help them build a plan.
- Which students are included?
Watchlist
The Planning Watchlist is a list pinned to your Dashboard for your convenience only: add students that you want to access quickly, and remove them when your planning support is no longer critical.
No students assigned — If you don’t have an assigned caseload, adding students to your watchlist is your essential tool to track students who require follow-up or extra support.
To add a student, start by using the search bar at the top of the page. You can type in their name or Student ID and the results will populate and narrow accordingly. Then click the name of the student and you will be brought to their Planning page.

Important
No notifications, consequences, or advising flags or notes result from watchlisting.
You build your own Watchlist as best suits your needs:
- Add a student — After opening the student’s plan, click the circle to enable Add to watchlist.

- Remove a student — Click the circle to select Remove from watchlist, which clears it.

- Sort your list — Click on any of the column headers.
- Reverse the order — Click on the same column header again, which flips the sort order.

PLAN
What to Monitor
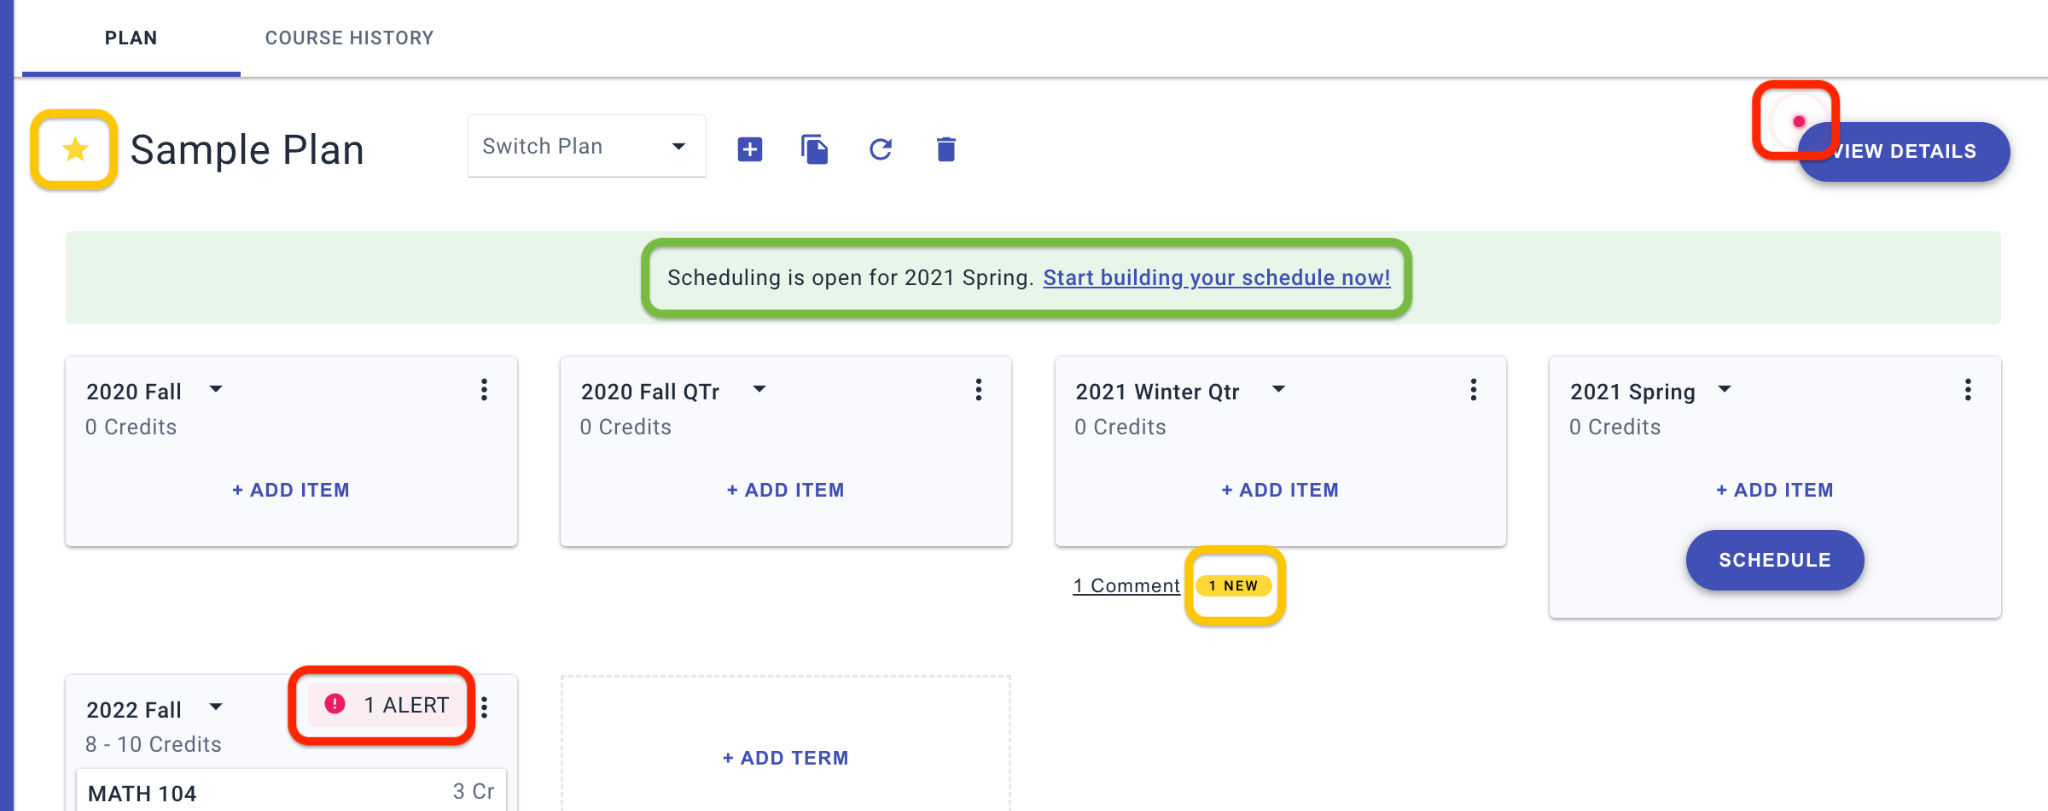
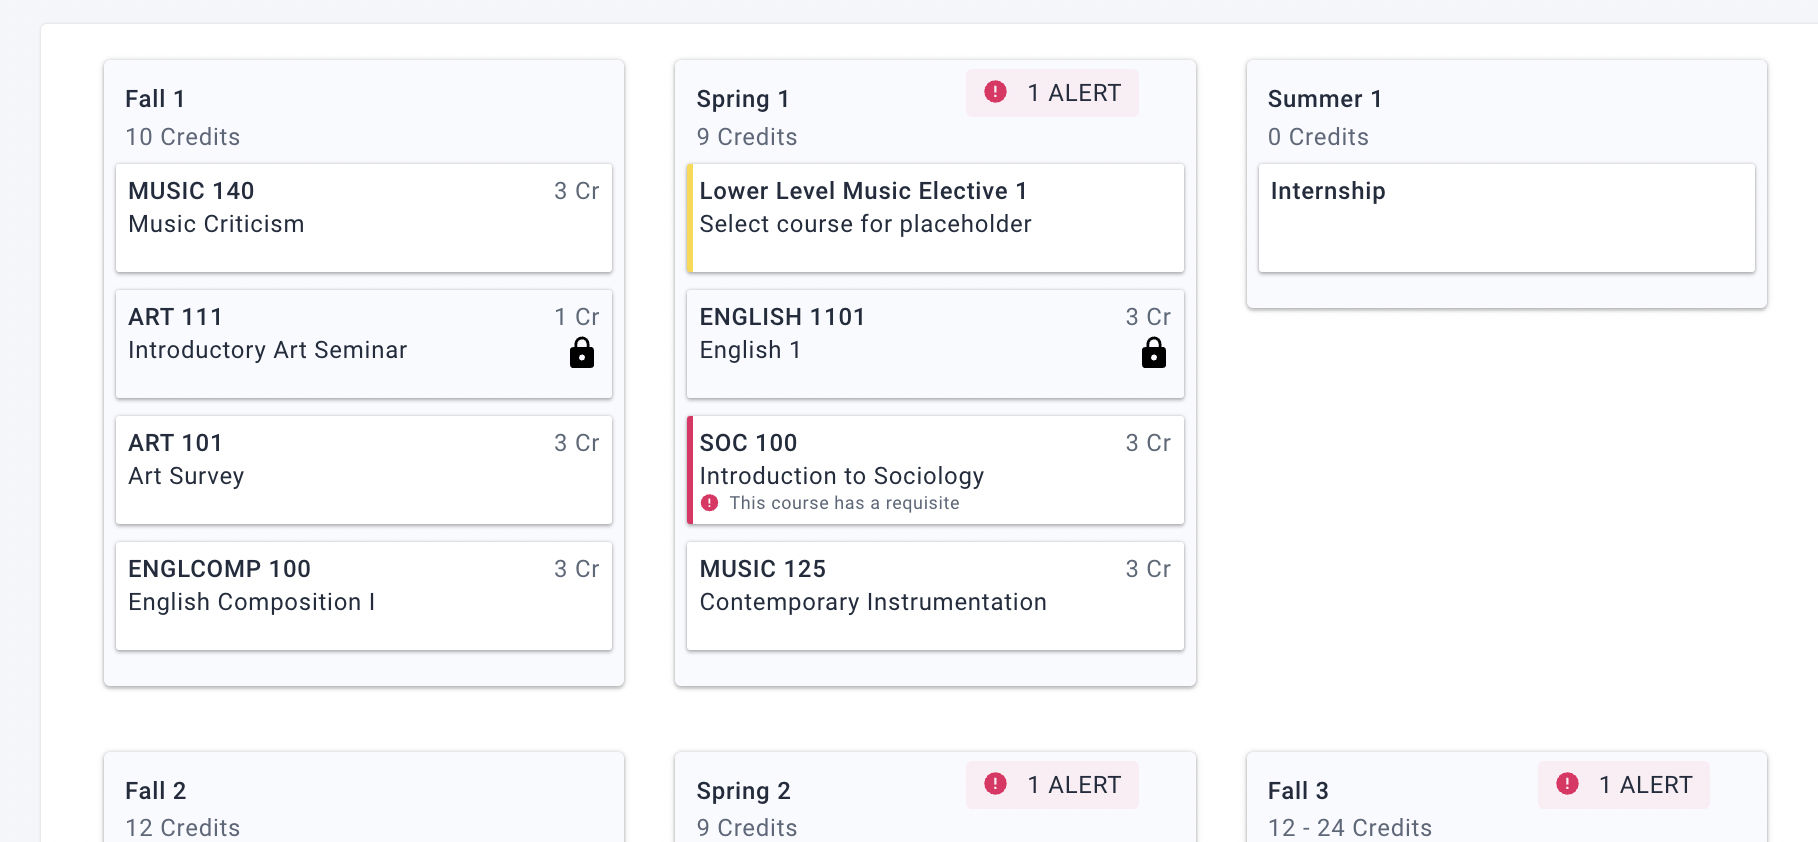
Each time you open student plans, scan for these visual alerts:
- The star ⭐ flags the student’s primary plan. Only one plan may be primary (active). The primary plan should be the student’s current, chosen plan.
- Take action: If you see courses on the primary plan that don’t match what the student is enrolled in, reach out to them.
- Change Log — A pulsating red dot near View Details means that the student made one or more changes for you to review. Open View Details and select the Change Log tab.
- Alerts — Red alert ( ! ) flags at the top of a term let you know where problems exist with planned courses.
- Scheduling — A green banner will appear under the plan title to alert you if open registration has begun, which means the student should start scheduling now.
- Comment — A yellow NEW marker next to a Comment link means that new content needs your review. Open the Comment link.
Working with Plans
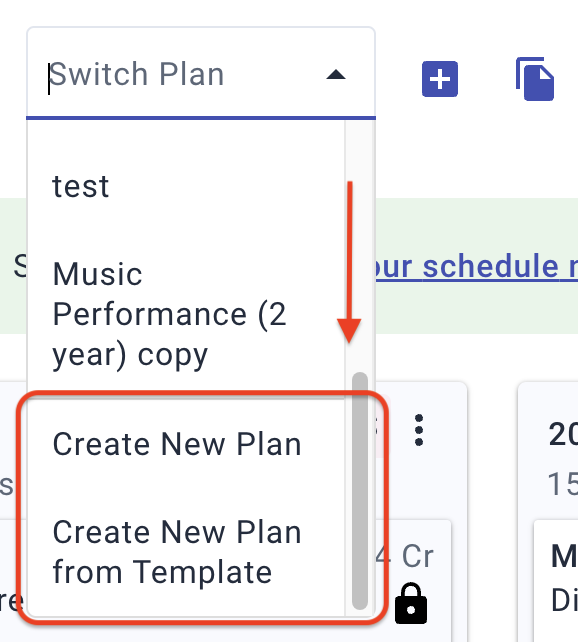
Switch Plan — Use this drop-down list for quick actions on behalf of this student: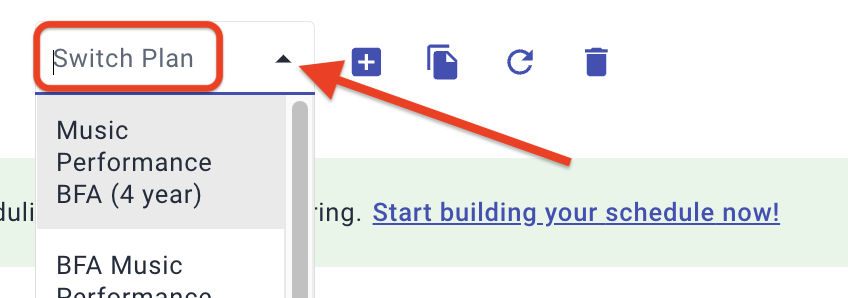
- Open another plan that they have
- Create a new plan for them, with or without a template (scroll to the end of the drop-list)
To edit any of these plans, you can make your changes directly by adding or removing a term, or adding, removing, or moving a course.
Best practices
- Add a comment explaining why you made a change, for the student and for tracking.
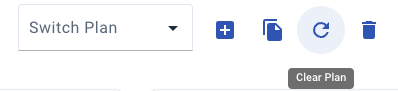
- Be aware that there is no undo, and that changes are saved immediately. If you know that you need to make significant changes, first copy the plan (select the Copy Plan icon), which can become the new primary plan as needed.
- Use the Clear Plan and Delete Plan icons with caution: these actions cannot be undone, which is why dialogs will prompt you to confirm your choice and select a new primary plan if needed.
⬜ Sample Workflow
Arya wants to show her student Ty how he might squeeze in a Government minor and still stay on track for graduating on time. She types “tyrone” in the top search box and finds him quickly from the list of Tyrones currently enrolled. She selects his PLAN tab and scans for any new changes or comments. Seeing none, she selects the Copy Plan icon from the command bar and updates the plan Title to include the minor. She adds the courses and the additional summer session that it would take. Ready to propose this to Ty, she selects the Send email to student link, which is the envelope icon next to his name.
Terms
These are the ordered set of semesters or sessions that are being planned out, including blocks that might need to be scheduled, such as Summer and Winter terms.
Start terms — If it’s common at your institution to have similar but slightly different templates for different start terms, there should be templates for both scenarios: “Art History – Fall Start” and “Art History – Spring Start”.
Adding Items to Terms
The + ADD command offers a choice between looking up a course directly from the catalog or inserting some type of placeholder into the plan: 
Add a course — This lookup is specific to active courses in the catalog:
- At the bottom of the term, click ‘+ ADD > Course’.
- Click into the “Course” field and type-to-search for the name.
- From the auto-suggested matches, select the one you want to add.
Add a saved placeholder — This process is the same for both course and non-course placeholders, relying on the placeholder’s Title for you to find it by type-to-search:
- At the bottom of the term, click ‘+ ADD > Placeholder’.
- Click into the “Placeholder” field and type to search for the name.
- From the auto-suggested matches, select the one you want to add.
- If you cannot match the title through search, go to Templates to see the full listing.
Add a new placeholder — If you need to give the student a placeholder (such as a reminder) that isn’t in the template library, you can add one yourself:
- At the bottom of the term, click ‘+ ADD > Placeholder’.
- Click into the “Placeholder” field and type the name for your new placeholder.
- Press Enter or select “Add {your title}” to create it.
- Click to open the placeholder and configure it.
If this will be a course placeholder, be sure to slide the Course Placeholder toggle:
Courses
These are active courses (not sections) from the current catalog that are being planned out.
- To add one, select + Add > Course from the bottom of the term and type to search for it.
- To move a course, drag it to another term’s panel.
- To require or lock a course, open (click) it to access its details, and drag the toggles.
- To remove the course from the entire plan, open it and select Delete (bottom left).
Course Status
The plan alerts you to the audit status of each course with colored icons, which help you track progress and make timely plan corrections:
| Completed Courses | Incomplete Courses |
| Satisfies requirements Satisfies no degree requirements |
In progress Registered (will change to In progress) |
Course Placeholders
Course placeholders are visual flags to prompt the student to take action and select a course that meets the requirement. When the student clicks the placeholder, they type to search the course catalog according to the placeholder’s instructions, or they choose from a prebuilt set of courses.
Course placeholders are flagged with yellow highlighting, which alerts the student that they have options to pick: 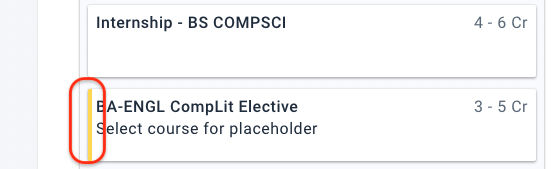
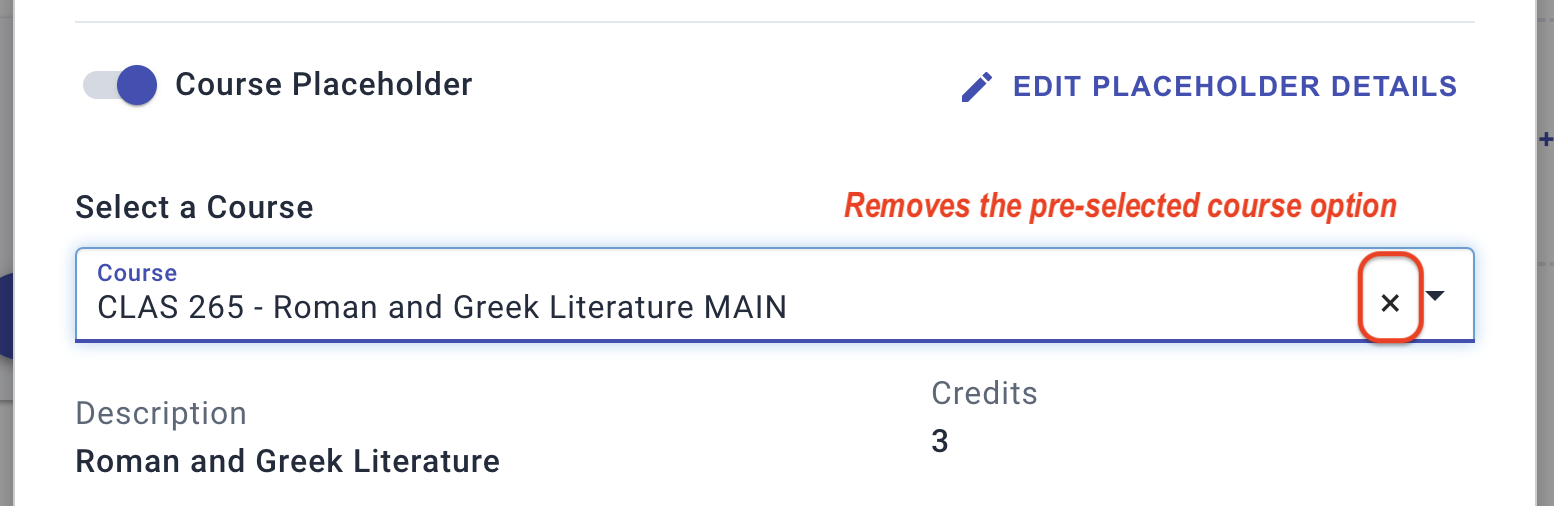
As soon as you or the student opens the placeholder and selects a course, the placeholder’s name is replaced by the course, but the yellow highlighting remains as a flag. To pick a different course, just open (click) the placeholder: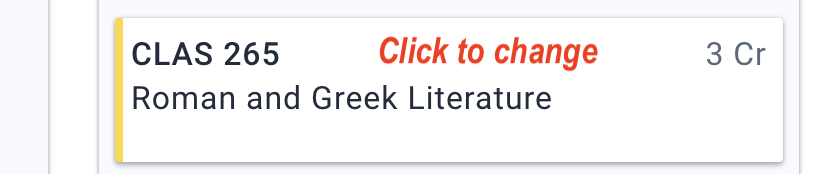
- To make a course selection, pick from the Select a Course drop-down list.
- To add or remove courses from this student’s placeholder, select Edit Placeholder Details.
- To remove the current course selection, click the ✕:
To put a placeholder on the plan, select + Add > Placeholder.
- To create a new placeholder, type in a title and select Add.
- To add a predefined course placeholder, type words from its title (to filter the placeholders) and select the one you want from those that appear in the dynamic list:

Note
Reusable course placeholders can only be added by advisors. Students can create their own non-course item by typing in the field when adding an item, but they will not see suggestions from the Placeholder Library.
Non-Course Placeholders
On templates, non-course placeholders hold suggested or required milestones, such as internships and program applications. On a student’s plan, add new non-course items to plan their individual commitments, reminders, and activities, such as work-study and study abroad.
- To add a predefined non-course item on a term, select ‘+Add > Placeholder’, start typing the title, then select the item from the search results.

To add a predefined non-course item on a term, select ‘+Add > Placeholder’, start typing the title, then select the item from the search results.
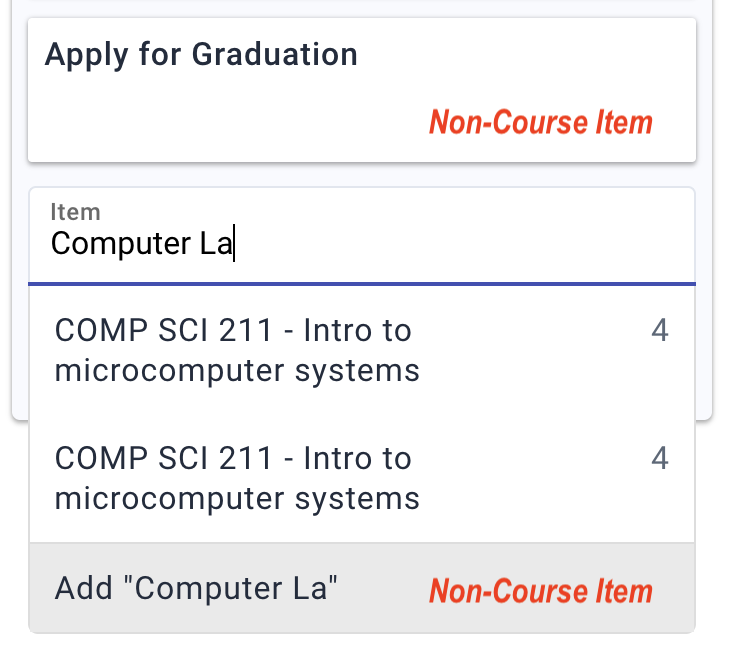
- To create a new non-course item on a term, select + Add > Placeholder, and start typing the title of your new entry. As you type, fewer and fewer results will populate in the drop-down list, so you can then select the final “Add …” option and this non-course item will then appear on the term.
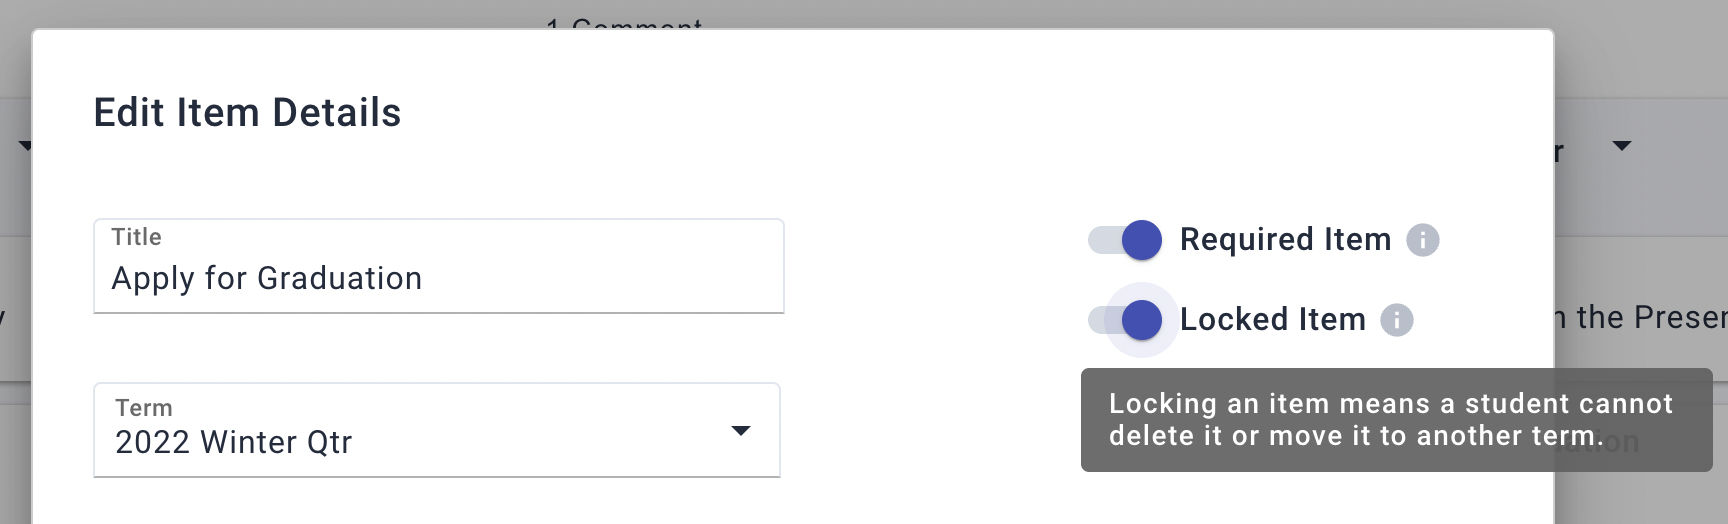
Required and Locked Items
Important
If your institution elected to have all items on plan templates be Required, that setting applies to every template in your library. Institutions choose this setup so that students can move but cannot delete any courses from the plan they receive without an Advisor’s help.
On both templates and individual plans, you can require and/or lock individual courses, non-course items, and placeholders. To enable or disable each, slide the toggle.
- Required — Students cannot delete an item flagged as required, but they are free to move it to a different term.

- Locked — Students cannot delete or move a locked course. Locking can help prevent errors, such as when moving a course from a term would jeopardize the timing of subsequent courses. They must work with you to have the lock changed.
Registered Courses are Locked
To help track the scheduling status of courses, a student’s plans, requirements, and course history show the status of “Registered”, up until the term starts. To refresh this status, run the Update (audit). Note that this does not apply to course equivalents.
What “registered” means — A scheduled course is registered if:
- The term and section have not yet started
- There is no grade for the course yet
- The student hasn’t withdrawn or dropped the course
Locking on Plans — On the bottom left of a course tile, the Registered (empty blue circle) icon and message will show for a scheduled course until it changes to In Progress.
- If the course is dropped or withdrawn before the drop deadline, it’s no longer registered and you are free to move the course to another term.
- You can’t delete a registered or in-progress course from a plan, but you can move it if it is on a different term than shown in the audit.
Course Alerts
Planning sends the same alerts to advisors and students. There are several types of alerts (flagged with red) that Planning offers to head off scheduling trouble:
Course requisites — For each course added, Planning uses alerts to warn you about any and all requisites (audit requirements) that could block them from taking a course:
- prerequisite — something they must complete first or test out of, such as an introductory course
- co-requisite — something they must take at the same time, such as a required lab section for Biology
If you add or view a course that has dependencies, you will see all of the requirements highlighted. The student can opt to remove that course or take action to meet the requirements (complete the prereq or add the co-req).
Tip
If anyone chooses to Dismiss the alert message, the course requirements will still be visible.
Duplicate courses — Planning alerts you if you try to add a course that already appears in another term of your plan. You will see the alert on both instances of the duplicated course. To get rid of the alert, delete the course from one of the terms.
Tip
If the student is still deciding which term to take the course, they can opt to Dismiss the alert, which dismisses the warning.
Unavailable courses — Planning alerts you if their planned term includes courses that aren’t available for scheduling in the current term. These alerts kick in when registration for the term opens, which means the actual courses and sections are now official. The alert will warn you that the course may not be available for that term, to give the student time to adjust the plan before scheduling and registering.
Course no longer active — Sometimes courses are no longer offered at an institution. When a course no longer has an effective Status of “active”, it’s no longer available for the student in the future. If a new version of this course is available, we will update the course accordingly. If not, this alert will be surfaced to prompt you to help the student decide on another course to take in its place.
Commenting on Plans
Comments appear below a given term, and they are stored (and deleted) along with the plan that holds them: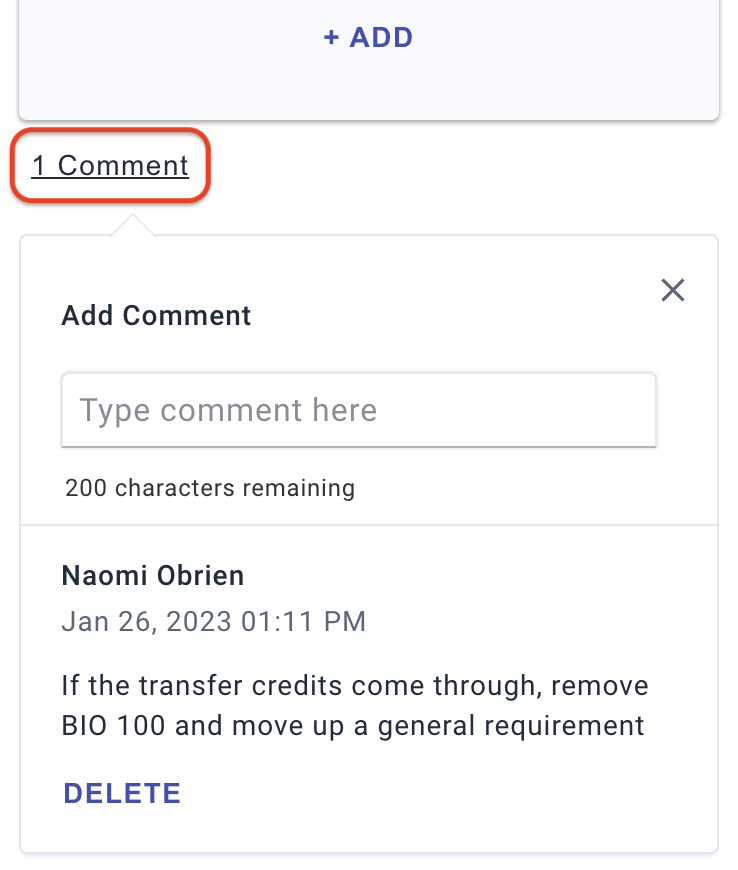
The purpose of comments depends on where they are created:
- On a template, comments are for general advice, reminders, and cautions.
- On a student plan, comments let you communicate personally with the student in a way that is visible to everyone involved with that student’s plan.
Comments appear in real time, like chat messages: you never need to refresh the page to see new comments. Just as with messaging, notifications about new comments remain visible on a plan until they are opened.
Important
No external notifications (such as email) are available currently. Urge your students to contact you directly if they have time-critical plan comments needing your quick feedback.
Privacy — Keep in mind that the student and every staff member who can access the student can see the comments, as well as everyone with whom the plan is shared. Never put possibly sensitive information on a student plan: restrict them to Advising notes for the student.
Requirements (Audit)
The Degree Requirements page provides full-page viewing of the existing degree audit requirements for the current student, even if they do not yet have a primary (active) plan created. The page is available to both students and advisors, via different navigation, and it pulls the same audit information that displays in the View Details pop-out pane of an academic plan.
Note
If your institution does not have your audit system integrated, these features are hidden. Instead, you see a link to the page that must be used for audits.
You view the student’s Degree Requirements as a tab in their dashboard. To quickly focus on requirements that still need to be added to the student’s plan, enable the Hide Planned Requirements and Hide Completed Requirements options: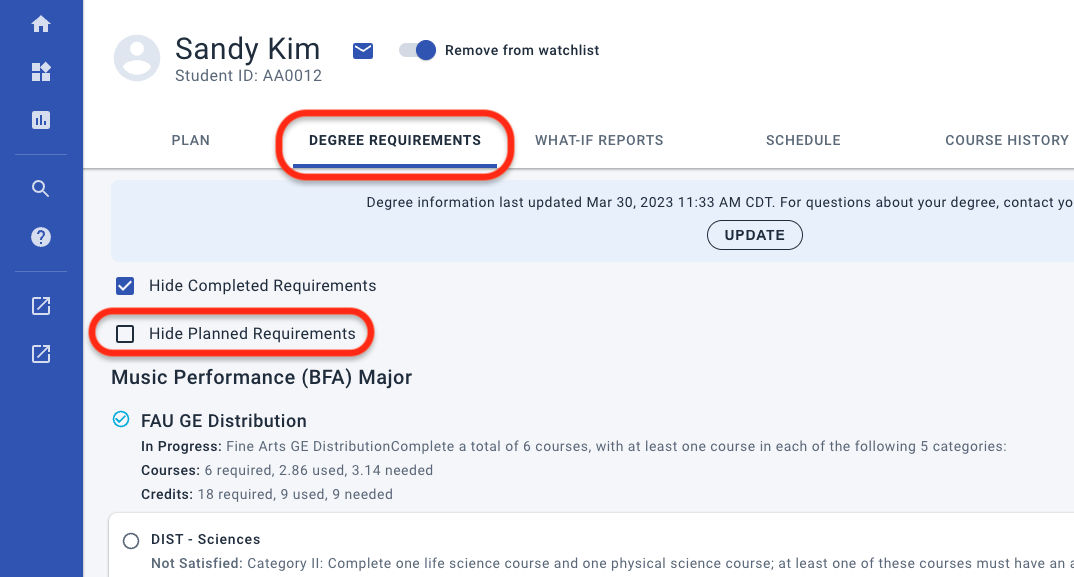
Undeclared majors — What will surface as degree audit requirements for undeclared students depends on how this is managed at your institution. For example, General Education requirements may appear for all active students.
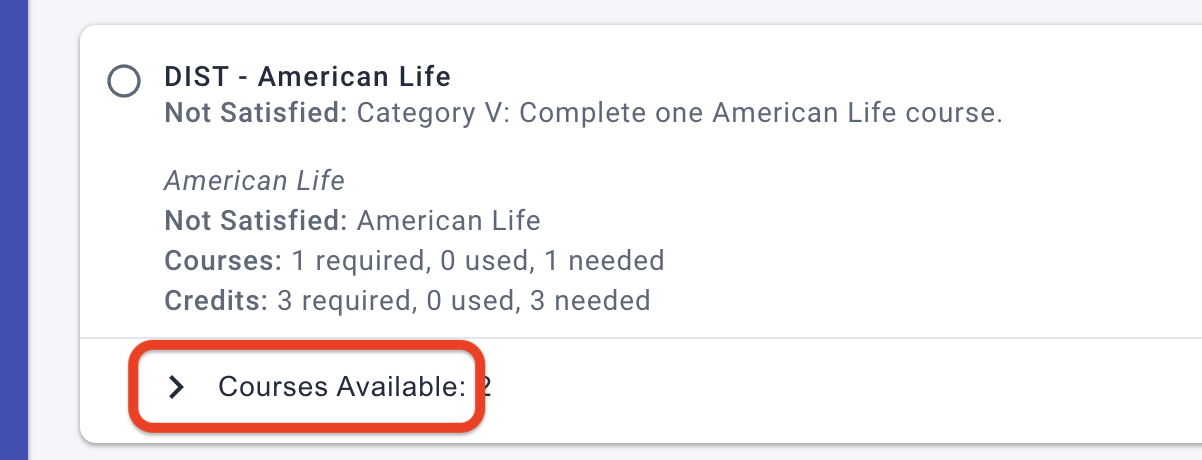
Adding Requirements to Plans
For unmet requirements (empty circle icon), the Degree Requirements page lists the courses that could satisfy the audit. Expand the Courses Available drop-down list for a given requirement to see the choices. If a Primary Plan exists for the student, a Select Term drop-list lets you add a course directly to a specific term:
Printing Requirements
On the Degree Requirements tab (not the plan Details), you can choose to Print the requirements:
These are ways to optimize what appears in the printout:
- Choose the print option Save as PDF to export a file to store and share.
- To trim it down to only what’s remaining to be taken, first enable Hide Completed Requirements.
- To trim it to only what still needs to be added to the plan, enable Hide Planned Requirements.
- To include all of the course options related to each requirement, expand each of the Courses Available panels before you select Print:
- Locate the UPDATE panel on the first page of your printout to determine how fresh the audit data was when it was generated.
Audit Status and Freshness
Best practice
Be sure you’re always working with the latest audit data. Select the Generate button for a new plan and Update for an existing one. The time of the last update appears at the top right of every plan.
The plan shows icons next to courses to help with status tracking. Click on an icon to see specifics on how that course applies to the primary (active) degree program, such as in this example:![]()
As with the plan, course status is displayed on the Degree Requirements with icons before each course. As a rule, solid icons mean that a course is complete, and outline icons mean that they are not: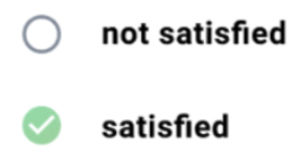
Dynamic Auditing — Currently, plans do not reconcile dynamically against degree requirements, nor do catalog lookups filter by them.
Important
If what the Requirements show looks wrong, check the auditing system. The authority determining their degree progress is the auditing system, not Planning.
SCHEDULE
On the Schedule tab, you can check the student’s progress toward registration and access your student’s Current Schedule. The term specified will always appear on the page:
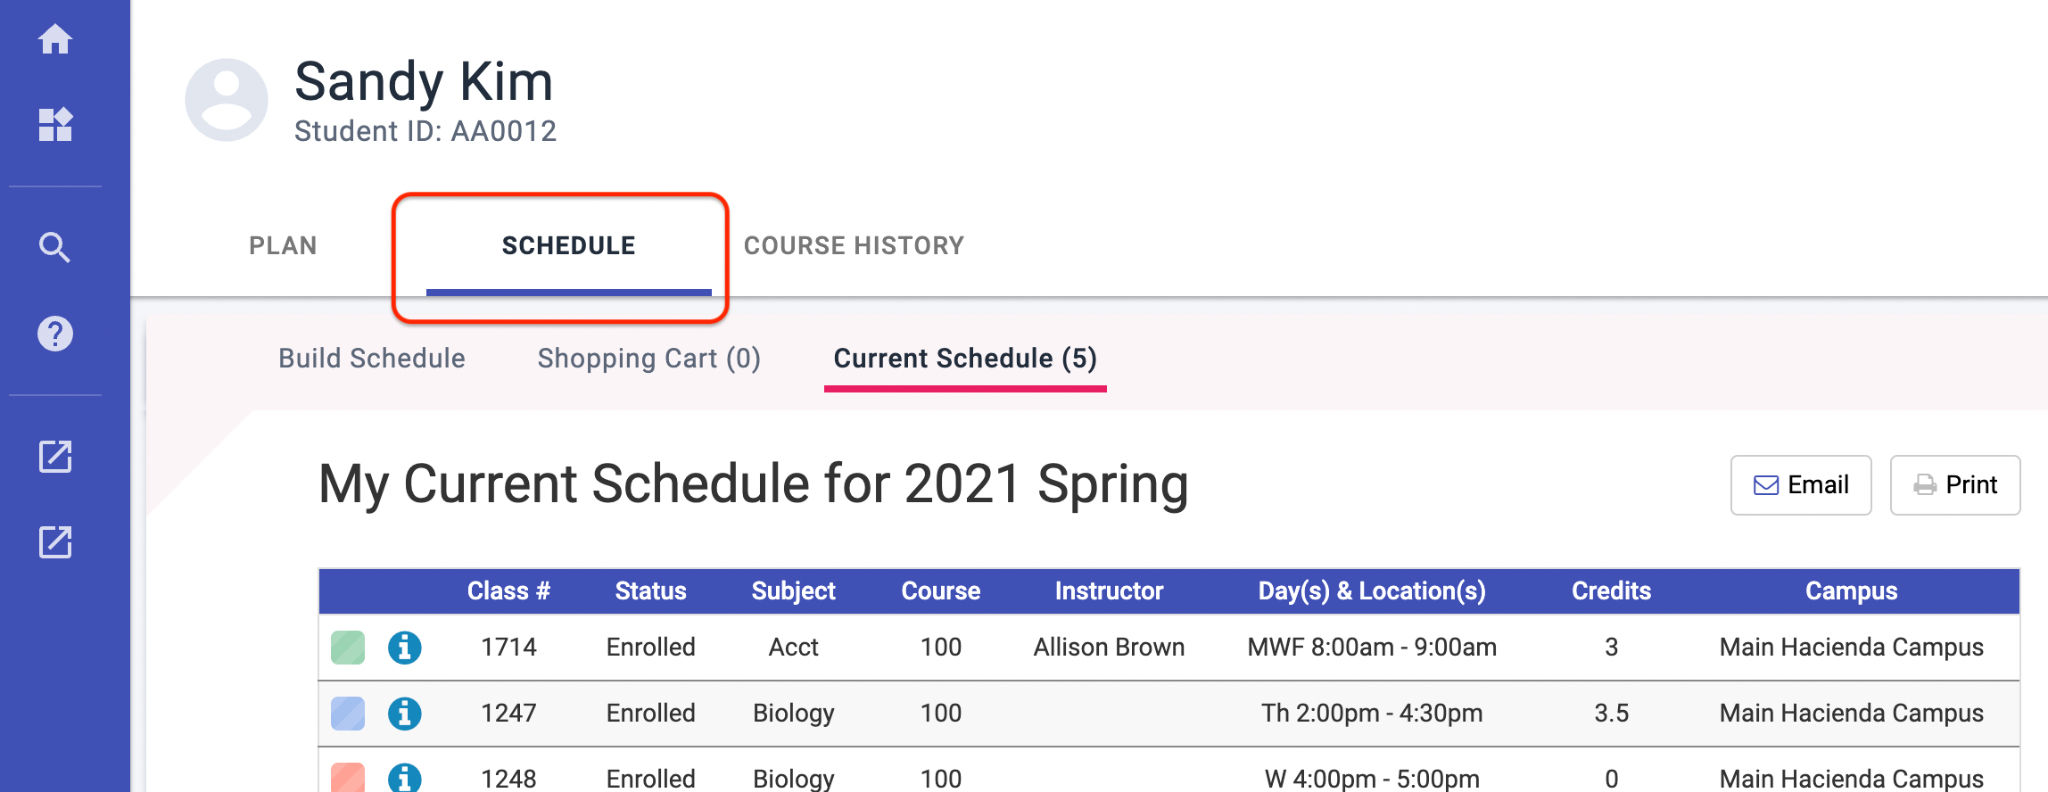
These are ways to get to Scheduling, to help your students build their schedules:
- On their plan, select the Schedule button or the green banner announcing open registration.
- Open Scheduling Tools (bottom link on the left side menu) and use Sample student login to schedule on their behalf.
Tip
If you know of helpful activities, such as weekly tutoring hours, that this student should access, you can add this to the Breaks section of their schedule, to reserve that opportunity. The student is free to delete your suggested breaks.
Repeated Courses
Scheduling checks the courses it pulls from the plan for having already been completed, reporting which active terms (one or more that are open for registration) they would be added to.
If the course should not be taken again, clear the Include checkbox; if the course is one that should be registered and repeated, keep Include enabled. Once this choice is made, it is remembered: Scheduling will not prompt for these completed courses.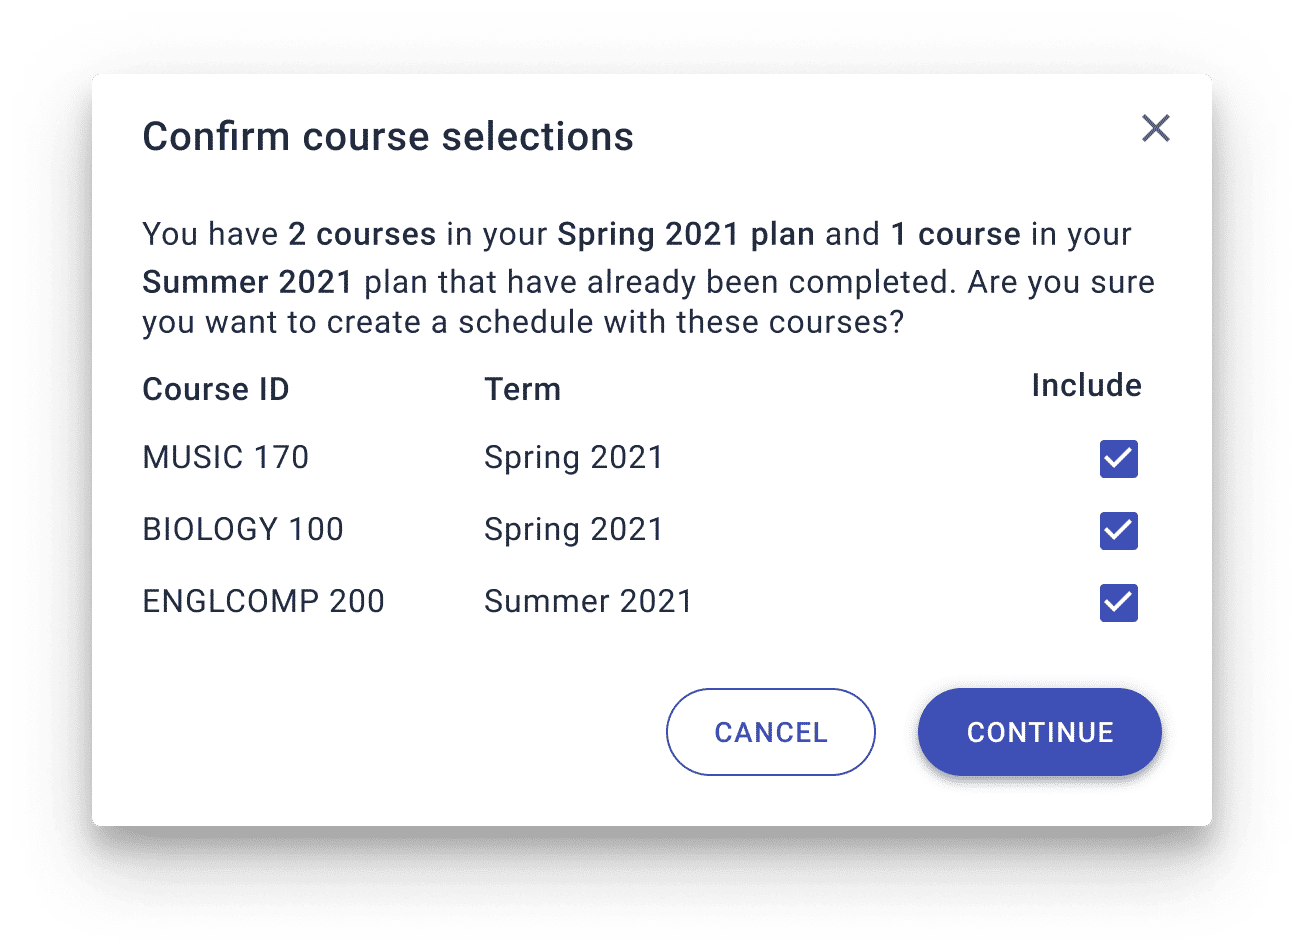
COURSE HISTORY
While the plan focuses on the student’s future, the Course History tab covers their past and present. It charts and lists the details of their total activity toward their credential:
- Current courses
- Completed courses
- Transferred courses
- Waitlisted courses
- Withdrawn courses
Progress Summary — The chart tracks their GPA over time, and it summarizes their course totals at right. All of the information on this page is current as of the Last Updated date shown in blue, at top. Hover over points on the chart to see the details:
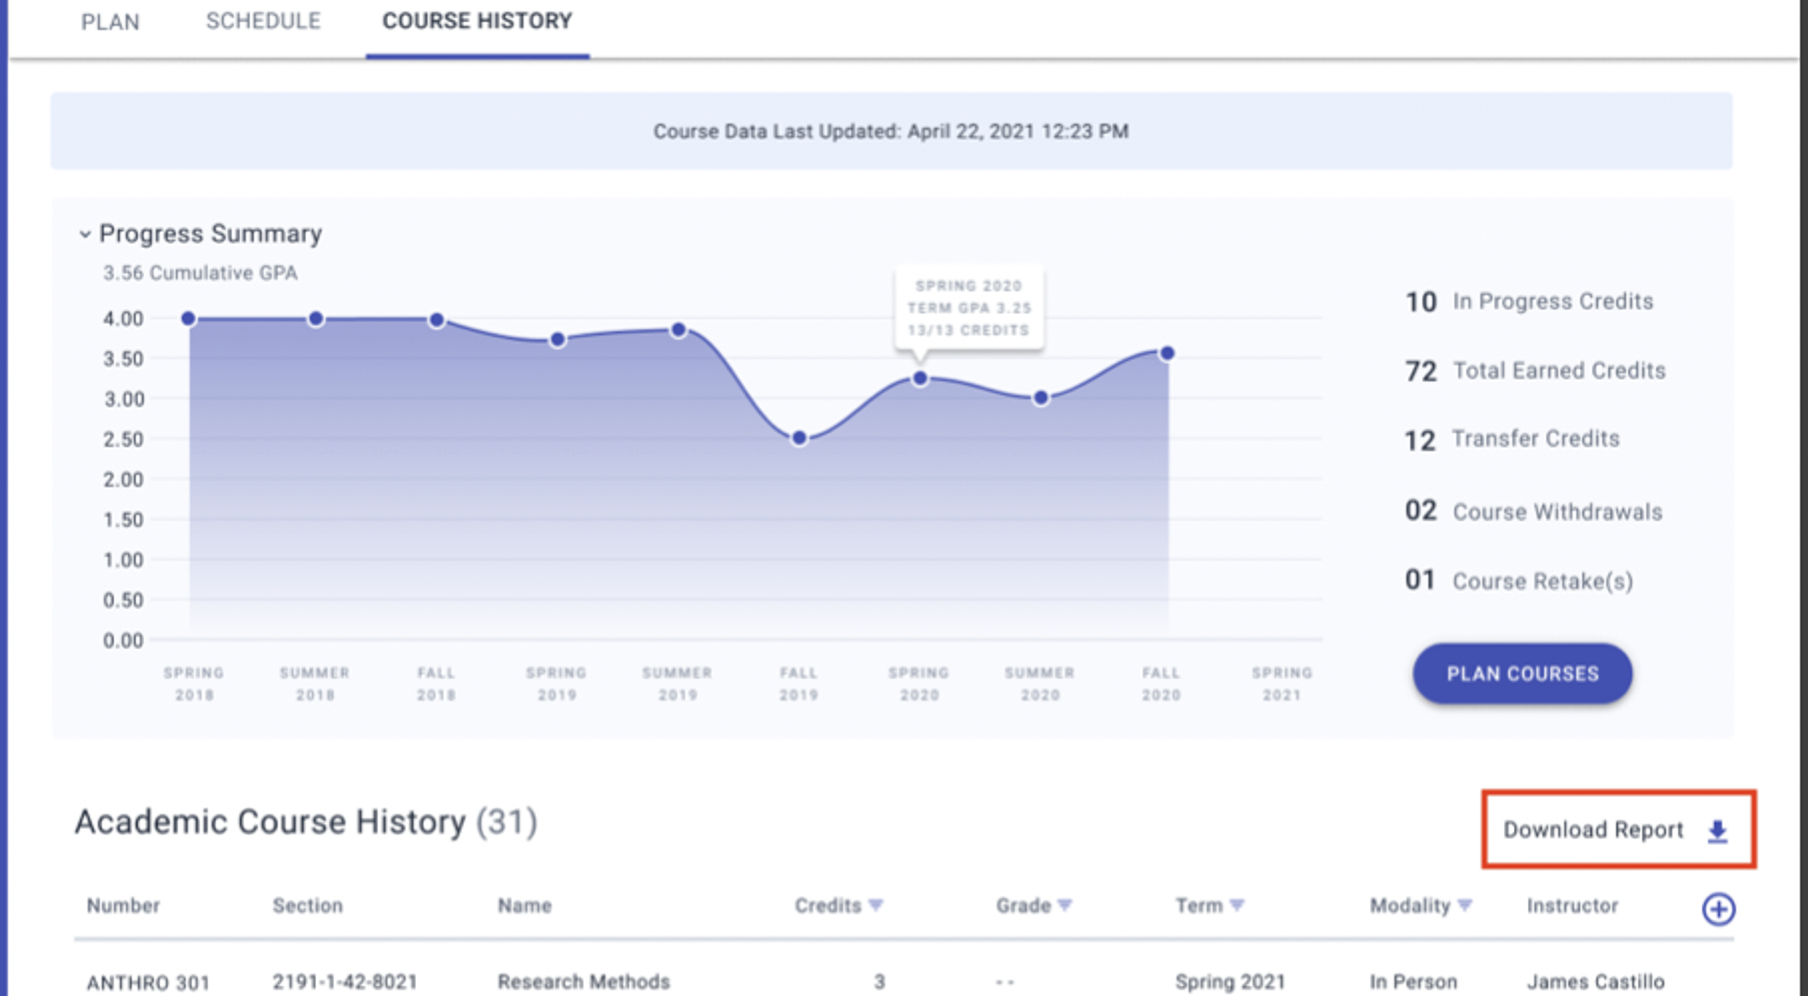
Course History — Below the chart is their complete Academic Course History list. You can download their complete history, and you can change the list to see just what you want:
- Click a column header to sort by that column (click it again to reverse the sort order).
- Example: Click on the Number header to sort by the course codes (ACCT-1012)
- Click a Filter (▼) icon to narrow the list, such as to a specific term or only online courses.
- Example: Filter the Status column to see only their Transfer courses
- Click the Add Columns (⊕) icon to add or hide columns of information about their courses.
- If your institution has tied in their class activity data, you might also see their grade averages and LMS logins.
Tip
When you select Download Report, you get a “CSV” (comma-separated values) file. It’s just a simple text-based spreadsheet format. Open it directly in Google Sheets or Microsoft Excel, where you can format it as you like and print it.