Scheduling Updates
“Plan Schedule” now “Build Schedule”
Responding to customer feedback, we have renamed the “Plan Schedule” page to “Build Schedule”, to clarify the action that students are taking. Although the page has been renamed, the functionality remains the same: students will have the same scheduling experience.
For updated training materials that show the new page name, please contact your Civitas team.
Term-Specific Breaks
Term-specific breaks and the ability to report on them are now available for all institutions.
For Staff
For administrative users, term-specific breaks are reported as such in the Breaks download report, so you can see common break times that may impact scheduling per term.
For Students
Students have breaks that are specific to certain terms (such as a practice block for student athletes) and others that are ongoing (commuting to campus). Scheduling now handles both temporary and permanent scheduling breaks.
When creating breaks, students can set the break’s duration:
- Ongoing
- One term
- Multiple terms

The next time students build a schedule, any term-specific breaks that have expired are automatically removed for them.

Enabling Optional Features
If you see a new optional feature that you want to implement for your institution, your first step is to contact Support. The process looks like this:
- Support confirms that your institution meets the requirements, such as using Banner as your SIS.
- Support arranges for any needed update to your bridging software between Civitas and your external systems.
- Depending on the feature, Support will confirm what configuration choices you want (such as to customize label text for your institution).
Search by CRN or Class #
Available for: PeopleSoft, Banner, Colleague (not Workday at this time)
Product Update – Released 10/12/20
Students can now search to add courses by CRN (course registration number) before schedule generation. Searching by CRN allows students to find a specific section of a course earlier in the scheduling process and generate their schedule around that desired section.
When students click the +Add Course screen from the Scheduling home page, they are taken to the Add Course screen. Here they have a tab called By CRN.
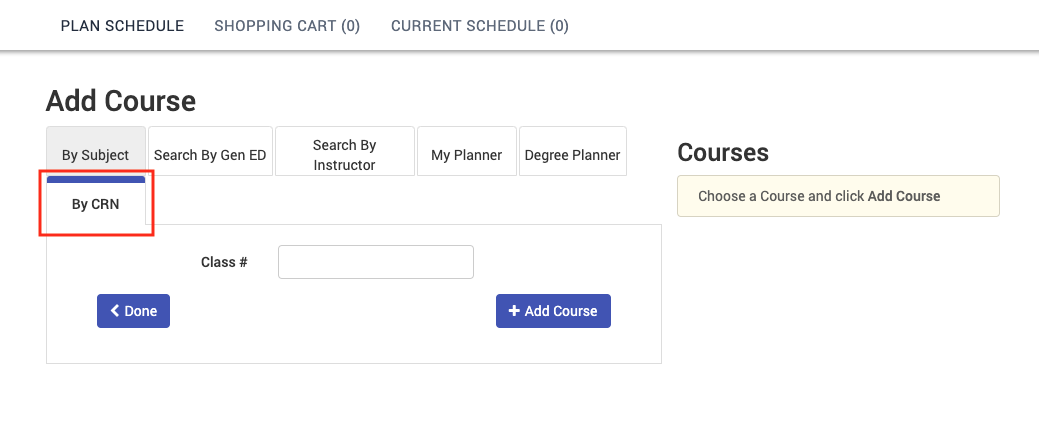
Students can enter one CRN at a time. The + Add Course button adds the specified section to their course selections.
Clicking on the Options (gear icon) for that course on the homepage, you see that the specific section added by CRN appears under the Enabled tab and all other sections of the course appear under the Disabled tab.
Tip: The label “By CRN” is configurable per institution.


Swap Classes (PeopleSoft, Banner)
Available for: PeopleSoft, Banner
Product Update – Released 10/12/20
Swap a Course from Cart History
In addition to Swapping by CRN or Class #, students can swap courses from their Shopping Cart. Students begin by selecting the class to swap, then clicking the Shopping Cart tab. Here they can select an alternate course that they have previously added to their Shopping Cart without navigating back to the Shopping Cart screen.

Swap by Subject
The Search functionality now includes Search for a Course By Subject. Students begin by selecting the class to Swap then clicking the By Subject tab. After selecting a subject and course, students can select from the list of sections to Swap.

If you currently have Swap enabled, you will see tabs for Search by Class Number and Shopping Cart. If you have enabled Search by Subject on the Add Course screen this will also be available. Search by Subject can be configured on or off.
Register by CRN (Banner)
Available for: Banner
9/30/2021 – Register by CRN, which allows you to skip schedule generation and selection, is available by request for institutions that use Banner.
What It Does
Scheduler allows students to see all possible schedules for their desired course list, but sometimes students (or advisors) know exactly which sections are needed. To allow them to skip schedule generation and selection altogether, Scheduling includes a Register by CRN (Course Registration Number) option you can enable, for directly adding course sections for immediate registration.
If your institution uses a different acronym for CRN, the field can be customized to match.
How It Works
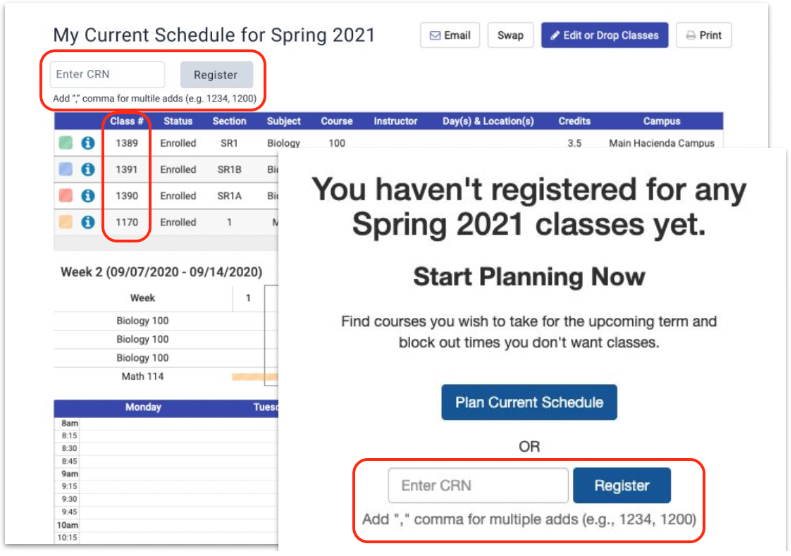
On the Current Schedule tab, select Register by CRN to enter one or more CRN codes to the schedule without going through schedule generation. Using this shortcut, you can:
- Enter a complete schedule (as a comma-separated set of CRN numbers)
- Add one or more courses to the existing schedule
The option appears both before and during scheduling:

Implementation
This feature is disabled by default. To enable it, contact Support.
Scheduling’s Accessibility
Major efforts have been made to improve Scheduling’s accessibility to better support all users.
Section 508 – VPAT
A Voluntary Product Accessibility Template (VPAT™) is a document that explains how software conforms to the Revised 508 Standards for IT accessibility.
The report below covers the degree of conformance for accessibility standards/guidelines in Civitas Learning Scheduling.
WCAG Accessibility
Scheduling’s primary user interface is now WCAG 2.0 AA accessible. This means users no longer have to switch to a “text only mode” for screen reader support. Several changes occurred to the default UI to make our product accessible:
- Headers have been added to every page
- The “text only” version has been removed from the header
- “Skip Nav” is available on each page