Planning Updates
-
Updates for Planning
- Accessibility Improvements
- Registration Status
- Applying Templates in Bulk
- Expand/Collapse All Requirements
- Automatic User Creation and Removal
- Printing Degree Requirements
- Placeholder Usage Locations
- Degree Requirements Page
- Planned Course Report
- Warning for Completed Courses
- Student Prompt to Run Audit
- Course Status Icons
- Improvements to Adding Plan Items
- Reusable Placeholders
- Reselectable Course Placeholders
- Course Equivalents (PeopleSoft)
Updates for Planning
As feature updates to Academic Planning are made, they will be described here, starting with the most recent.
Accessibility Improvements
Oct 10, 2023 | Available for: All
Because it’s critical that all users are supported in using the platform, Academic Planning has resolved numerous issues with accessibility.
- For low-vision users, WCAG 2.0 requires minimum color contrast ratios for any text and its background. Color contrast has been boosted throughout the navigation and the Terms of Service and Acceptable Use pages.
- To correct window management and control, the Open a course item modal window now must be closed before it allows navigation away from the window.
Several fixes support keyboard-only users:
- Checkboxes (such as on the Dashboard’s Student List) can now be enabled/disabled with a single press of the spacebar (or equivalent voice command).
- The filters on individual column headers can now be navigated by arrow keys.
Numerous fixes support use of screen readers:
- Because screen readers need clearly structured tables for them to be understandable, several tables have been reimplemented to support better navigation of column-spanning rows that hold section-specific notes.
- Screen readers can now announce the titles of the fields that are currently in focus on drop-down lists.
- For all tables that let you add columns, the Add Columns header no longer renders in a way that confuses screen readers.
- To clarify the sequence of operations, the Reset Filters button is now located next to the Search button.
- For correct page announcing, a screen-reader-only H1 tag now aids navigation.
- For faster page navigation, screen-reader users can skip to the main page content.
- For clearer page structuring, ARIA landmarks now identify the regions of a page.
Registration Status
Oct 10, 2023 | Available for: All
To help you clearly track the scheduling status of courses, a student’s plans, requirements, and course history now show the icon (a blue empty circle) and status of “Registered” on affected courses, until the term starts and it moves to “In Progress”. Note that this does not apply to course equivalents. 
To see the current status, run the Update (audit):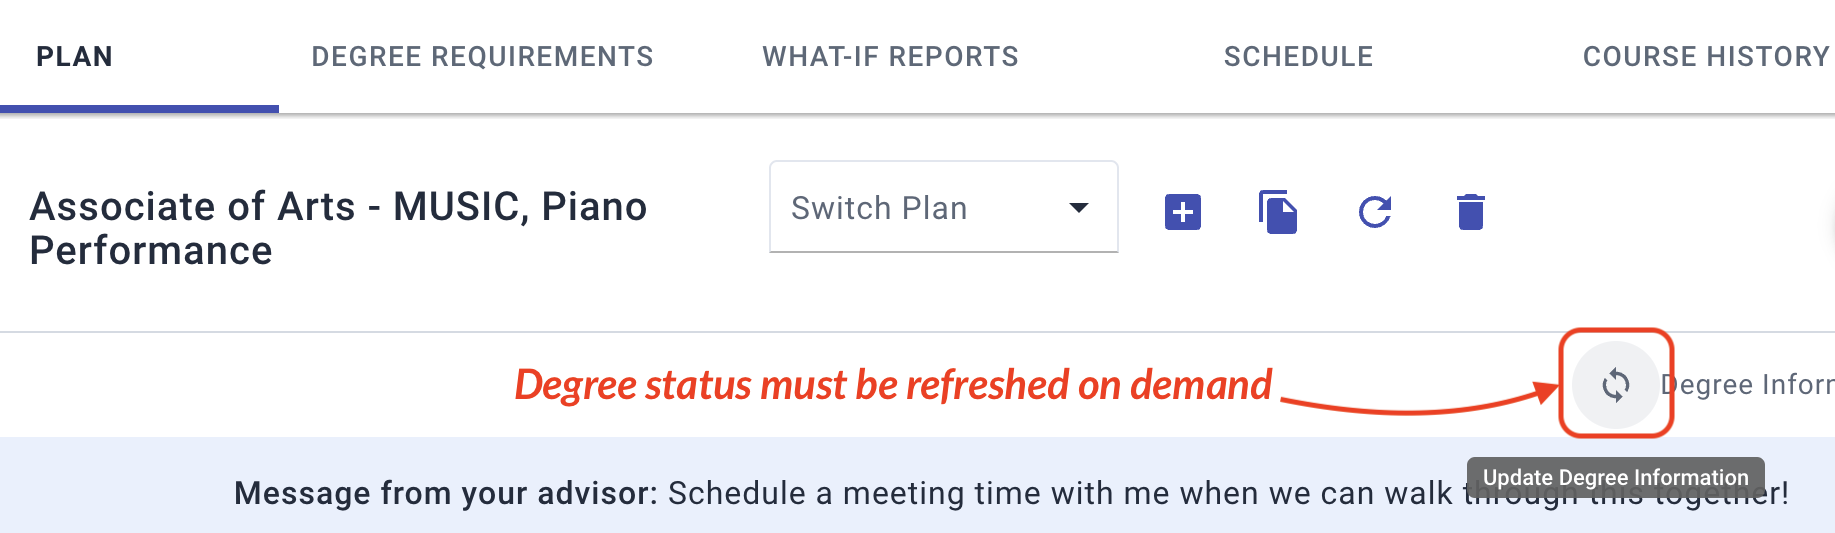
What “registered” means — A scheduled course is registered if:
- The term and section have not yet started (once started, the status is In Progress)
- There is no grade for the course yet
- The student hasn’t withdrawn or dropped the course
Impact on Plans — On the bottom left of a course tile, the Registered (empty blue circle) icon and message will show for a scheduled course until it changes to In Progress.
- If the course is dropped or withdrawn before the drop deadline, it’s no longer registered and you are free to move the course to another term.
- You can’t delete a registered or in-progress course from a plan, but you can move it to the term listed in the audit, if it’s different from the plan.
Impact on Course History — Registered courses appear in the student’s Course History, but they are removed if dropped before the drop deadline. The Status column of the Academic Course History table shows Registered, which changes to In Progress as soon as the term starts.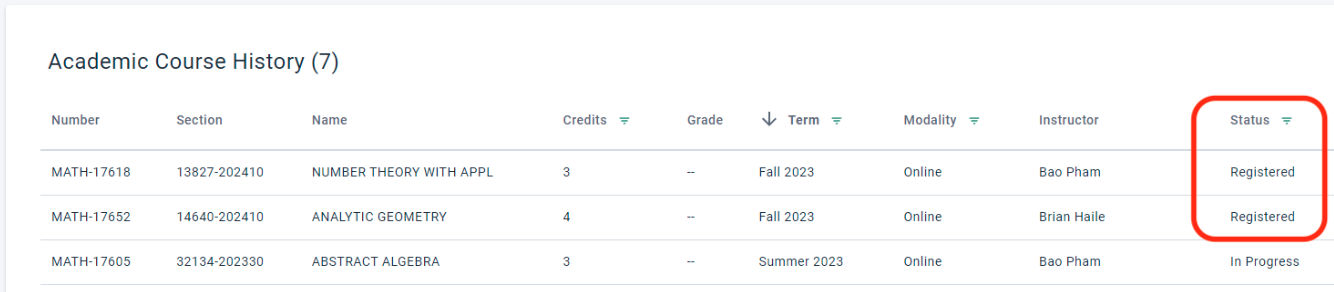
Applying Templates in Bulk
Aug 29, 2023 | Available for: All
To provide better support when you apply plan templates to large numbers of uploaded student IDs, a system of notifications has been engineered.
- As soon as the application process begins, you will see a bottom-screen notification, which you’re free to close and continue your work:

- As soon as the process completes, you’ll be notified of which template was applied to how many students, which is helpful if you’re running multiple template applications:

- Just as before, if one template cannot be applied successfully, none will be applied and you’ll be notified of the problem.
Expand/Collapse All Requirements
Jul 20, 2023 | Available for: All
To help students and staff quickly toggle the view of Degree Requirements, new Expand All and Collapse All links appear to the left of the Print button. Choosing Expand All before you print ensures that all of the course details are included in the hard copy or PDF that you export.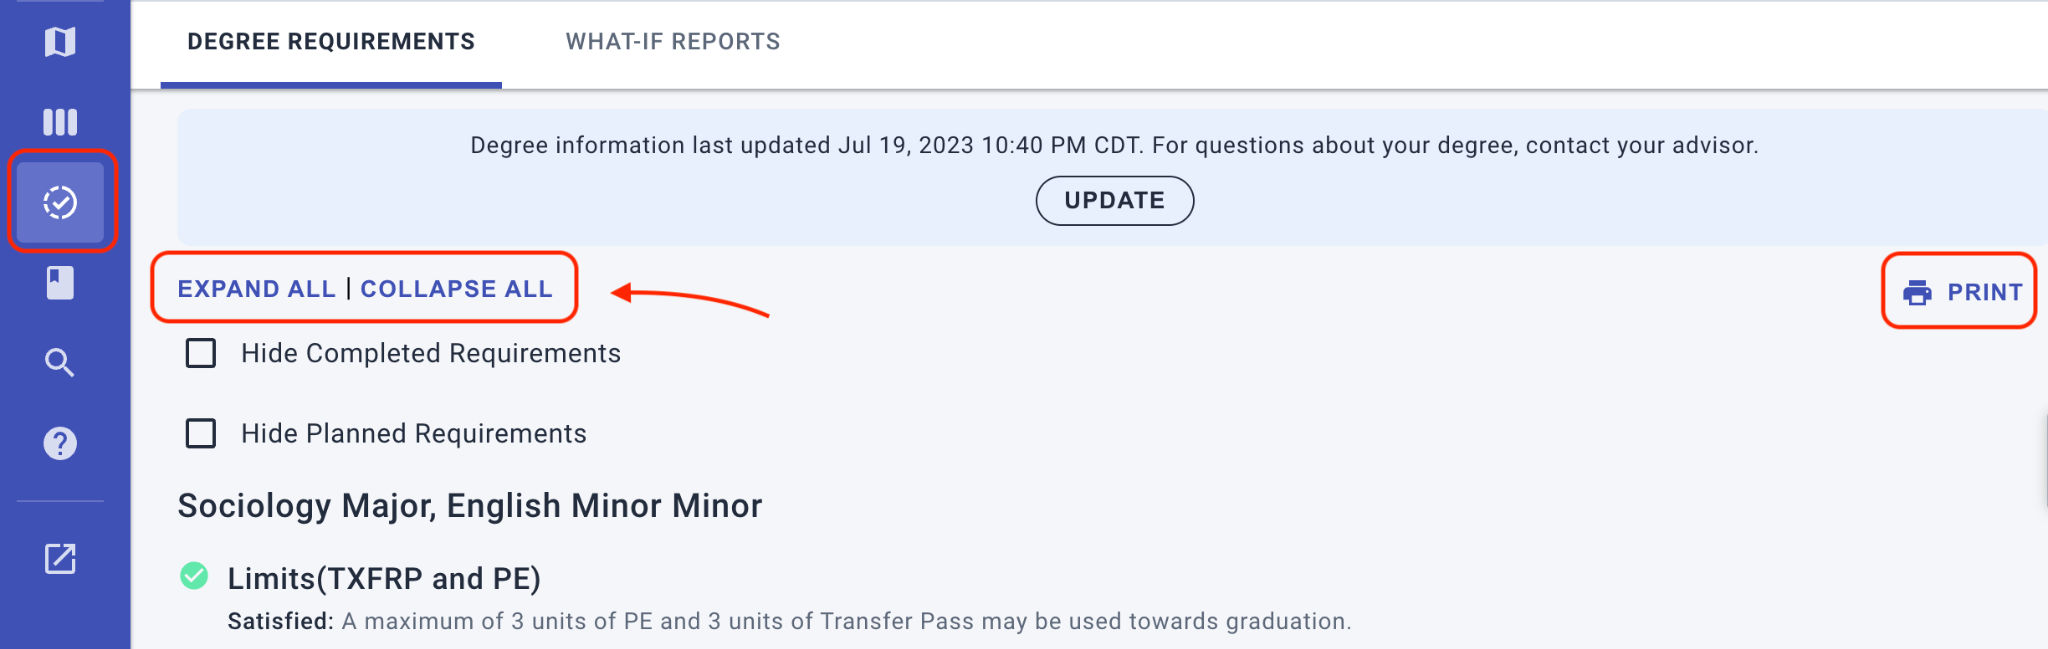
Automatic User Creation and Removal
Jun 26, 2023 | Available for: All
▶ Action: To get this feature, submit a request to Support and specify what default role to use.
Your institution can now have Academic Planning configured to automatically create user accounts for your new non-student users, based on your institution’s SSO. Through your SSO, you control who can be granted access and who no longer has access, so that you don’t have to manually create or remove users within the application. You can also choose which role to assign to those new users: Director, Advisor+, or Advisor.
The default role you select applies to all newly created users, and it will also be your institutional default for any users you upload in bulk with no specified role. You can change the default role at any time in the future by contacting Support.
Roles grant visibility into student data as well as default access to features. To choose the best default role for your auto-created users, consider the data visibility granted to each:
- Director — Has access to all students and can also access planning insights by their assigned caseload, based on SIS data if applicable
- Advisor Plus — Has access to all students and can also access planning insights by their assigned caseload, based on SIS data if applicable
- Advisor — Only has access to their assigned students, based on SIS data.
Reminder: You still need to edit these auto-created user accounts in order to promote them to a higher role or add individual permissions they might require, such as “Manage Templates”.
Printing Degree Requirements
May 17, 2023 | Available for: All (with Enable Requirements Tab configured)
When students or advisors view the Degree Requirements tab (not the plan Details), they can now choose to Print the requirements: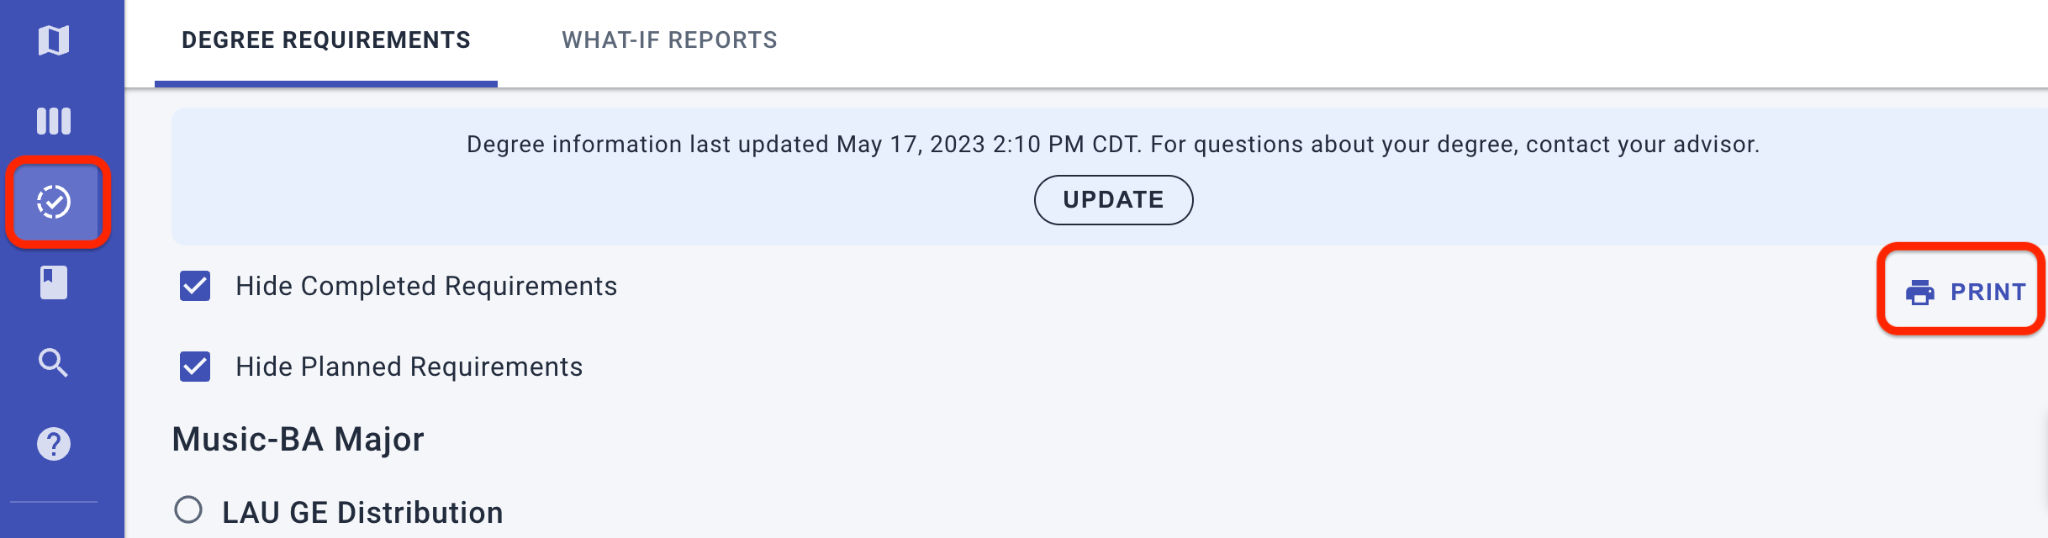
These are ways to optimize what appears in the printout:
- Choose the browser’s print option Save as PDF to export a file to store and share.
- To trim it down to only what’s remaining to be taken, first enable Hide Completed Requirements.
- To trim it further to only what still needs to be added to the plan, enable Hide Planned Requirements.
- To include all of the course options related to each requirement, expand each of the Courses Available panels before you select Print:

- Locate the UPDATE banner on the first page of your printout to determine how fresh the audit data was when it was generated.
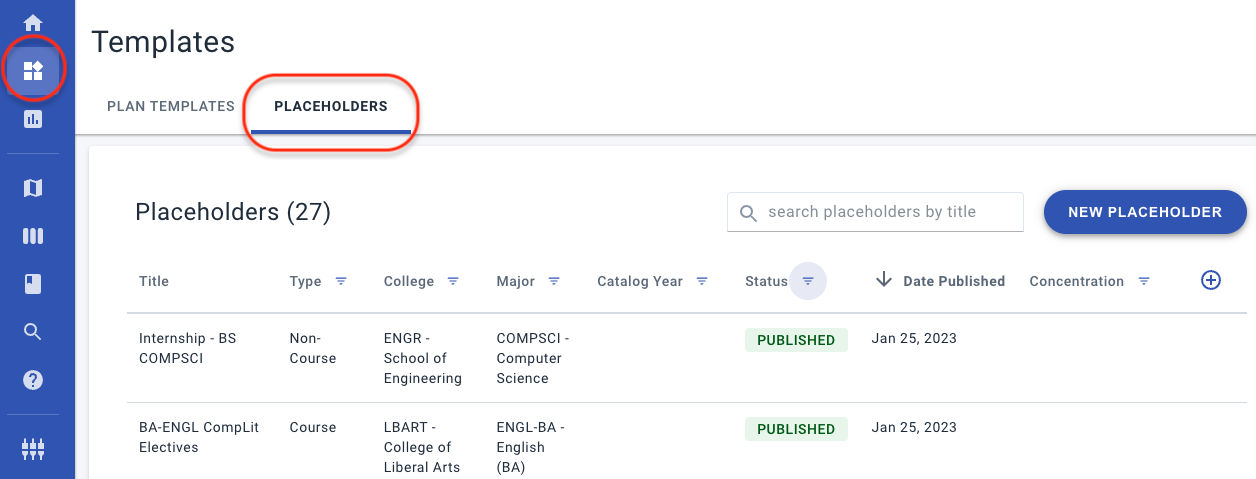
Placeholder Usage Locations
Apr 21, 2023 | Available for: All
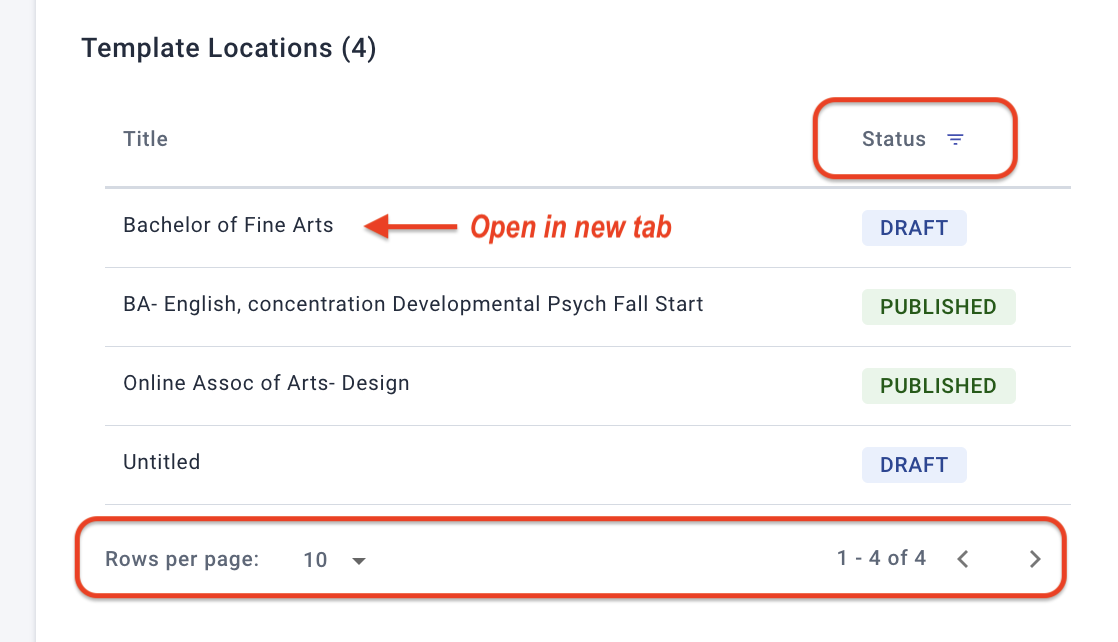
To help you manage placeholder reuse across your entire Template Library, the Placeholder Library now displays a Template Locations table to let you know if the Placeholder is being used on any templates, and, if so, which ones.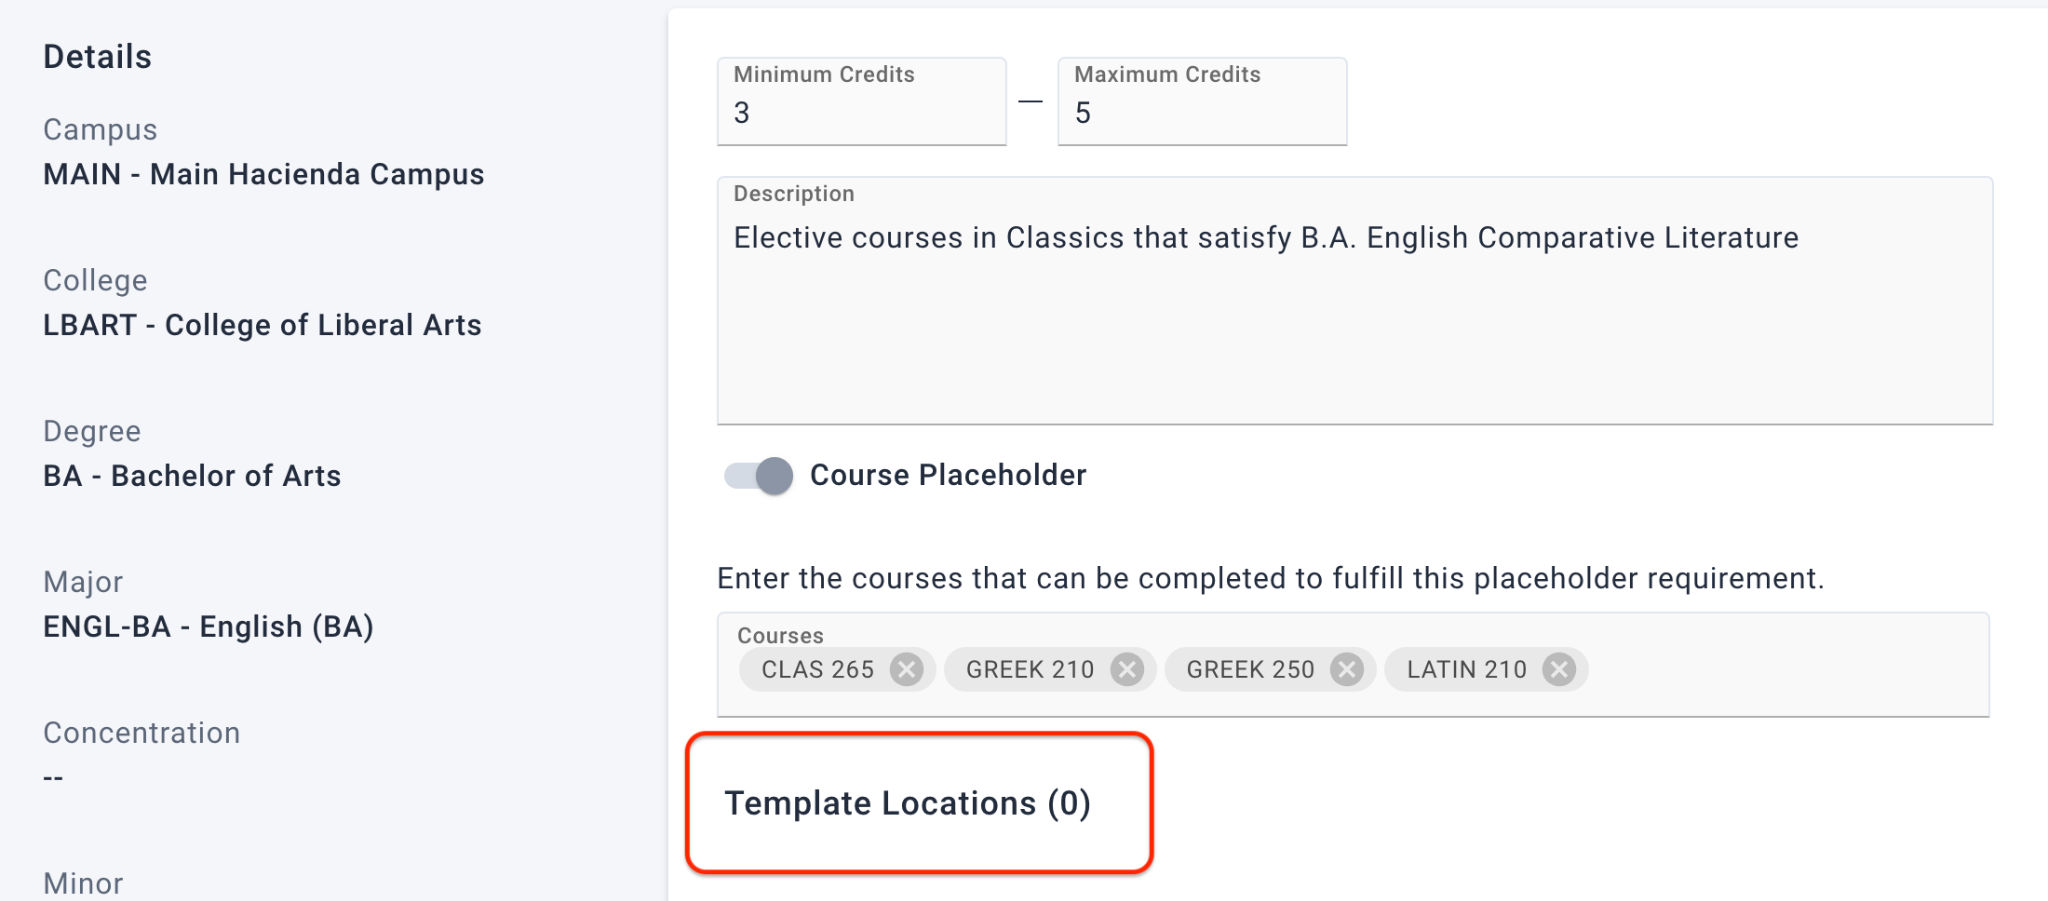
The Template Locations list gives you these controls:
- Click a template in the list to open it (it opens in a new browser tab)
- Click the Status filter to select one or more statuses to view (Archive, Draft, Published)
- Click the Title heading to toggle the sorting direction by name
- Use the Rows per page and paging arrows to scroll through large numbers of templates
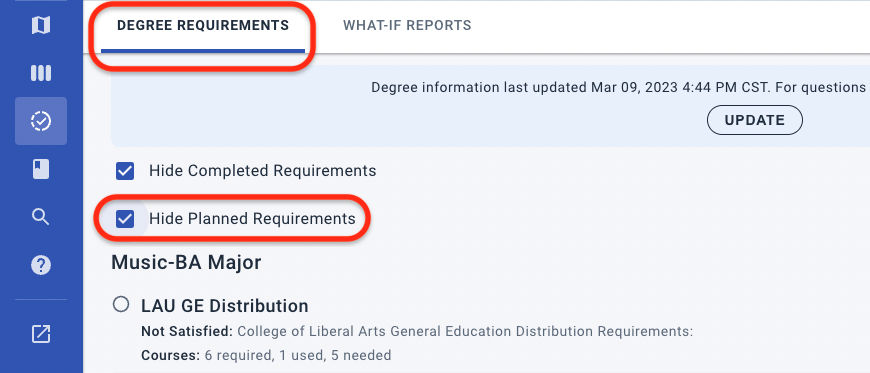
Degree Requirements Page
Apr 3, 2023 | Available for: All with audit system integrated
The new Requirements page provides full-page viewing of the existing degree audit requirements for the current student, even if they do not yet have a primary (active) plan created. The new page is available to both students and advisors, via different navigation, and it pulls the same audit information that displays in the Details pop-out pane of an academic plan.
Note: If your institution does not have your audit system integrated, these features are hidden.
Hide Planned — A key enhancement in this view of degree requirements is the checkbox to Hide Planned Requirements. This option, combined with Hide Completed Requirements, provides a view for action: it highlights requirements that need to be added to the primary plan.
Undeclared majors — What will surface as degree audit requirements for undeclared students depends on how this is managed at your institution. For example, General Education requirements may appear for all active students.
What’s Next? — These additional features are under development for future release:
- The What-If Reports tab, for running scenarios to preview degree plan changes
- Print button (now released)
Student view of Requirements
The students’ access to the Requirements page is a main link off the side menu (circled check icon). It has tabs for Degree Requirements and What-If Reports (coming). 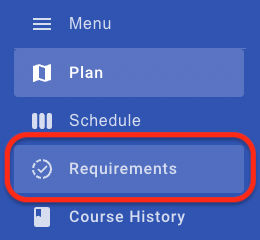
Advisor view of Requirements
The advisors’ access to the Requirements page is a new tab in their existing dashboard for a given student. There are new tabs for Degree Requirements and What-If Reports (coming).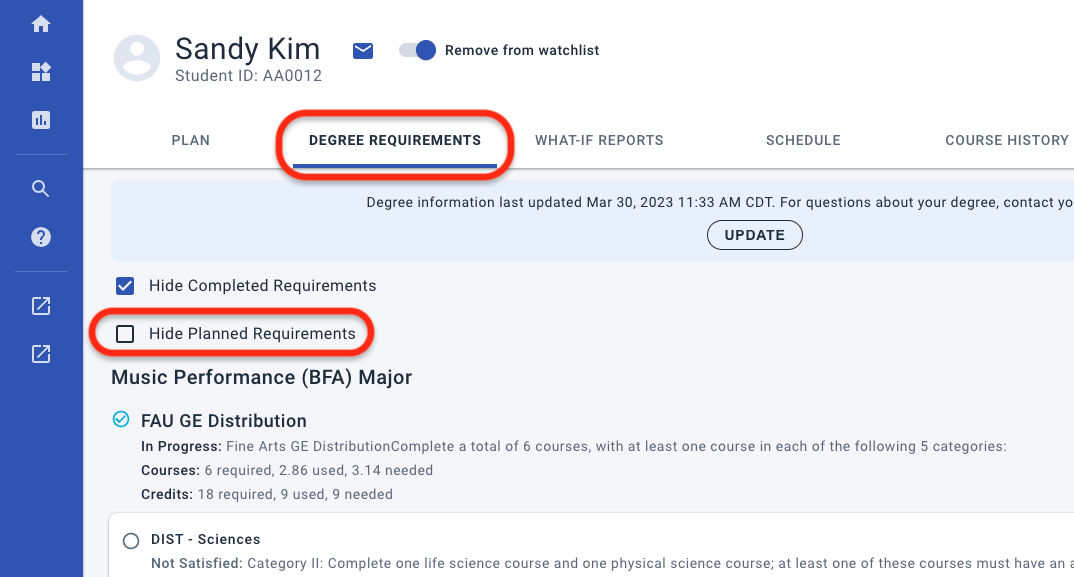
Adding Requirements to Plans
For unmet requirements (empty circle icon), the Requirements page lists the courses that could satisfy the audit. Expand the Courses Available drop-down list for a given requirement to see the choices. If a Primary Plan exists for the student, a Select Term drop-list lets you add a course directly to a specific term: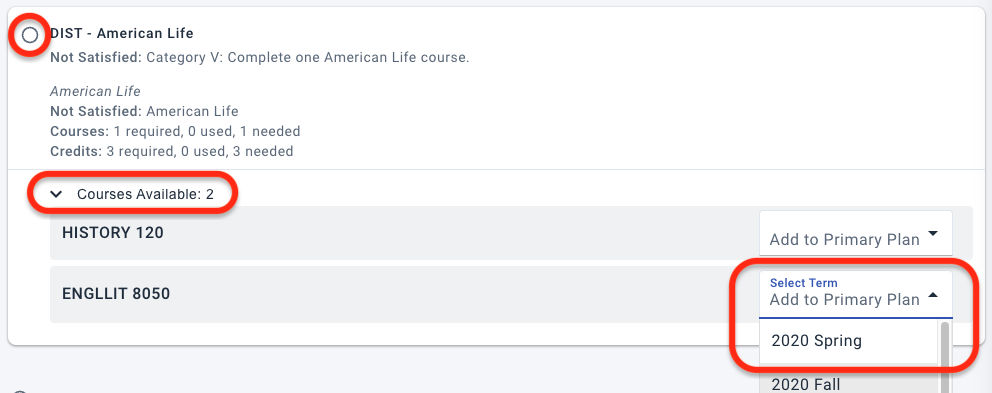
Planned Course Report
Mar 10, 2023 | Available for: All
What courses are students planning to take? Institutions can now download a current report of what classes their students have planned for each term. This report pulls real-time data from their Primary plans, offering greater accuracy in planning out course capacity.
How it works — The Planned Course Report generates a CSV download of all courses across all student Primary Plans that are planned for the selected terms. You can choose to filter out PII.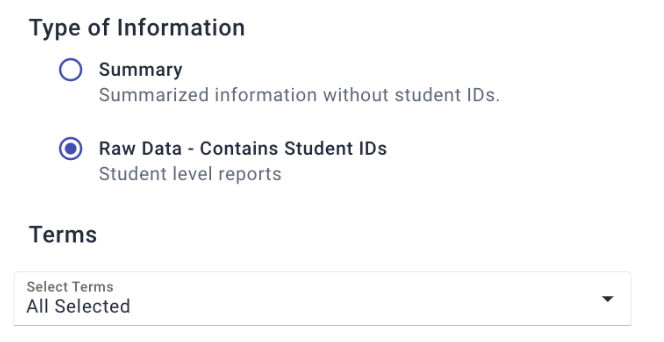
- On the left menu, select Reports and choose Planned Course Report.
- Select the level of privacy you want for the report:
- Summary — provides course information without any student PII
- Raw Data — includes complete data, including IDs, for student-level reporting
Warning for Completed Courses
Mar 10, 2023 | Available for: All
When Scheduling pulls courses from the plan, it now checks for any that have already been completed, reporting which active terms (one or more that are open for registration) they would be added to.
If the course should not be taken again, clear the Include checkbox; if the course is one that should be registered and repeated, keep Include enabled. Once this choice is made, it is remembered: Scheduling will not reprompt for these completed courses.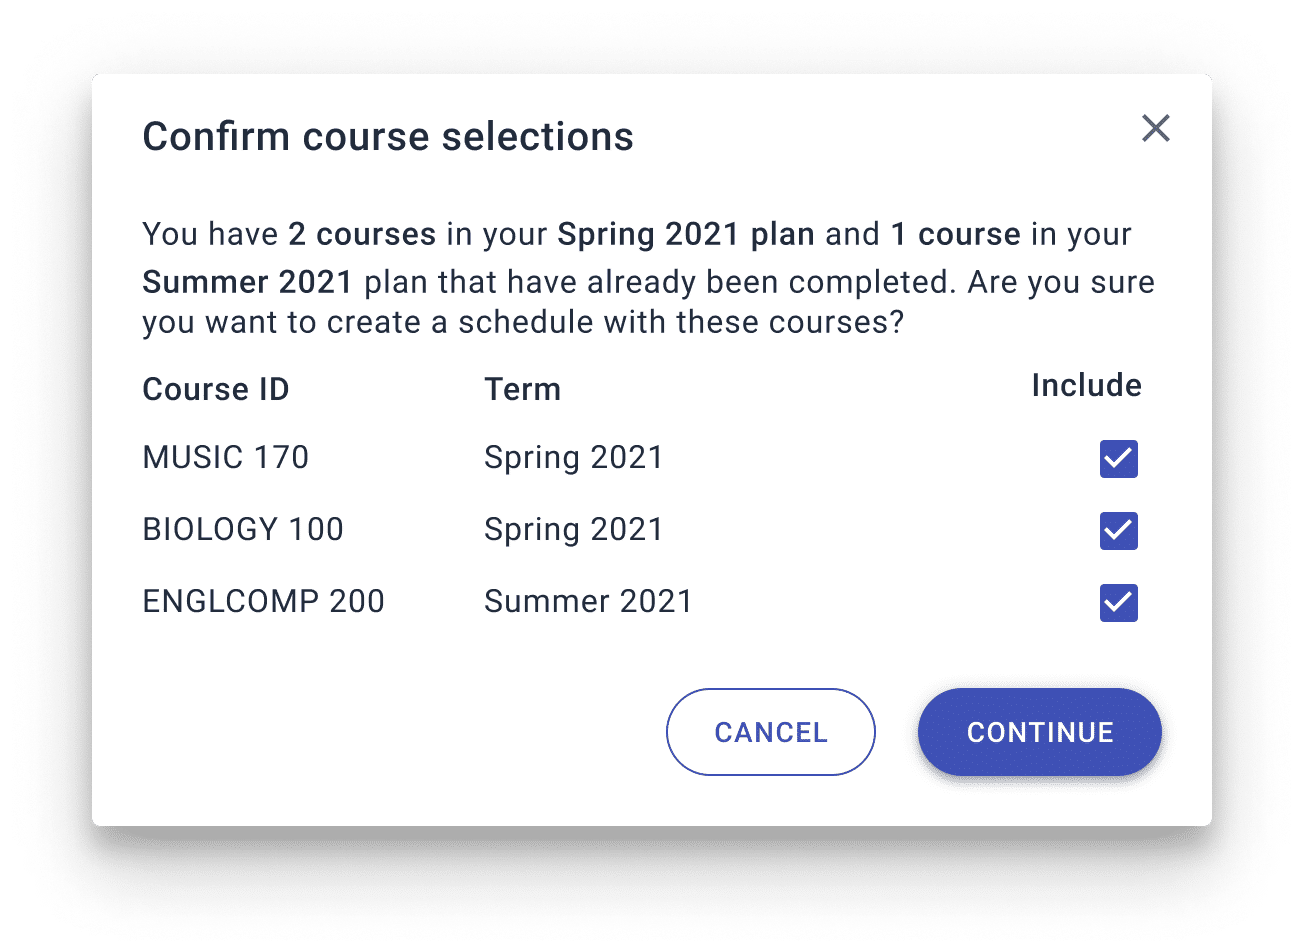
Student Prompt to Run Audit
Mar 10, 2023 | Available for: All
For the course status icons to give the latest information and guidance, the degree audit needs to be freshed. Seeing the most up-to-date degree information is critical to viewing a student’s actual progress towards their degree. To encourage students to run their audit refresh after they log into their plan, a new banner prompts them to update their degree program data. The date of the last update always appears at the top right of the plan.
Course Status Icons
Mar 10, 2023 | Available for: All
Plans include visual flags to show students and advisors the status of a given course. For example, a green check indicates a satisfied requirement and a blue outlined check shows a course in progress, which you can click to open the status and audit details for that course:![]()
A gray circle highlights a course that is completed but does not apply to (fulfill any requirement for) the student’s degree program. To see the full audit information, open the Requirements tab.
Improvements to Adding Plan Items
Jan 27, 2023 | Available for: All
With the addition of reusable placeholders, the workflow has improved for how advisors add courses and placeholders to student plans.
How it works — The + ADD command now offers a choice between looking up a course directly from the catalog or inserting some type of placeholder into the plan: 
Add a course — This lookup is specific to active courses in the catalog:
- At the bottom of the term, click “+ ADD > Course“.
- Click into the “Course” field and type-to-search for the name.
- From the auto-suggested matches, select the one you want to add.
Add a saved placeholder — This process is the same for both course and non-course placeholders, relying on the placeholder’s Title for you to find it by type-to-search:
- At the bottom of the term, click “+ ADD > Placeholder“.
- Click into the “Placeholder” field and type-to-search for the name.
- From the auto-suggested matches, select the one you want to add.
- If you cannot match the title through search, go to Templates to see the full listing.
Add a new placeholder — If you need to give the student a placeholder (such as a reminder) that isn’t in the template library, you can add one yourself:
- At the bottom of the term, click “+ ADD > Placeholder“.
- Click into the “Placeholder” field and type the name for your new placeholder.
- Press Enter or select “Add {your title}” to create it.
- Click to open the placeholder and configure it.
If this will be a course placeholder, be sure to slide the Course Placeholder toggle: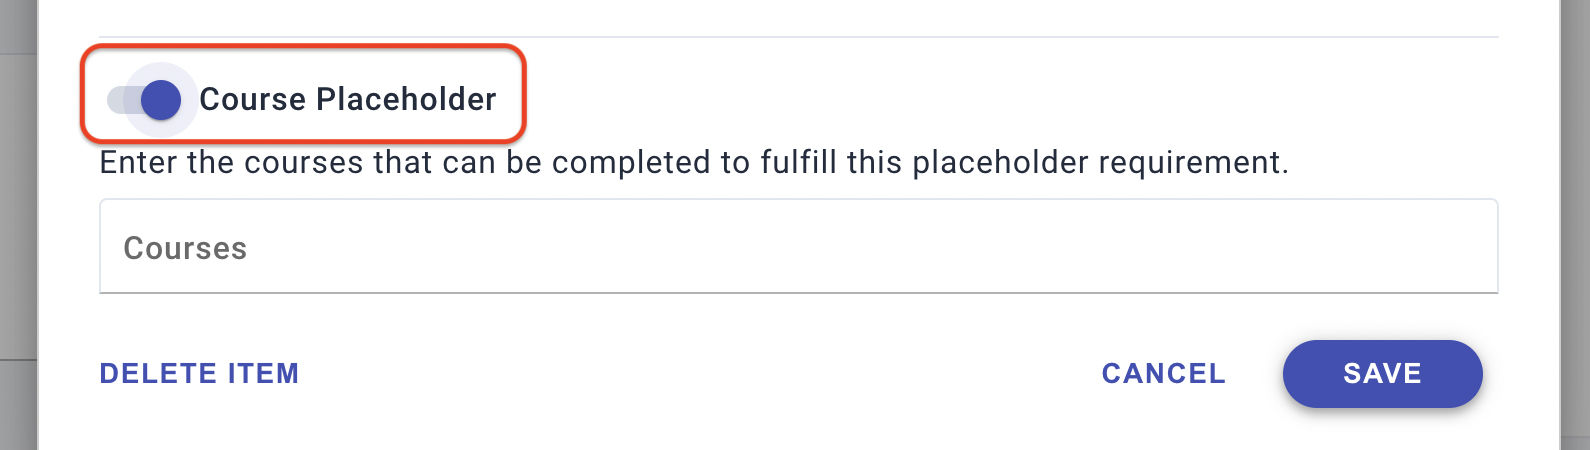
Reusable Placeholders
Jan 27, 2023 | Available for: All
Broad support for reusing course and non-course placeholders is now available.
- Placeholder library — You can now save a placeholder and reuse it throughout the application. Those users with the Manage Templates permission will be able to create and manage your library of Placeholders.
- Add existing placeholder — When adding an item to a plan or template, you can select Placeholder and then type to search for existing placeholders, or else add a new one. (Students can only create their own non-course items.)

Best practices
- Immediately archive an old placeholder when a newer or corrected one is published.
- Only specify the fields that are needed (most are optional). For example, if your institution does not update requirements until they change, do not specify the Catalog Year.
- Use Add/Remove Columns (⊕) to trim your view to just the placeholder fields you want to see, sort, and filter on. (This does not change the view for others on your team.)
Naming Convention
Because users do type-to-search to filter saved placeholders dynamically, create a naming convention that will help them identify placeholders by title, quickly and accurately.
- Use the same care as when you’re naming plan templates.
- Build the name from general to specific: “Internship – U.S. DOJ – Pathways”
Example
For a course placeholder “Foreign Language”, name it “AA BUSADM Foreign Lang”, which captures the degree (Associates) and major (Business Administration) it’s created for. Named that way, it won’t be confused with language placeholders for other degrees and majors, which could be different.
Reselectable Course Placeholders
Jan 27, 2023 | Available for: All
Course placeholders on individual plans can now be updated to change or remove the current course selection. Whether a placeholder course selection is made by the advisor or the student, that choice can be changed. The advisor can also remove or add additional course options on that student’s placeholder.
The yellow highlighting now permanently flags it as a placeholder, so the student can re-open it and pick another course: 
Changing courses — To add or remove courses from a placeholder, select Edit Placeholder Details.
- To make a course selection, pick from the Select a Course drop-down list.
- To remove the current course selection, click the ✕:

Course Equivalents (PeopleSoft)
Jan 27, 2023 | Available for: PeopleSoft
Course equivalencies (tables of courses that are transferable among institutions) are now being recognized for PeopleSoft integrations.