Advising User Management
If you are serving an advising team as a Director (a user role in Advising), you hold the “manage user” permission, which gives you access to the User Management page for adding and editing users on your advising staff. (Students are users if they are given accounts as teaching assistants or advisors.)
Your advanced “manage user” permissions grant you these actions:
- Search for a User
- Add a User (Director, Advisor+, Advisor, Admin Assistant, Faculty)
- Edit Info/Permissions
- Send Welcome Email (login information)
- Reset Password
- Deactivate User
- Reactivate User
This video covers how to manage users in Advising:
▶ Video: Advising User Management
Managing Users
Only the User Role of “Director” may be granted the Manage Users permission.
Directors find the Configurations (wrench icon) link on the bottom of the left-side menu, below the Settings (gear icon):
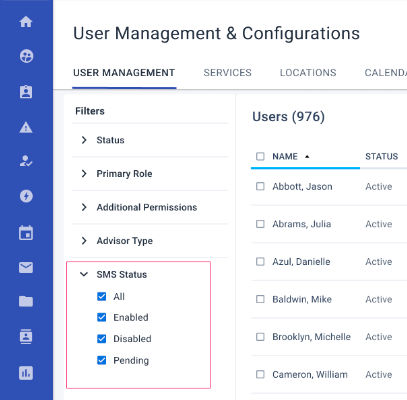
From the User Management tab, Directors see all user accounts in a table format, with these default columns:
- Name
- Status
- Student Success Unit (only available for Directors in all SSUs)
- Primary Role
- Additional Permissions
- Advisor Type (as defined by SSU)
- SMS Status
- SMS Number (if provisioned)
Add a User
From the Configurations > User Management tab, locate the + Add User button above the Users table.
To add a new user, be ready with a good understanding of their advising role so that you can define the best role, permissions, and visibility (to students).
Required information — Be prepared to answer the following for each user:
- Are they a “student user” (such as a TA who can raise alerts)? Choose the second tab.
- What is their first/last name, institutional (Unique Person) ID, and institutional email
- Which SSU should they see (if more than one appear; if not, this is within your SSU)
- For an Advisor role, which Advisor Type (as defined for the current/selected SSU)
- Which additional permissions do they need to do their job, or do they need a higher role?
Login Instructions — At the bottom of the page, there is an option to send a “welcome” email with login information to this user. This is not enabled by default!
Best practice
- Single user — Enable the option to send them a “welcome” email, which will give them their log in instructions. If you forget to enable the option, select them in the Users list and choose Actions > Send Welcome Email.
- Many users — Ensure that you don’t forget anyone by skipping the option and sending the welcome email in bulk after all of your users are created: select them and choose Actions > Send Welcome Email.

Edit a User
Note: To remove a user, use the option to Deactivate User. This preserves data integrity.
- To find a user, type part of their name or email into the Search box, above the Users table commands.
- Select the user by checking the box next to the name.
Note: You can only edit user information and permissions one at a time.
- Choose Actions > Edit Info/Permissions.

You will be able to update their User Information, Roles and Permissions, and Visibility.
Tip
If you change the Primary Role, the Permissions will update to match, so verify those selections!
Important
If there is an error with the NetID or unique person ID, these cannot be fixed (they identify the user record). If this happens, make sure to replace the bad record:
- Copy the user information you need to re-enter.
- Create a new user for them, including the Welcome email (login instructions).
- Remove the old user (select it and choose Actions > Deactivate User).
Provisioning SMS Numbers
Because of anti-spam registration requirements, each user must have SMS enabled in order to be assigned an SMS number for their official Advising messages. Once new users have SMS enabled, they can start to send messages (those who are already sending messages need not register). Otherwise, SMS appears disabled: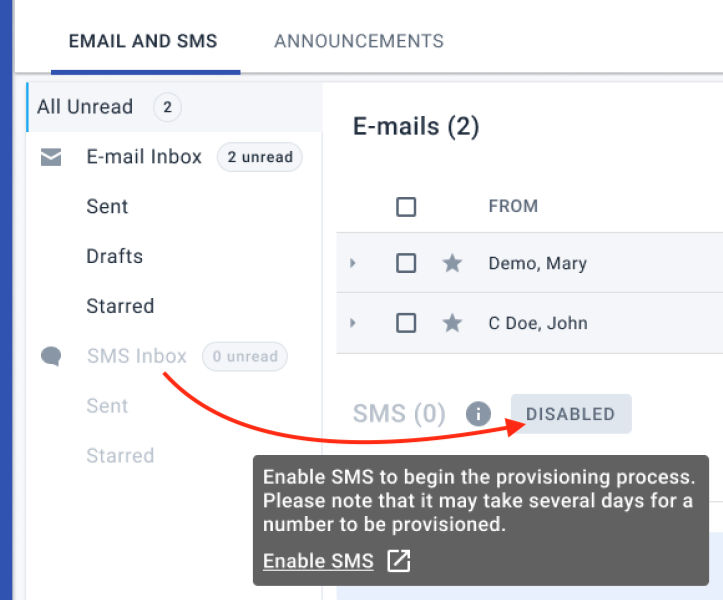
Enabling a user happens one of two ways:
- Users can select Enable SMS themselves on their Profile (top right image/avatar).
- Admins can select Enable SMS on individual user records (User Management tab).
Enable SMS for a User
If you have the Director role and the Manager Users permission and your institution opted for SMS messaging, you can enable SMS for a user by editing their user record.
- Open Configurations > User Management.
- While creating a new user or updating an existing user, select the Enable SMS checkbox in the Civitas Advising SMS section.

- Save your changes. SMS number provisioning begins immediately, and a Pending flag will display on the user’s record. Provisioning happens immediately unless the SMS provider requires additional approval (up to 6 weeks).
- Once you see the flag change to Enabled, with the assigned SMS number below it, provisioning is complete.
- From the User Management tab, you can monitor the provisioning of all your users, using the columns for SMS Status and SMS Number (which are included on download):
You can also filter by SMS Status:
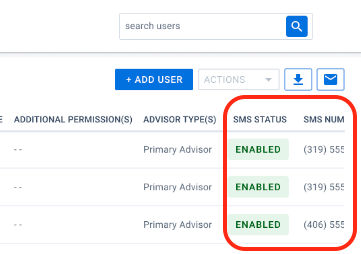
From the User Management tab, you can monitor the provisioning of all your users, using the columns for SMS Status and SMS Number (which are included on download):
You can also filter by SMS Status:
From the User Management tab, you can monitor the provisioning of all your users, using the columns for SMS Status and SMS Number (which are included on download):
You can also filter by SMS Status:
Dual Roles for Students
Dual Roles allows students to hold a Staff or Faculty role in addition to their student role. Each role is completely separate from the other, with no overlap in permissions or visibility.
Why? This is for when active students are working as teaching assistants, admins for advisors, or mentors for other students. They need one role for themselves as students and another role for how they work for your institution.
How it works — When they hold dual roles, they see which role they are logged in as next to their name on the top right.
| To switch between roles, they use the drop-down menu: |
On their Settings (gear icon) page, they choose their default role: |
Adding a Staff or Faculty role to a Student user
- In Configurations (wrench icon) > User Management, select + Add User.
- Change to the Add Role to Student User tab.
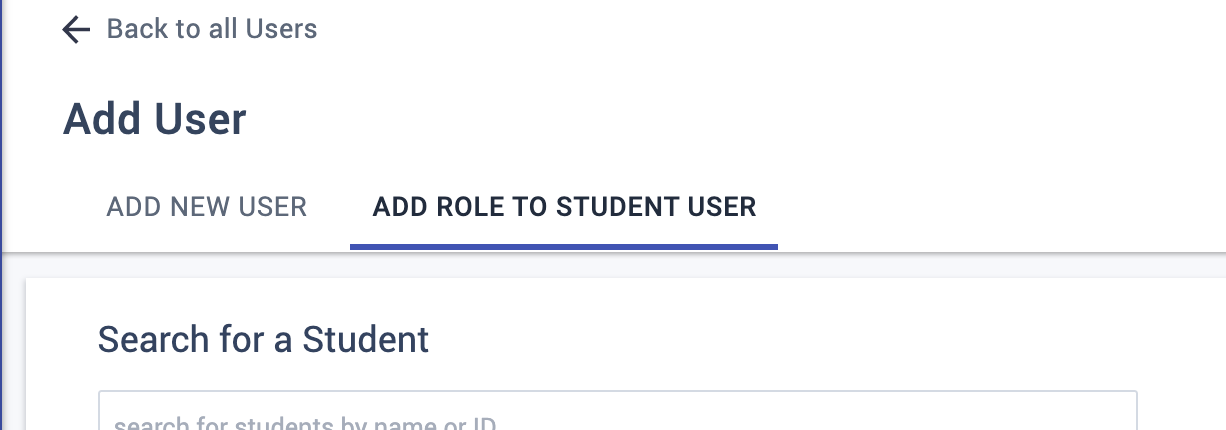
- Enter the name or ID of the student in the search bar.
- If appropriate, add the user’s NedID and/or Unique Person ID.
- Assign them to one of three available dual roles:
- Advisor — sees assigned students in the specified SSU
- Admin Assistant — sees no students; manages Advising calendars
- Faculty — sees rosters and manages alerts and commendations
- Grant any additional permissions as needed, and configure their visibility.
- Select Add User.
Merge a Student User into an existing Staff/Faculty account
If a student has been serving students using a standalone staff/faculty account, you can merge it so that the student can take advantage of the “dual role” (account-switching) feature:
- In Configurations (wrench icon) > User Management, select the checkbox next to the Staff or Faculty user’s name.
- Select Actions > Merge With Student Account.
- Enter the name or ID of the student user to be merged into the account.
- Select which email to associate with the combined account.
- Choose carefully! This email will be the email used to login for both roles.
- Select Merge Users.